*** IMPORTANT - I'm retiring my digital files - SVG/PNG/DXF/EPS - and printables from 31st December 2025 ***
*** Please ensure that you have everything you need - files and/or instructions printed off from the website (find them currently in the ARCHIVES section) - by 31st December 2025 as they will not be available after this date ***

3D Paper Gingerbread House Template
- Home
- SVG files
- Project Ideas
- 3D Paper Gingerbread House

Pretty 3D light-up paper gingerbread house template to make with your Cricut or similar cutting machine - you can also make the project by cutting by hand...

Get the ginger bread house template from my store here...
Digital download 3D papercraft gingerbread house template
For Cricut and similar cutting machines or cutting by hand
SVG, DXF, EPS and PNG file formats
For personal craft use and small-business commercial use (up to 200 products)
For physical (craft) products only - no digital products, use, or sharing
Paper Gingerbread House Template
 Papercraft gingerbread house
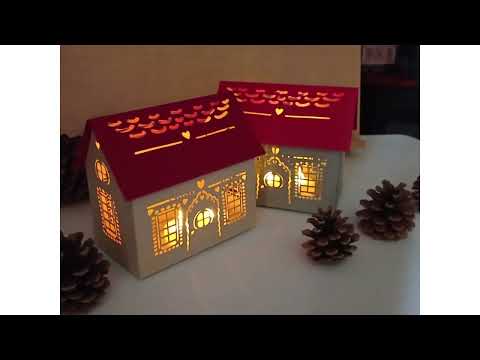
My gorgeous little paper gingerbread house template is a lovely little craft project that's perfect for when you're feeling festive - make these cute little light-up houses as seasonal home decorations!
I also think that they'd make cute home decor in all different colours at any time of the year!
I've made my template in a gingerbread beige/tan for the house walls, and a cute red roof - I also tried out a little house in a soft grey with a red roof - I love them both - you can definitely stick with these for a simple and festive look or get creative with different colour roofs and even walls - have fun with your creations!
I've lit my gingerbread houses with battery tea light candles but you could also use fairy lights or other suitable battery lights - it's important NOT to use a candle with a real flame as the houses are made of paper and cardstock, so it could be very dangerous. So keep it safe, always!
You don't even need to light up the houses if you don't want to - they look lovely even when they're not lit!
I was inspired to make the 3D paper gingerbread house template design by my 2D (flat) gingerbread house SVG design, that's been popular each Christmas - I imagined it as a cute 3D little house that could be lit-up, so I wanted to make it so!
My paper gingerbread house template is fun to make and quite easy (the gluing can be a little bit fiddly) - especially as I take you through all the instructions step by step...
 3D gingerbread house template - SVG, DXF, EPS, PNG
 Papercraft 3D gingerbread house
I know you'll enjoy making this cute little gingerbread house - the instructions are quite long as I photographed absolutely everything that I was doing, so I've split the instructions into two parts...
There's a separate part of the instructions for setting up the score lines in Cricut Design Space - this may be useful to you even if you're not using a Cricut as it will likely help you understand the correct process for your own cutting machine.
You may also choose to score by hand instead of with the cutting machine. You can do this with a blunt point like a knitting needle, along with a metal ruler. If you're cutting with the cutting machine but scoring by hand, please remember to delete the score lines in your cutting machine program.
Then, once everything is cut and scored, I've got the instructions for folding and assembling the pieces to make the gingerbread house up - that's later on this page...
I'll guide you through where you need to be and when, so please just follow through the tutorial, starting with what you'll need to make your paper gingerbread house template, just below...
What you'll need:
- Three sheets of A4 or letter-sized cardstock in one colour and one sheet of A4 or letter-sized cardstock in a different colour for the roof (four sheets in total) - I'm using Sizzix 'Surfacez' textured cardstock
- Paper glue - I used a glue stick - it's best to choose a glue that will give you a little time for repositioning, but we still want it to stick fairly quickly so that we can get on with our project
- Metal rule to assist with folding
- A way to cut the template - I'm using my Cricut Maker cutting machine
- A way to score the template - I'm using the 'cut and score function' on my Cricut Maker with the stylus scoring tool - you can also score by hand (if you're using a cutting machine for the cuts, remember to delete the score lines if you're scoring by hand)
- My paper gingerbread house template - you can find that here....
- Battery tea lights to display (NO REAL FLAMES)
- If you need the measurements for this project, take a look here...
 Light-up paper gingerbread house craft tutorial
When you've get everything ready, let's start with uploading the file into the cutting machine and setting up the score lines correctly, ready to score and cut with the machine...
Follow in the section just below!
Instructions for Setting Up the Paper Gingerbread House Template in Cricut Design Space
The instructions for setting up the score lines correctly in Cricut Design Space are on this page...
Please also take a look at the instructions even if you're using another type of cutting machine, as it may be useful to help you understand the process in your own cutting machine.
When everything has been cut and scored, you can come back here for the rest of the instructions - don't worry, I'll prompt you at the right time...
Follow the instructions for setting up the template in Cricut Design Space here...
Putting Together your Paper Gingerbread House
If you want to print the instructions out, you can use the button below to do this - by using this button you can choose which parts of the page you want to print, and which parts you want to leave out, so you only print the parts you need...
You should now have everything cut and scored and be ready for the fun bit of folding it and putting it all together - if you haven't reached this stage yet, go back to this page to help you set everything up in your cutting machine.
 Paper gingerbread house craft tutorial - getting started!
- Let's start with the roof - look for the score line across the centre of the roof, and line up your metal rule along this score line, so that you can still just see the score line.
- Press down with your fingers onto the metal rule to hold it in place - see the image below...
 Line up your metal rule with the score line in the centre of the roof - press down firmly with your fingers to hold it in place
- Then, using your other hand (still keep pressing down on the metal rule), fold up the other half of the roof towards you - see the image below - use your fingers to push against the metal rule on the back of the card along the fold line, to firm up the fold.
 Fold up the other half of the roof towards you, pressing against the back of the fold with your fingers to firm it up
- Now, remove your metal rule and keep folding in the same direction until you've folded the roof piece fully in half - try and line up the edges and corners to keep it true, if possible - it doesn't matter too much, though. See the image below...
 Keep folding until you've folded it in half
- The next step is to unfold the roof piece and fold it back on itself again (reverse the fold) - to help you get the fold straight, align the top fold first, and press down on the top part of the fold - before then continuing to press the fold down along its length - see the image below...
 Fold it back on itself again
- The reason we fold in both directions is to get a stronger and better fold. Your roof piece should be nicely folded now - see my image below - if it's neatly folded with the corners lined up that's fantastic - if it's not quite true don't worry about it as it won't matter once it's in place.
 The roof piece is folded and ready
- So now, let's move onto folding each of the score lines for the rest of the paper gingerbread house template. Let's start with one of the bigger pieces for the front (or back) of the house - see the image below...
 Let's start with one of these pieces for the rest of the house
- We're essentially going to follow the fold we've just done on the roof for each of the score lines on each of the pieces (don't worry, it goes very quickly once you've done a couple and got used to it). It's easier to fold forward all of the score lines on one piece, and then go back and fold them all back down again, rather than folding each forward and back individually...
- So align your metal rule along the first score line like in the image below - remember to press down firmly, and use your other hand to fold the little flap upwards, using your fingers to push against the rule along the fold to firm up the fold - see the image below...
 Align your metal rule along the score line then fold up the flap towards you, pushing against the metal rule along the fold as you go
- Repeat this for each score line along the first piece, folding each little flap up towards you and firming it from behind as you go - see the image below...
 Fold each flap forwards along each score line
- Then go back and start folding each of those folds back on themselves - see the image below where I've just folded the top flap backwards and all the rest remain facing forward. Remember to use your fingers to press along each fold as you go to firm up the fold.
 Fold each of these folds back on themselves
- Continue until each of the flaps is folded back and your piece should look something like mine in the image below...
 Gingerbread house front piece folded and ready
- Repeat these steps with the matching piece for the back of the house - see the two images below...
 Repeat the steps with the second piece
 Both pieces should end up looking like this
- Now, you guessed it, we're going to do the same for the two final pieces, the side panels - these are the two pieces that you can see in my image below...
 We'll need to do the same for the two side panels
- I'll start you off with the first fold - use your metal rule along the score lines - fold each of the flaps up towards you first, firming the fold with your fingers - see the image below...
 Use your metal rule along each score line and fold each flap up towards you at first...
- Continue for each of the three flaps on the first panel - see the image below with all the flaps currently folded forwards...
 Make each fold forwards first
- Then fold each fold back on itself again, just like you did before - see my image below...
 Then fold each fold back on itself again
- And do the same for the other side panel until both side panels look like mine in my image just below...
 Repeat for the second side panel
- Hopefully, now your pieces all look like mine in the image below - our next step will be to start gluing them together...
 Gingerbread house pieces all ready to glue
- We're going to start the gluing, and it might be a little messy, so make sure that your work surface is protected.
- First, let's get our first pieces in place without glue so that we know what we're doing and where the glue needs to go. Have a good look at my image below - we're going to glue together one of the side panels with the front panel.
- The glued tabs will go on the inside of the creation - so in the image below, we should have the 'nice' (front) side of the cardstock facing down onto the worksurface - the flaps should all be folding upwards in this position...
- The two panels should be at right angles to each other - line up the creases along the bottom of the side panel and the small flap - try to also make sure that the small flap keeps inside the edge of the house panel - we don't want extra bits peeking out, particularly!
- When you're happy that you know how these two pieces will fit together right now, we can move onto gluing in the next step...
 The first two pieces will fit together like this
- Leave the side panel where it is face down on the work surface. So our first bit to glue will be the very bottom of the side panel - on the flap at the bottom - and we're just going to apply glue to the small area where it would be overlapping with the front panel - so it's just the small area to the right of my glue stick in the image below...
 Just apply glue to the very bottom right corner
- Then, we're going to quickly move on to apply glue onto the front panel - you will need to flip this over so we're applying glue to the nice/front side of the cardstock...
- You can see the two flaps that need glue adding in the two images just below...
 Apply glue to the side flap here
 And the bottom side flap here
- Apply the glue to both of the flaps in the two above images - see image below for applying the glue...
 Apply the glue to both of these flaps
- Now, glue the two pieces together, just starting at the bottom for now - lining up the creases along the bottom fold and ensuring the flap doesn't peek over the edge of the side panel. Press the parts you've glued together firmly with your fingers to ensure it sticks well - see my two images below...
 Glue the two pieces together like this - see the image below for a close-up look
 When everything is aligned, press the pieces together firmly
- Next, we're going to stand up both walls of the house so that we can glue the two walls together at the corner like in the image below - get it looking like this from the inside to start with (don't press firmly just yet)...
 Stand up the two house walls and glue them gently at the corner
- Then turn your house around so that you can see the corner from the outside - we want to get our corners as neat and true as possible, so while the glue is still wet see if you can adjust the corner so that the edges align - see mine in my image just below - the edges here aren't too bad and the bottom part is very neat, but the top parts could do with being a little more pushed together...
- Do your best (but don't worry) - it will still work even if it's not exact, but it will just look neater the more you try to get everything aligned.
- When you're happy, press the glued parts together with your fingers to help them stick firmly...
 Check your corner and adjust as necessary - press together to stick firmly when you're happy
- So we're going to add the main back piece the other side in a similar way - make sure that you're happy with how it's going to go before adding the glue - see my image just below...
 The main back piece will fit like this
- First, add glue to the corner of the bottom flap of the side panel, like you can see in my photo below...
 Add glue just to this bottom corner
- Then, working quite quickly, we're going to add glue to the two side flaps on the larger panel - see my photos below pointing these out for you - this is mainly a repeat of the what we did on the other larger front/back wall of the house...
 Add glue to the two side flaps - see them pointed out in the two images below
 Add glue to this small bottom flap
 And also to this longer side flap
- So now, glue the base of the two walls together at the bottom like in my image below - make sure you line up the bottom creases and also make sure the flap going up the side doesn't peek out over the edge...
 Start gluing the bases together like this
- Then, lift your wall up vertically and glue gently from the inside like this in my image below...
 Glue the wall up like this
- Now, turn your house around, and just like we did before, just check your corners are neat and adjust if necessary before firming down the seam with your fingers to make sure it's stuck well - your little house should now be looking something like mine in the image below...
 Your gingerbread house should now be looking something like this
- We're now going to add the final wall - it will fit in the same way, but because we already have three walls standing, we'll put it together in a slightly different way...
- First, let's add glue to the bottom two corners of the side wall. Make sure you're working on what will be the inside of the gingerbread house and just add glue to the two corners of the bottom flap like in my image just below...
 Add glue to the bottom two corners of this piece
- Now, this next bit is a little awkward as you'll need to add glue to the side and bottom flaps on each side of the house - use your hand to support the flaps as you're adding glue. See the series of photos below...
 Add glue to the side and bottom flaps on each side of the house
 Glue here
 And all along here!
- So your side panel is going to slide in beneath the structure of your house like you can see in my photos below - make sure you line up those creases on both sides, again, and make sure the flaps won't peek out over the edges. Firm down the glued areas when you're ready...
 Add the final panel in like this - check the creases and make sure there's no peeking. Firm the glued areas down when you're happy.
 It should now be looking something like this
- Next, just lift up the final wall and glue down the flaps gently - then turn your house so that you can check the corners from the outside and adjust if necessary. Firm everything down between your fingers so that it's properly stuck down as it will need to be firmly stuck for the next part. See mine in the photos below...
 Lift up the final wall and glue in place checking your corners are (more or less) straight
 Press firmly between your fingers for all your glued areas as we want everything stuck down well before we add the roof
- Then, when your walls are stuck well, we'll add glue onto all the flaps for the roof - so that's the long flap and the two side flaps on each side - I point them out (on one side) in the three photos below - we'll need to add glue to the flaps on both sides, though.
 Add glue here
 And here...
 And here - and the same on the other side too!
- So now you know where to glue, you can get gluing. This might be a little bit fiddly and you will need to support the flaps you're working on with your other hand - see my image below (one handed only as I needed to use the other to take the photo!)...
 Add glue carefully to all the roof flaps
- The roof fits on like in the image below - position it where you think, then check that you've got it fairly central. Also check whether any of the flaps are showing through the cut areas (we don't want this)...
 Fit on the roof like this - then check it's central and no flaps are showing through the cut areas
- You will need to turn your house upside down like this (see my photo just below), resting it first on one side of the roof and then the other - this is where you can adjust the position of the flaps - and when you're happy they're in a good position, just press down to stick them down firmly...
- You will need to get your hand right in (if you can) and push down - or if you can't, use your metal rule to push the flaps and then press on them to stick down (see the further two photos just below this one) - I used both my hand and the metal rule to be able to get to all the parts of the flaps...
 Turn the gingerbread house upside down to be able to reposition the flaps before you stick them down firmly
 If you can, get your hand in to press down the flaps so that they stick firmly
 Or push and press with a metal rule
And that's it - your little paper gingerbread house template is completed! Admire your handiwork and add some little battery tea lights (no real flames) to enjoy it in the evenings...
 Your paper gingerbread house is now finished! Well done!3D papercraft gingerbread house with intricate cut windows and decoration
 Your gingerbread house looks beautiful from every angle!
 Alternate colour idea for the gingerbread house - grey with a red roof!
 See how festive the gingerbread house looks lit up by 2 battery tea lights (no real flames)Pretty light-up 3D papercraft gingerbread house template
How to Buy the 3D Paper Gingerbread House Template
If you've enjoyed reading about this craft project and would like to make it, you'll need my 3D paper gingerbread house template - you can get that from my store at the link just below (instant worldwide download)...
 3D light-up paper gingerbread house template
Get the paper gingerbread house template from my store here...
Digital download 3D paper gingerbread house template
For Cricut and similar cutting machines or cutting by hand
SVG, DXF, EPS and PNG file formats
For personal craft use and small-business commercial use (up to 200 products)
For physical (craft) products only - no digital products, use, or sharing
If you need the instructions for setting up the template in Cricut Design Space, that's here...
You Might Also Like:
Lotti Brown's Designs & Templates
How-tos...
- How to use SVG cut files for Cricut (also other cut file formats & machines)
You might also like to try this lovely Christmas project - print then cut papercraft Christmas decorations... (made from my hand-drawn artworks)!
 Papercraft Christmas decoration templates
I also have lots of different Christmas card templates - including print and cut card designs of the artwork above plus papercut card templates (below) - see them all here...
 Christmas card templates for Cricut
I also have lots of Christmas SVG designs and projects on this page...
 Layered nativity scene SVG file
And if you're looking for more Cricut projects (non-Christmas) for other times of the year, I've got an ever-growing collection of projects for you to try on this page. Happy crafting!

Shall we stay in touch..?
Each month, I share stories from my own nature journal, new art from my studio, and simple seasonal inspiration to help you feel more connected with the turning year...
Recent Articles
-
British Nature Folklore Library: Stories, Seasons & Celtic Tree Wisdom
Dec 01, 25 05:09 AM
 Explore British nature folklore, Celtic tree meanings, and seasonal wildlife stories. A growing library of myth, meaning, and hand-drawn inspiration.
 -
Beautiful Art Inspired by Nature
Dec 01, 25 05:04 AM
 Beautiful folksy art inspired by nature from the fields and hedgerows of Yorkshire - colourful birds and wildlife with a nostalgic floral touch...
 -
Birds and Folklore in Britain: A November Nature Journal
Nov 26, 25 04:32 AM
 November birds and berries - fieldfares, redwings, lapwings and snow geese with folklore, meaning and nature journal inspiration.
Follow me:
Share this page: