*** IMPORTANT - I'm retiring my digital files - SVG/PNG/DXF/EPS - and printables from 31st December 2025 ***
*** Please ensure that you have everything you need - files and/or instructions printed off from the website (find them currently in the ARCHIVES section) - by 31st December 2025 as they will not be available after this date ***

Cricut Gingerbread House Set Up Instructions
- Home
- SVG files
- Project Ideas
- Cricut Gingerbread House Set Up Instructions
Cricut gingerbread house set up instructions for my paper gingerbread house craft project - set up everything correctly in Cricut Design Space ready to score and cut...
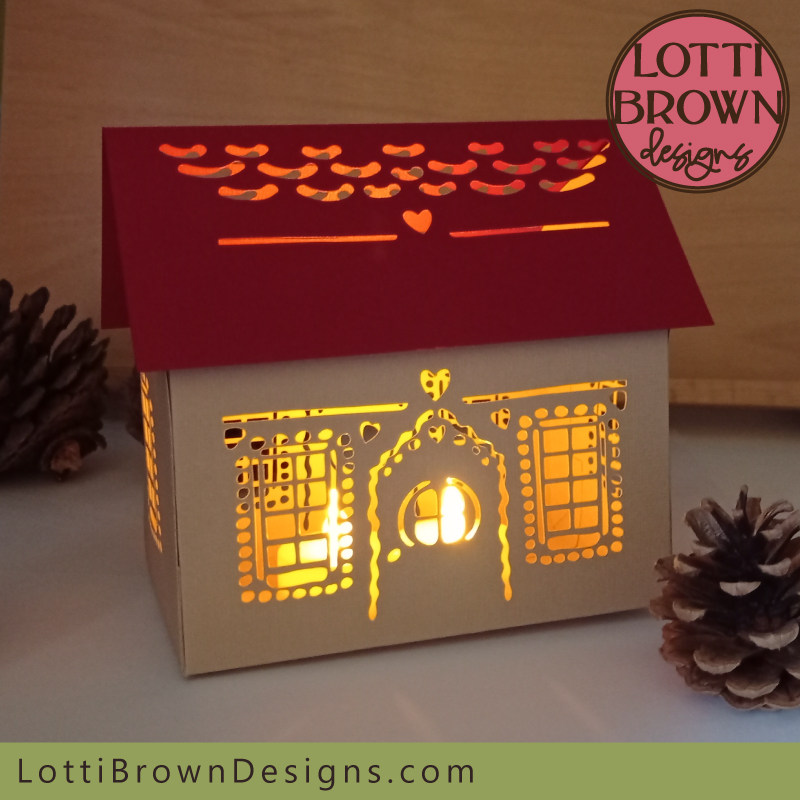 Gingerbread house cut file project for Cricut
These are the set-up instructions for making my paper gingerbread house template - it's a cute 3D papercraft gingerbread house project that can be lit with battery tea lights (no real flames, it's made of paper) so that it looks very cute and festive on those dark winter evenings.
It's lovely for Christmas but I think you could use it all year round if you wanted, too - and make it in all different fun colours!
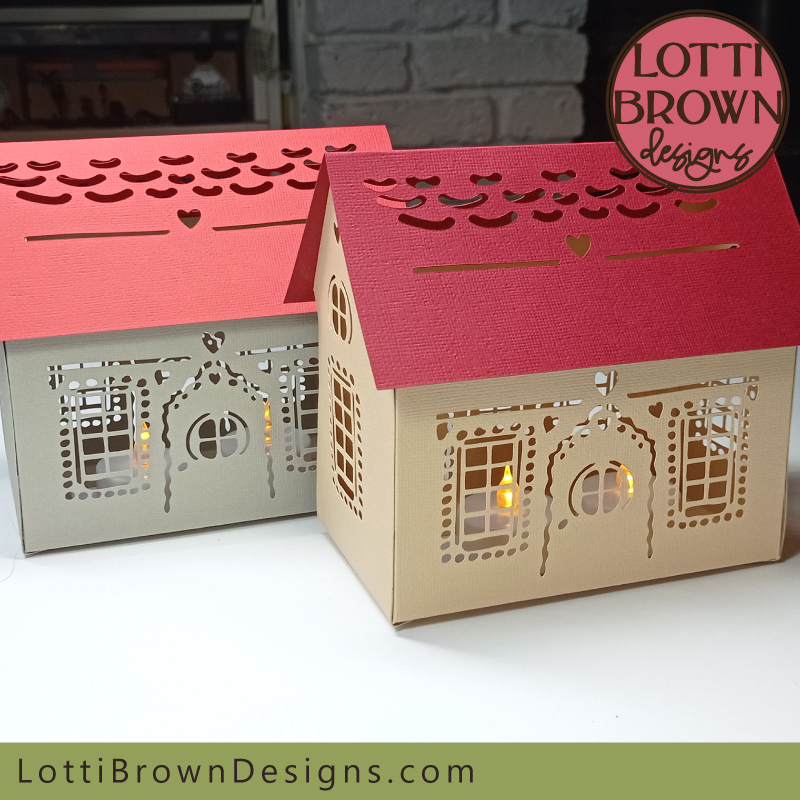 Let's make this cute papercraft gingerbread house with a Cricut
If you'd like to make the project, there's an introduction to what you'll need over on this page - this page here (the one you're reading now) is where you'll learn how to set up your file in Cricut Design Space - then I'll direct you back over to the original page for folding, gluing, and assembling the gingerbread house.
These set up instructions are particularly designed for Cricut users - but if you're making the gingerbread house, please do look over them, as I think they will help you to work out the process for your own machine.
You can also make the gingerbread house completely by hand if you prefer - using a blunt point to score (like a knitting needle) and a craft knife to cut.
If you choose to cut with your cutting machine but choose to score by hand, please do remember to delete the score lines in your cutting machine program before you send the project to cut.
Are you ready to start my Cricut gingerbread house set up tutorial?
If you haven't yet checked out what you'll need for the project, do that first and come back here when you're ready - I'll wait for you!
So if you're happy to start, let's get going...
Cricut Gingerbread House Template Set Up Instructions
If you want to print the Cricut gingerbread house set up instructions out, you can use the button below to do this - by using this button you can choose which parts of the page you want to print, and which parts you want to leave out, so you only print the parts you need...
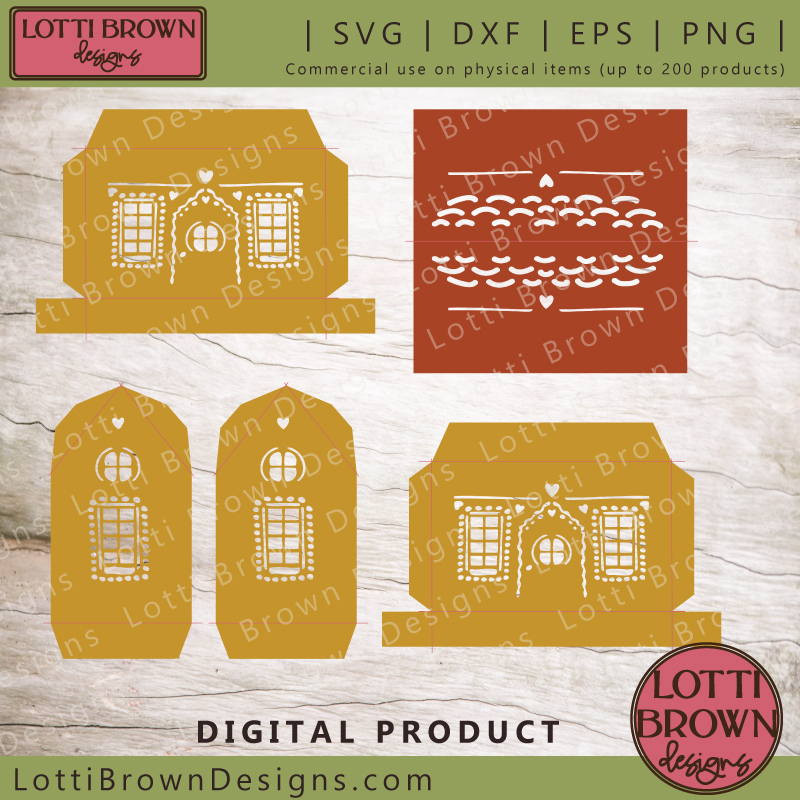 Gingerbread house template for Cricut - SVG, DXF, EPS, PNG
These Cricut gingerbread house template set up instructions are written using my Cricut Maker to cut and score the template. You can also make the project using another type of cutting machine (or even make it completely by hand). If you're using another type of cutting machine, you may still find these instructions helpful to prompt you to follow the same process on your own machine.
If you need the measurements for this project, take a look here...
Later on in the tutorial, we also get to the assembly part, too, which is for everyone!
Did you get your gingerbread house template yet? That's here...
Let's start by uploading the template into your cutting machine's software program - if you need any help with that, take a look at this page...
- With the template loaded into Cricut Design Space, our first step is to 'Ungroup' the template so that we can work with the different parts of it separately. Do this by clicking on the 'Group/Ungroup' button (two little squares with circles on the corners) so that the template is 'Ungrouped' - see the image below...
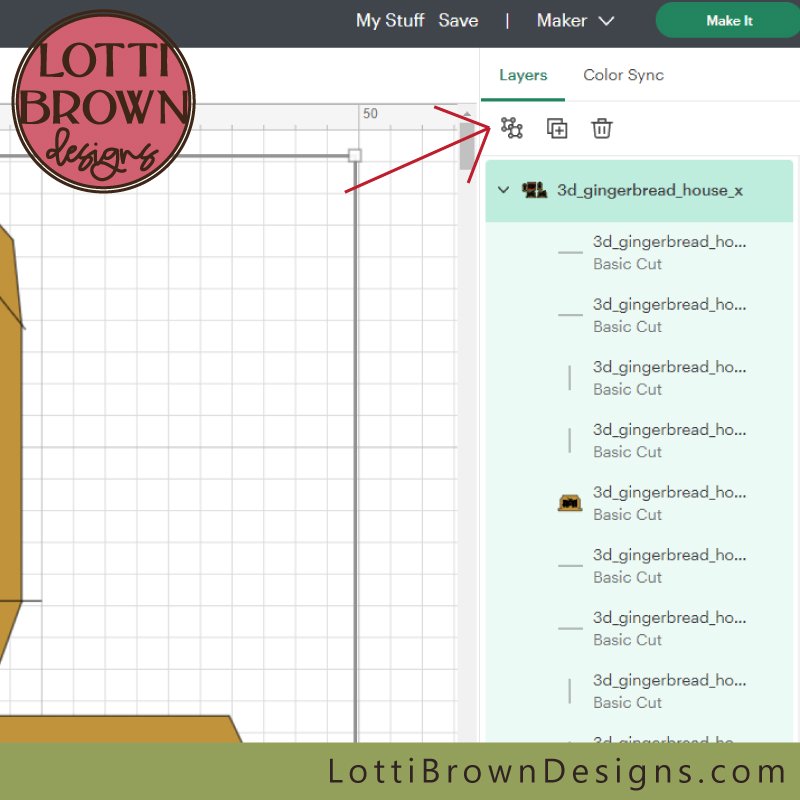 Click the icon to 'Ungroup' the template
- Next, we need to select the score lines to make them into score lines, as at the moment all the lines are set to 'cut' by default. You can identify the score lines as they are the single lines positioned above the house shapes in the layers panel on the right-hand side.
- There's quite a lot of these - and the screen jumps around a bit if you try and select them all in one go (a quirk of Cricut Design Space, I think, due to the long list of layers) - so I'll show you a section at a time to make it easier...
- So, starting from the top of the layers panel, click on the first line in the list, hold down the 'Shift' key, and then click to select the remaining three until you get to the house shape below them. They should turn green as you select them - see the image below...
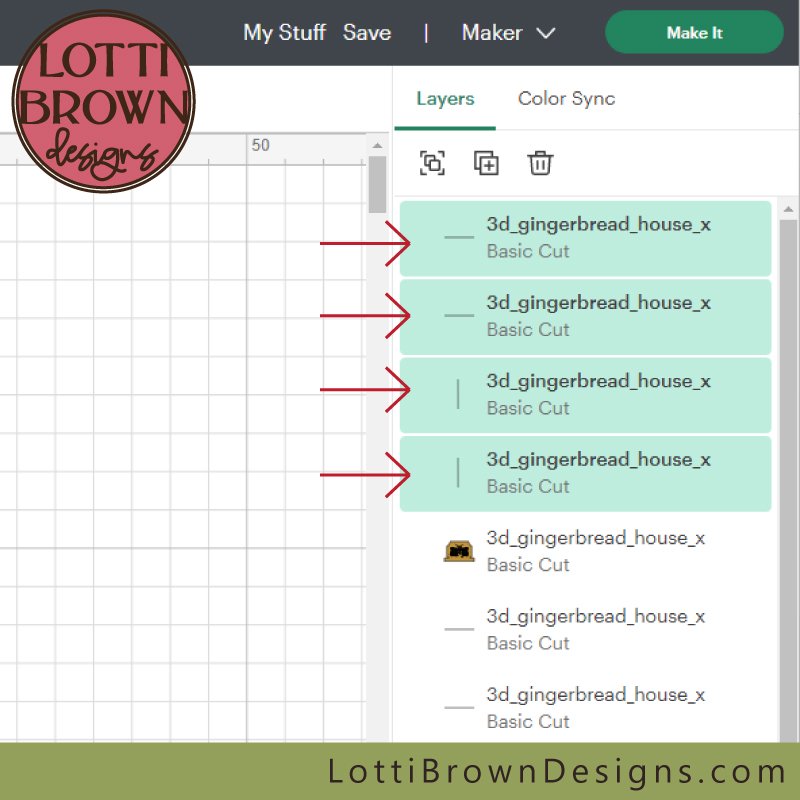 Select the first four lines in the list - they should turn green to show that they're selected
- To set them to score, we need to use the 'Operation' drop down menu along the top menu - at the moment, we can see it's set to 'Basic Cut' (see the image below)...
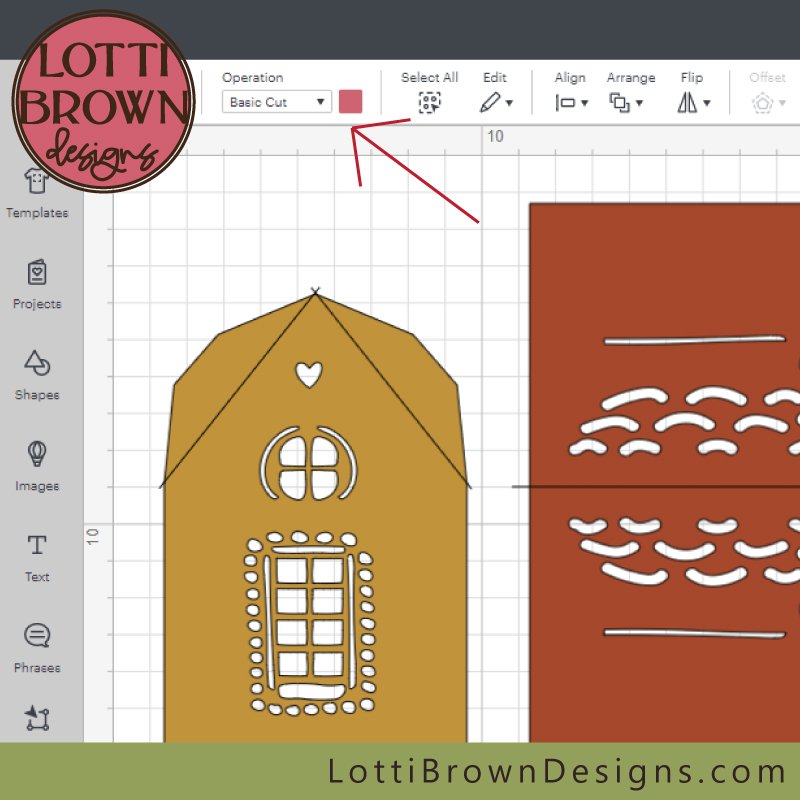 The lines are currently set to cut in this menu - we want them to score
- Select 'Score' from this drop-down menu - see the image below...
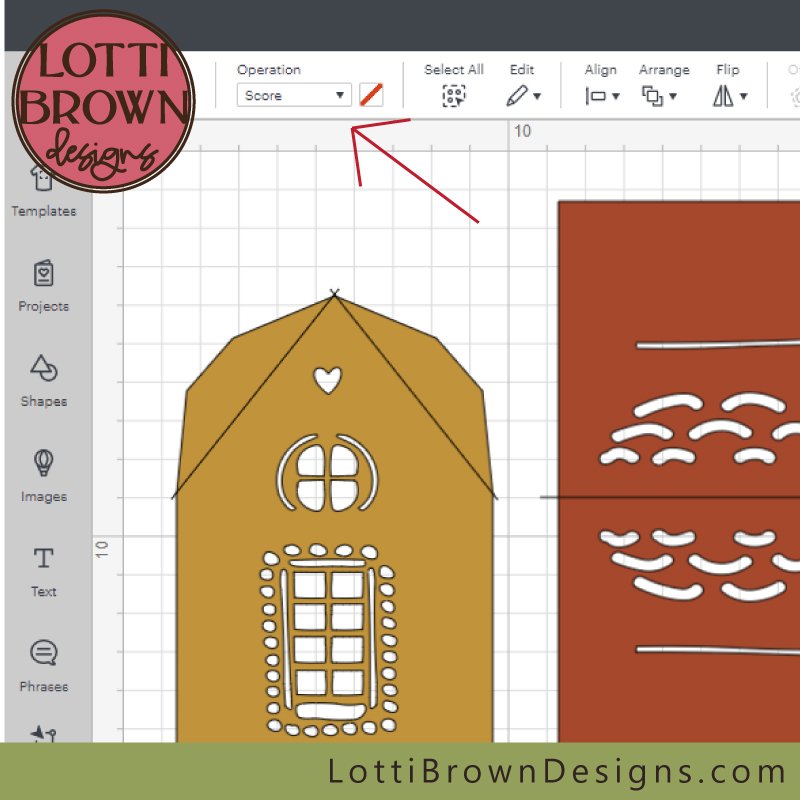 Select 'Score' from this drop-down menu
- You will see that the lines on the top of the list have actually changed to a dashed line, with the word 'Score' showing. This shows they've now been successfully set to score.
- So now move onto the next section of four lines to select, down to the next house shape - click and hold down 'Shift' to select the next four lines - see the image below...
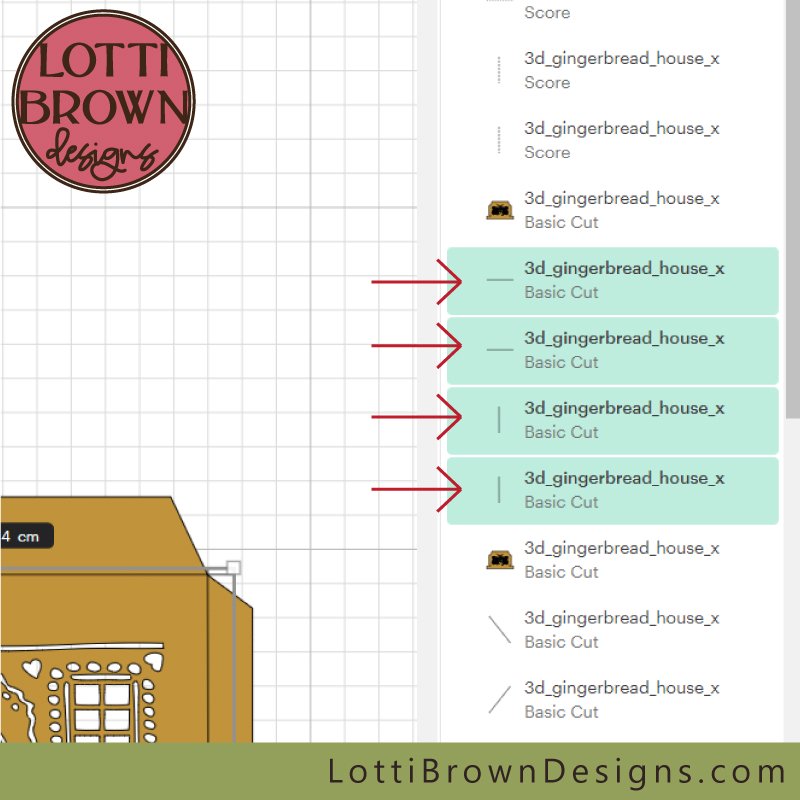 Select the next four lines
- Then click 'Score' again, to set this set of lines to 'Score' - see the image below...
 Select 'Score' again for this new set of lines
- The next set of lines is just three - select these - and then set them to Score - see the image below...
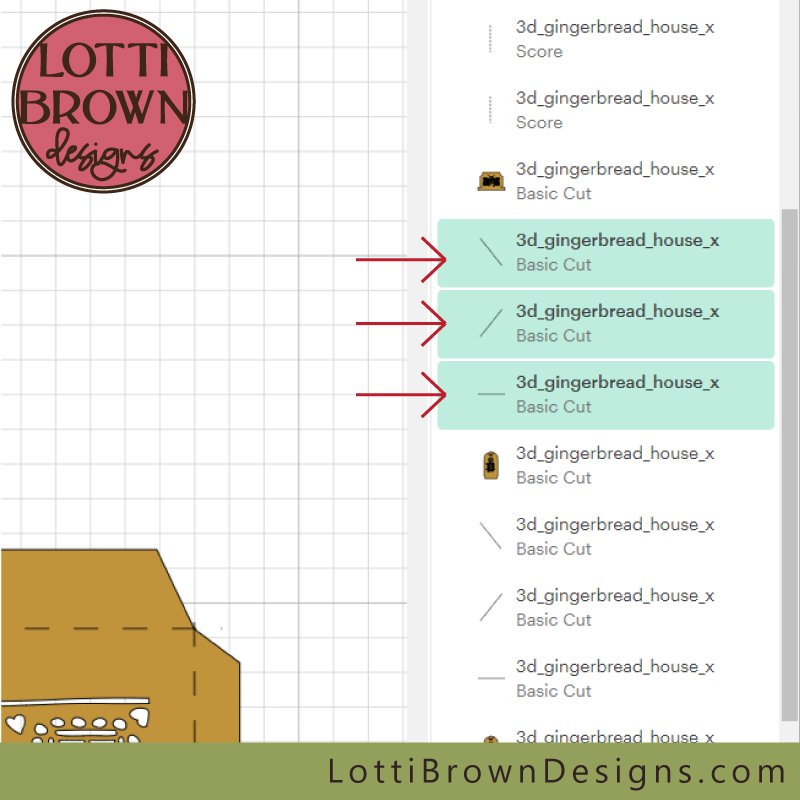 Select the next three lines and set them to Score
- Repeat this process for the next three lines in the list - select them and set them to Score - see the image below...
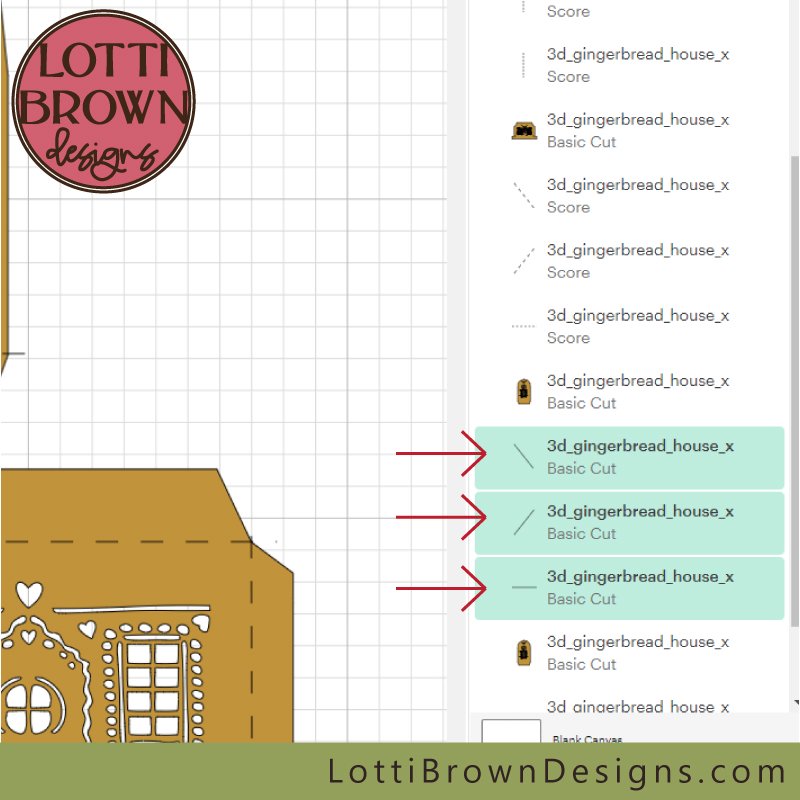 Select the next three lines and also set these to Score
- Just one line left now, right at the bottom of the list, above the roof shape - again click this to select and then set it to Score - see the image below...
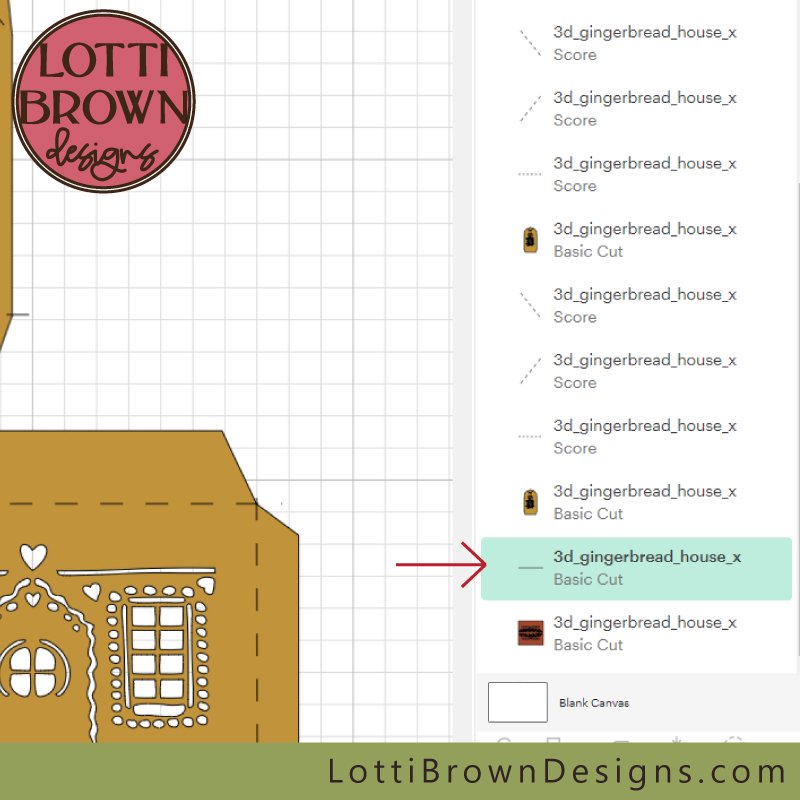 Select the final line and set it to 'Score'
- Our next task is to 'Attach' the score lines to their related shape. We need to do this for each shape...
- Let's start where we are, right at the bottom of the list, with the roof shape and its score line, sat just above - click on both of these to select them (click and hold the 'Shift' key)...
- When they're both selected (turned green), then click on the 'Attach' button at the bottom of the screen - see the image below...
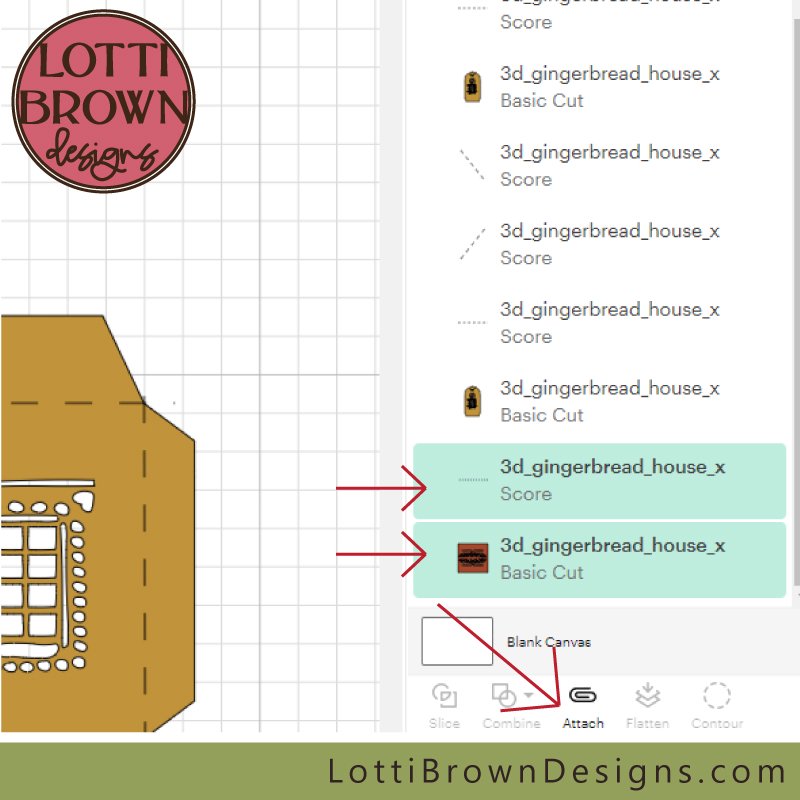 Click on the roof shape and its score line to select them, then click on 'Attach'
- Your roof shape and line will together shoot to the top of the screen - you will be able to see that they've been successfully 'Attached' together - there is a heading with a paperclip icon and the word 'Attach' then underneath you'll see both elements, slightly indented from the rest of the list. Take note, as this will help us to identify which we've done, and which still need doing - see the image below...
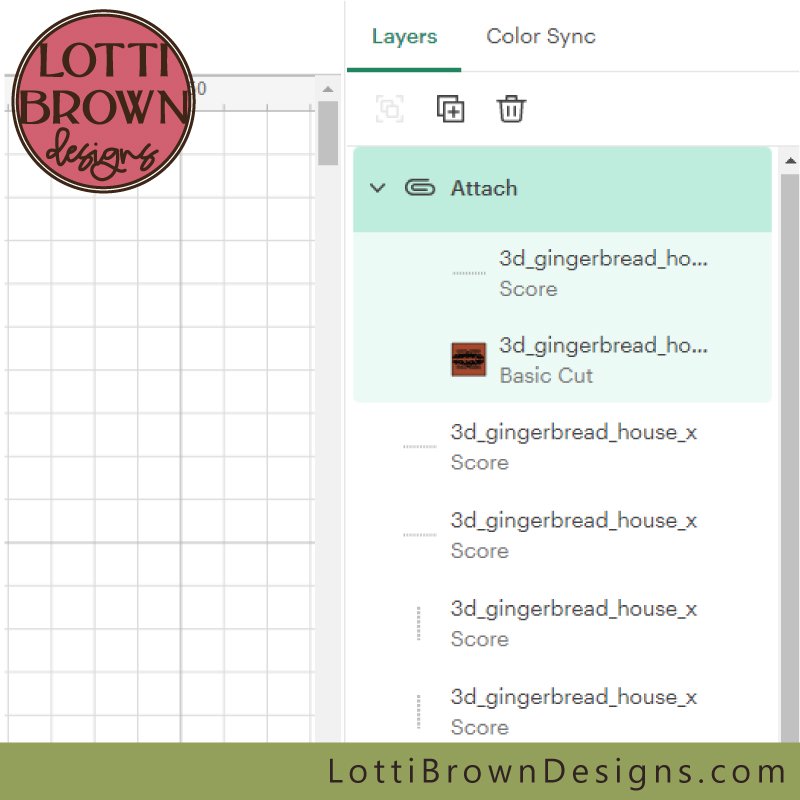 Look at the top of the list and see how the two elements have been 'attached' together and are now indented from the rest of the list
- So next, let's take the elements just below those we've just attached - and select the four score lines, together with their house shape - see the image below...
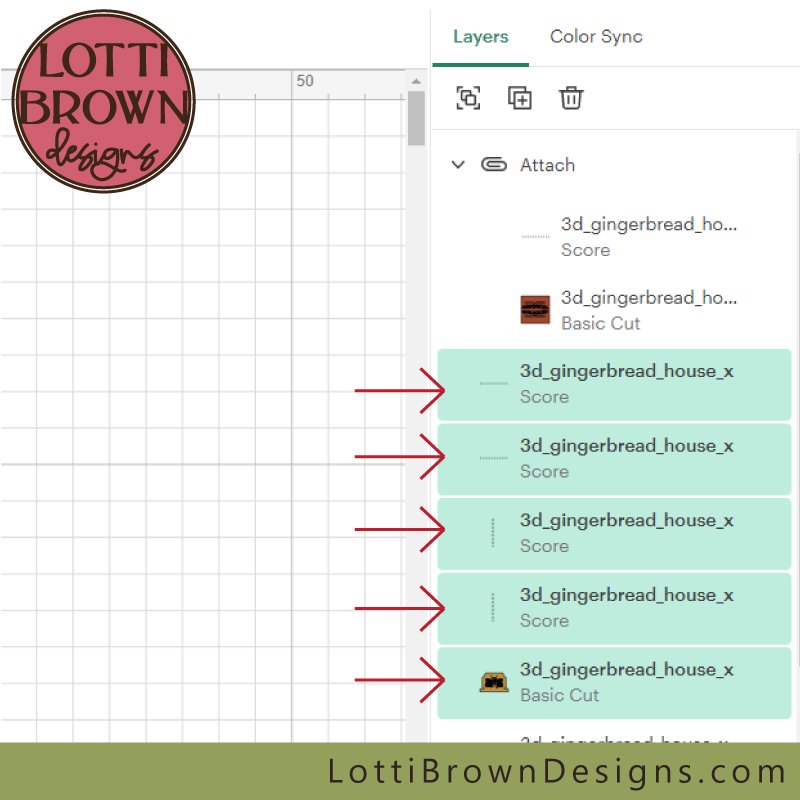 Select the next four score lines together with their relevant house shape
- Then click on 'Attach' at the bottom of the screen - see the image below...
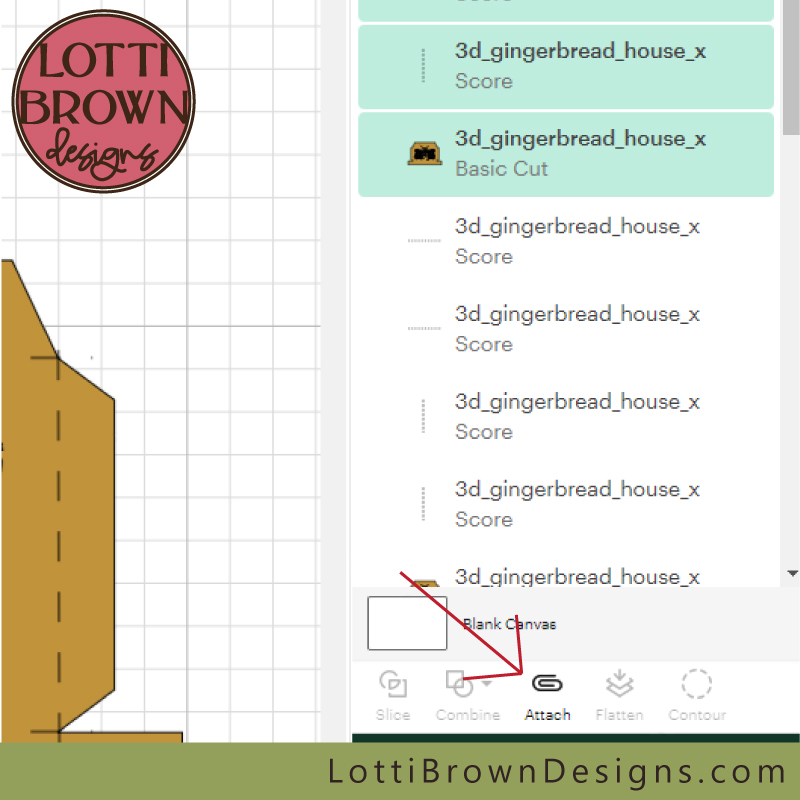 With all five elements selected, click on 'Attach' at the bottom of the screen
- Once they've been 'attached', this group then shoots to the top of the list - see it in the image below...
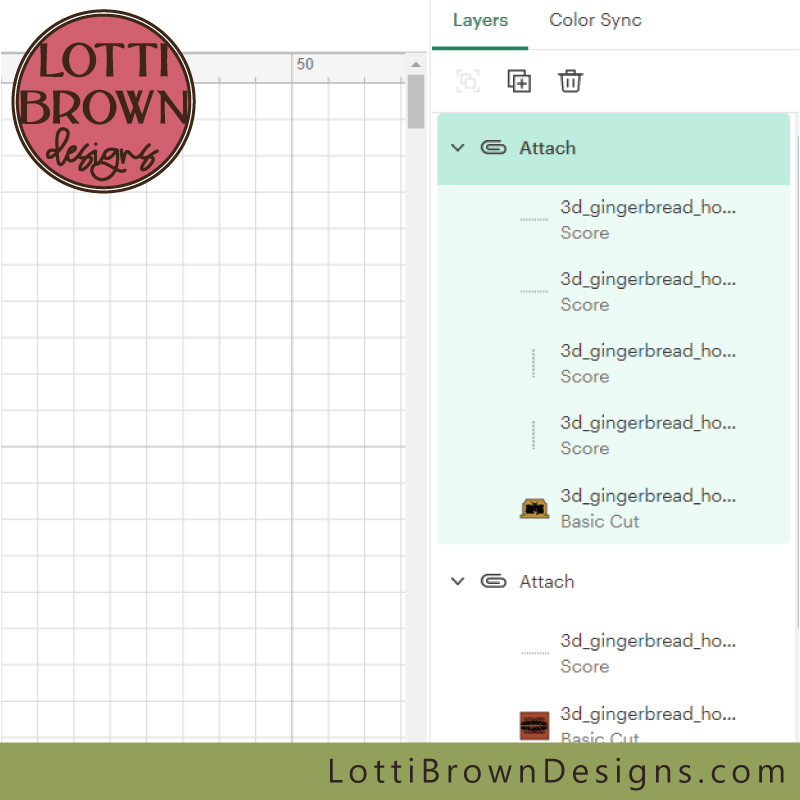 Check this new group to make sure everything is attached correctly
- Now, look down the list until we find, under the roof shape, the next items that need to be attached - this is a group of four score lines and their house shape - click on each (holding the Shift key) to select them all - see the image below...
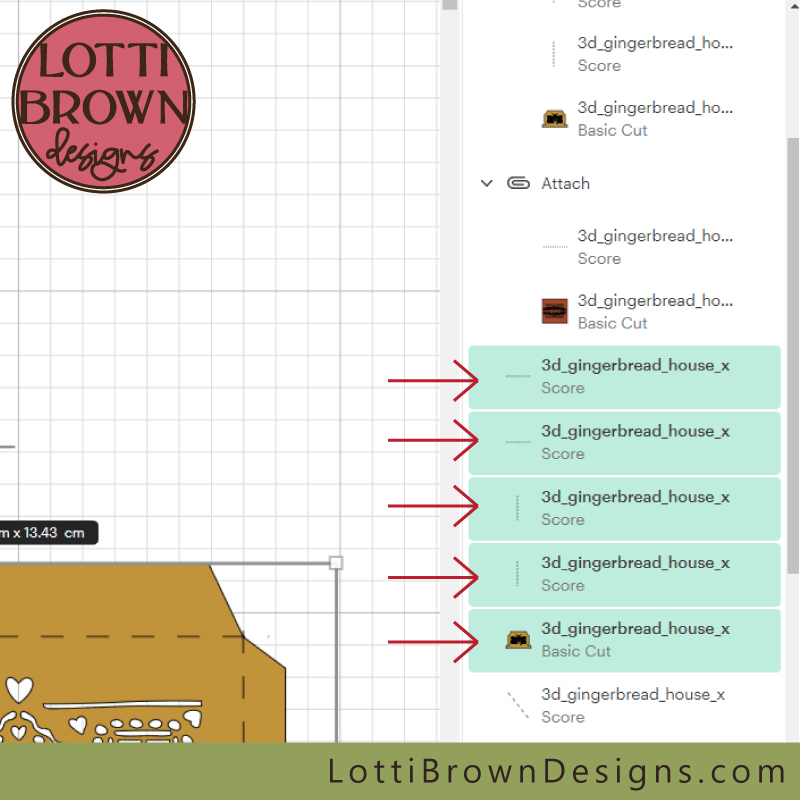 Select the next set of score lines and their related shape
- Then click on 'Attach' - see the image below...
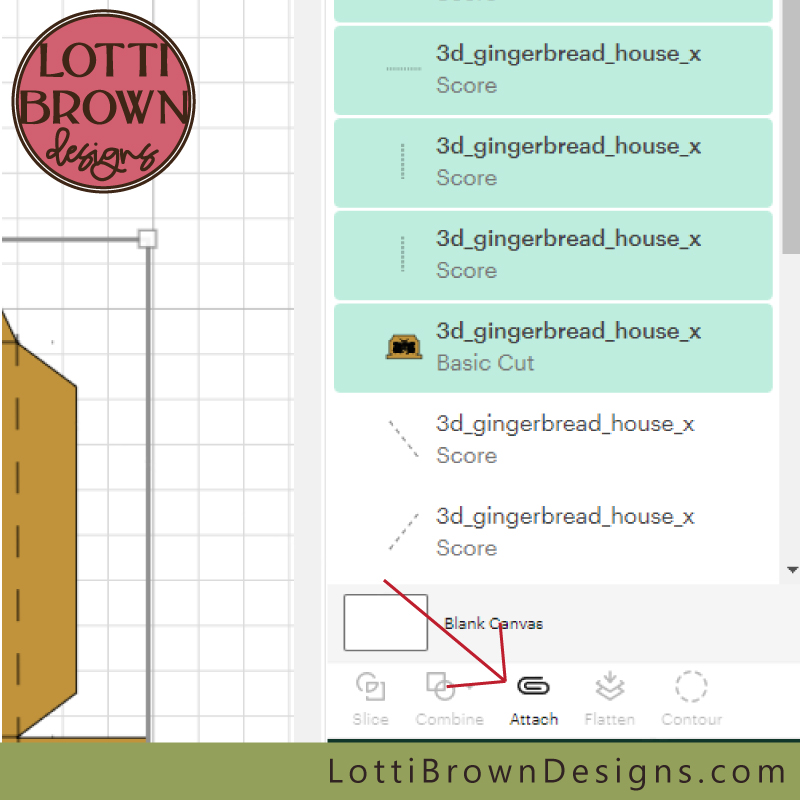 Click 'Attach'
- And now check this group as it shoots to the top of the list - see the image below...
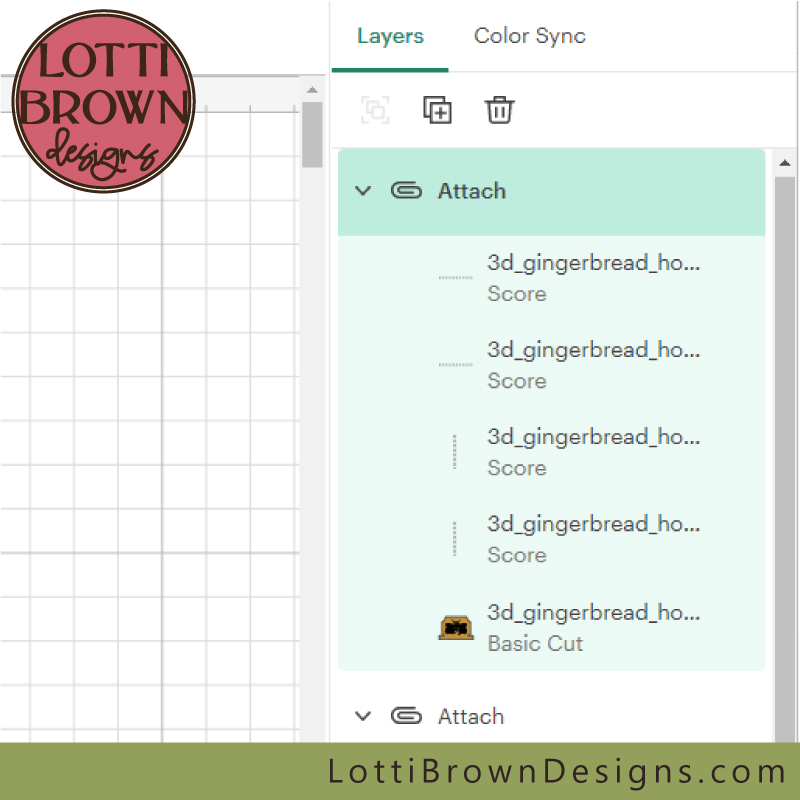 Check your list looks like this
- Scroll back down to look for the roof shape again - and select the next set of three score lines with their house shape just below - see the image below...
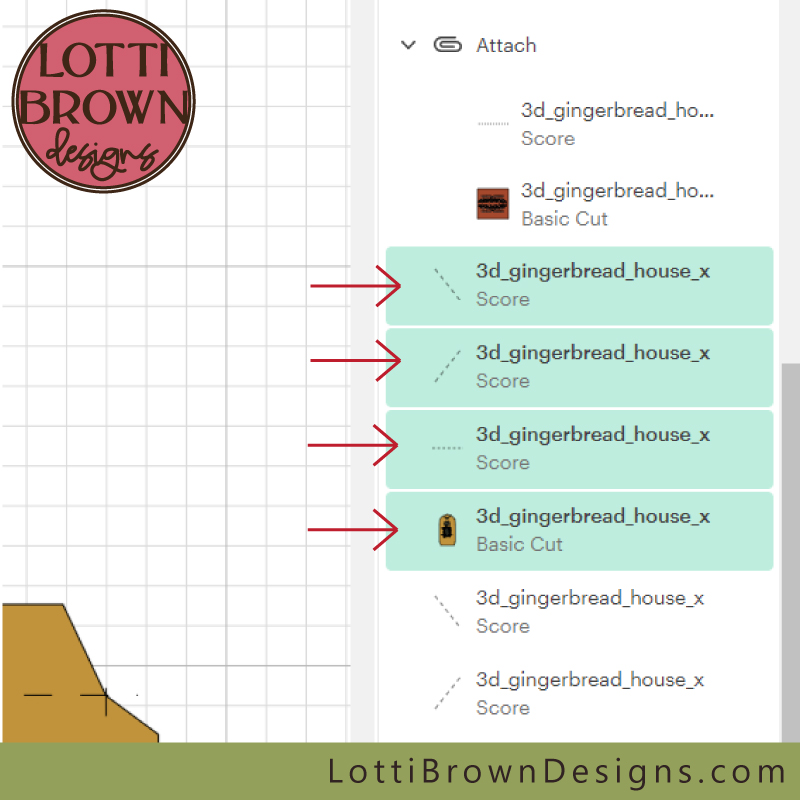 Select the next group of lines and their associated shape
- Then go on to click 'Attach' - see the image below...
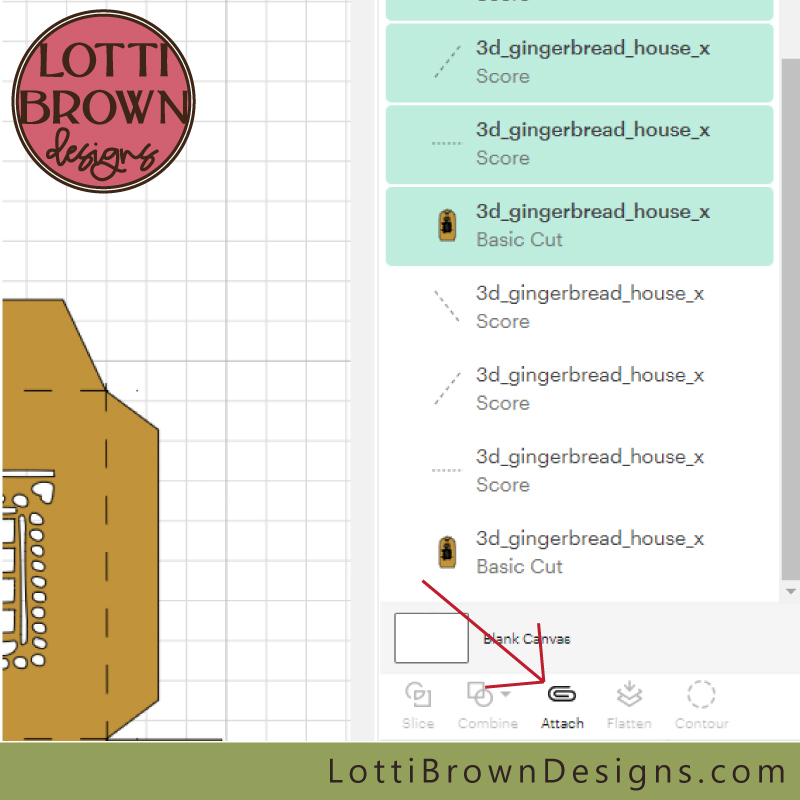 Click 'Attach'
- And once again, just check this looks correct as it shoots to the top of the list - see the image below...
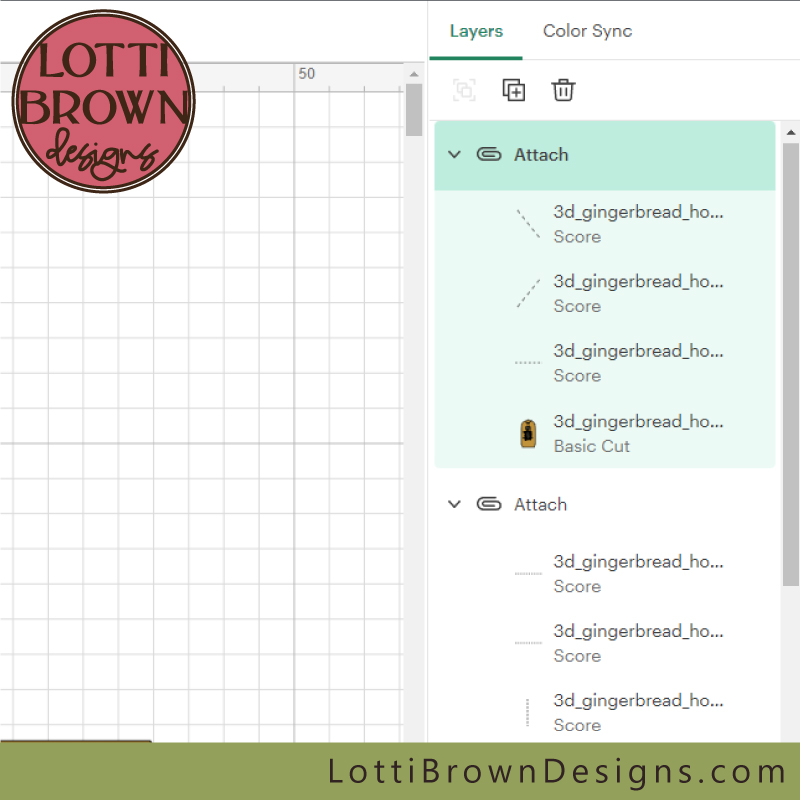 Check it all looks like it's attached correctly
- Then, scroll back down to find another set of three score lines and their associated house shape - these should be the final set - click to select these, then click on the 'Attach' icon - see the image below...
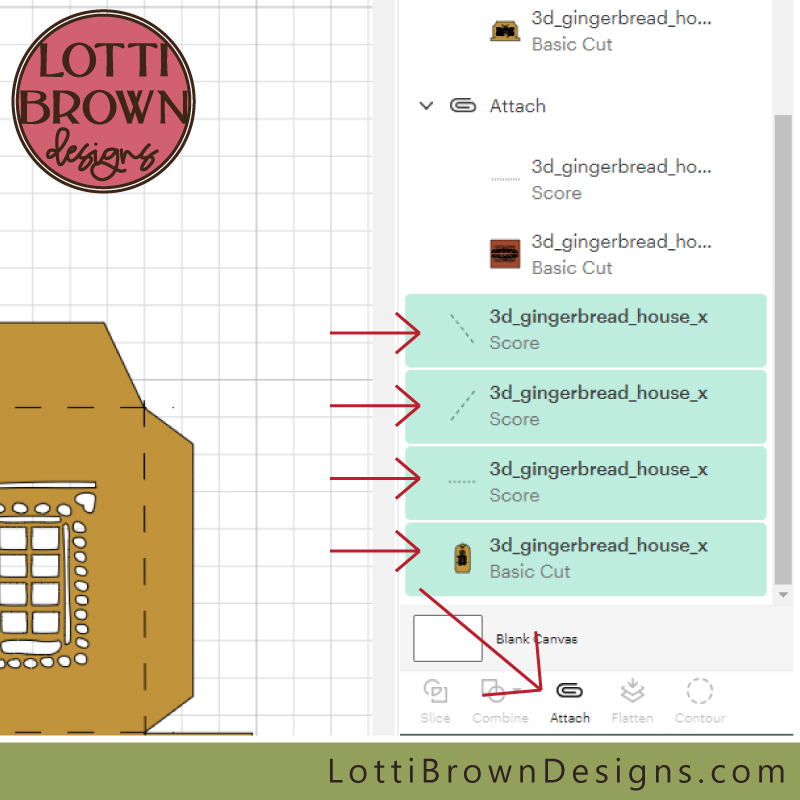 Click on the score lines, their associated shape, and then click 'Attach'
- Again, take the opportunity to check this set also looks right, as it shoots back up to the top - see the image below...
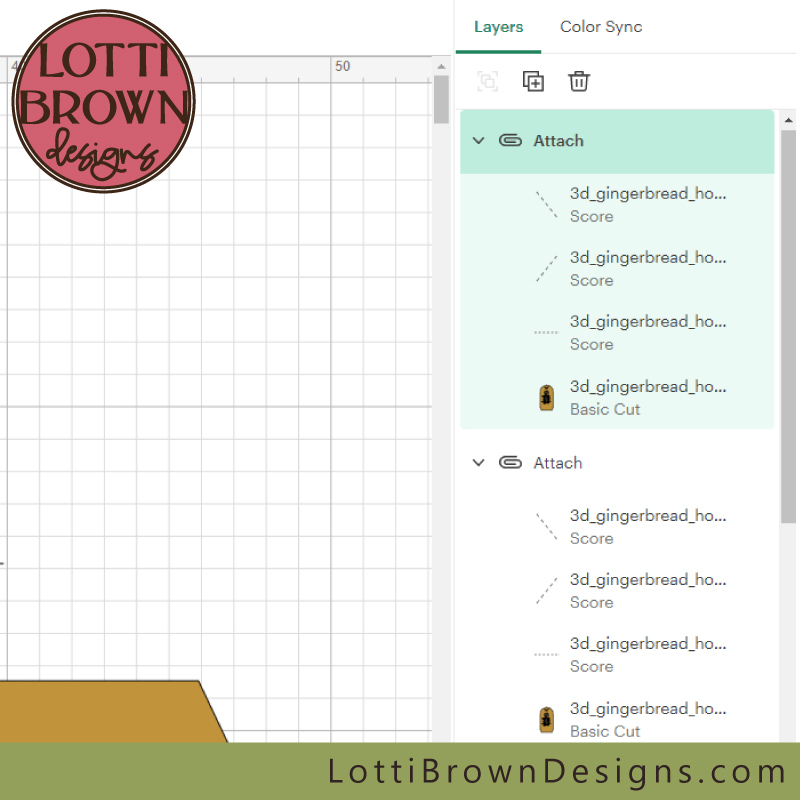 Check everything looks right
- If everything on the list looks like it's in its correct groupings, we're ready to click 'Make It' (top right) to start cutting and scoring the paper gingerbread house template - see the image below...
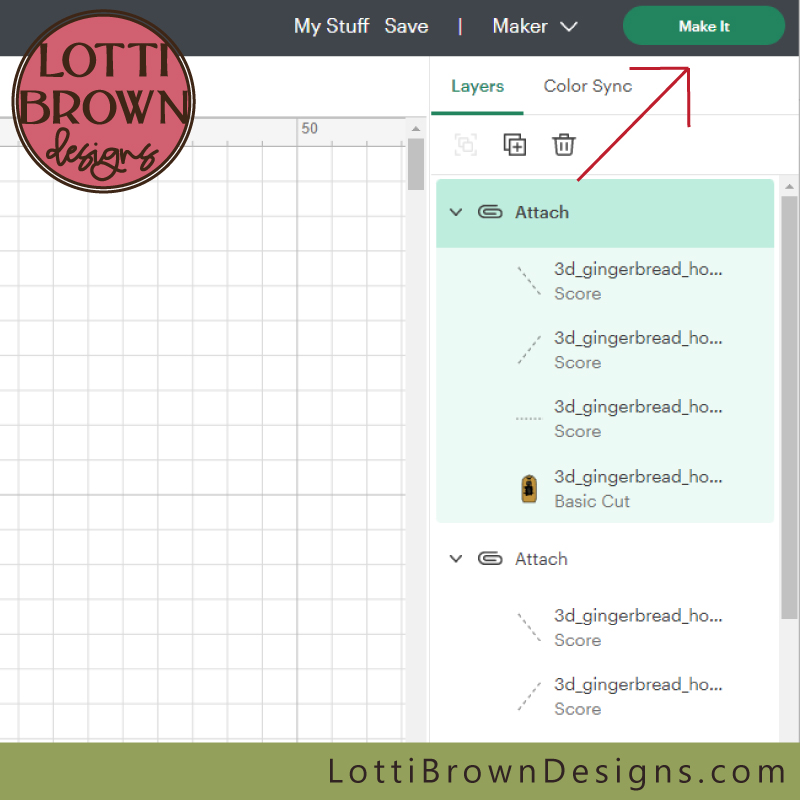 Click 'Make It'
- We now move to a screen where the Cricut shows you how it's set up the mats - each mat should say 'Score' and 'Basic Cut' by it. Change your material size, if necessary, by clicking on the 'Material Size' below the image of the mat. You will need to click on each mat image to check the material size set for that mat, and change it if necessary - see the image below...
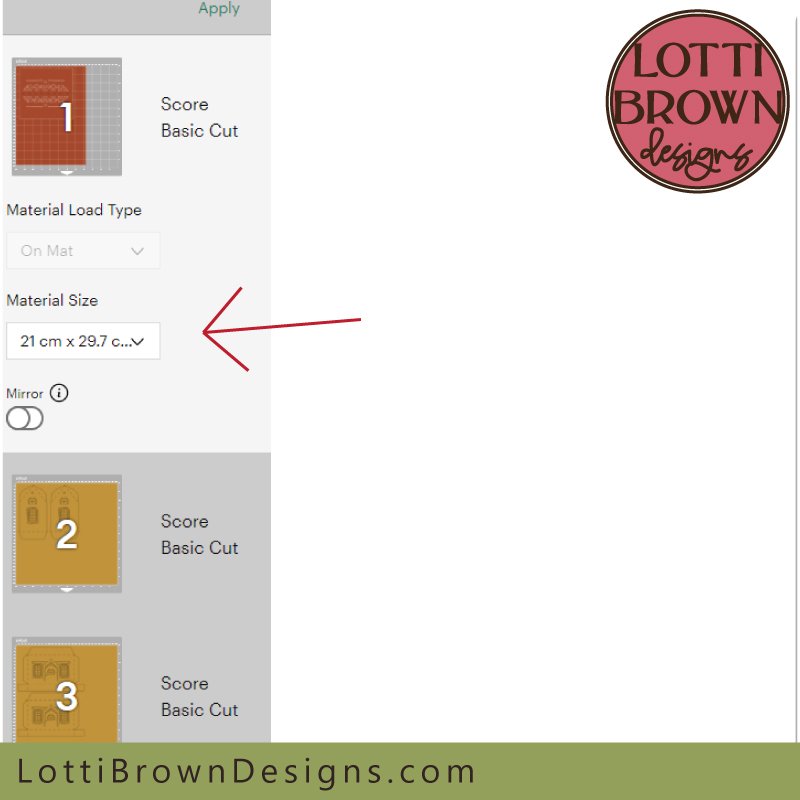 Change your material size if necessary
- When you're ready, click 'Continue' (bottom right) - see the image below...
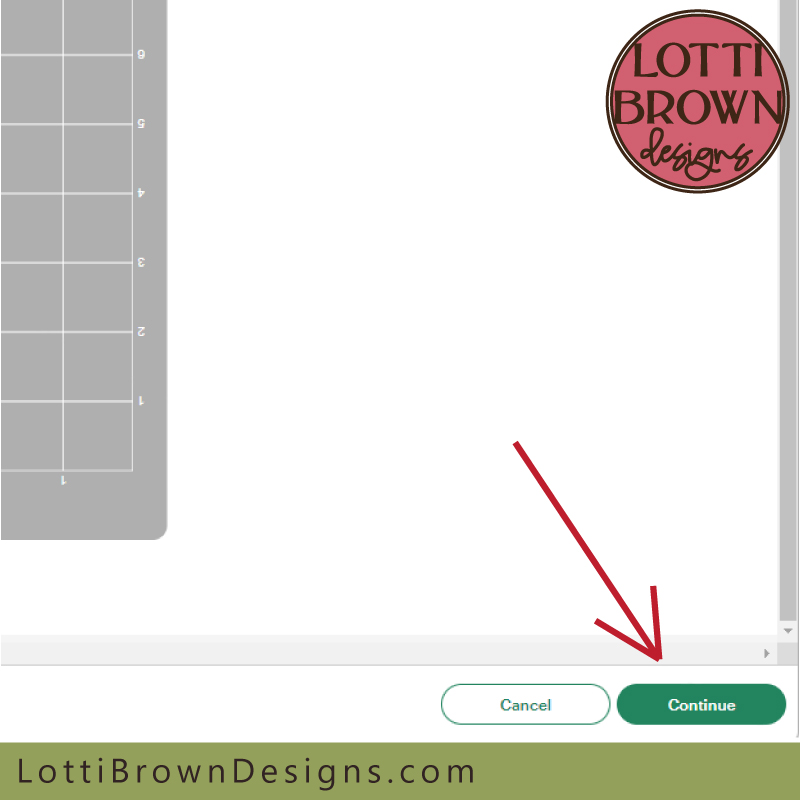 Click Continue
- Now, select your material - I recommend 'Cardstock (for intricate cuts)' if you're using cardstock...
- And if necessary, click on 'Edit Tools' (green) if you want to use the scoring stylus in your machine instead of the single scoring wheel. Now's a good time to also remember to put your tool in your machine! See the image below...
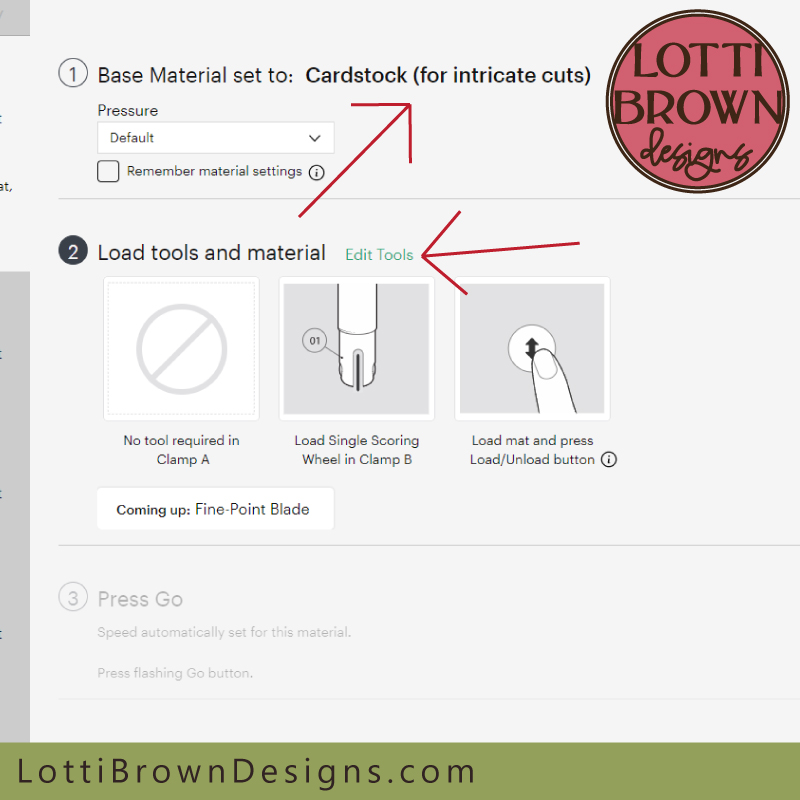 Select your material - I'm using 'Cardstock for intricate cuts' (which I recommend) and then click 'Edit Tools' to change to a scoring stylus (if necessary) - ALSO REMEMBER TO PUT YOUR SCORING TOOL IN YOUR MACHINE!
- In the pop-up window that appears, if you prefer to use a Scoring Stylus select this now (or leave the single scoring wheel selected if this is the tool you have) - see the image below...
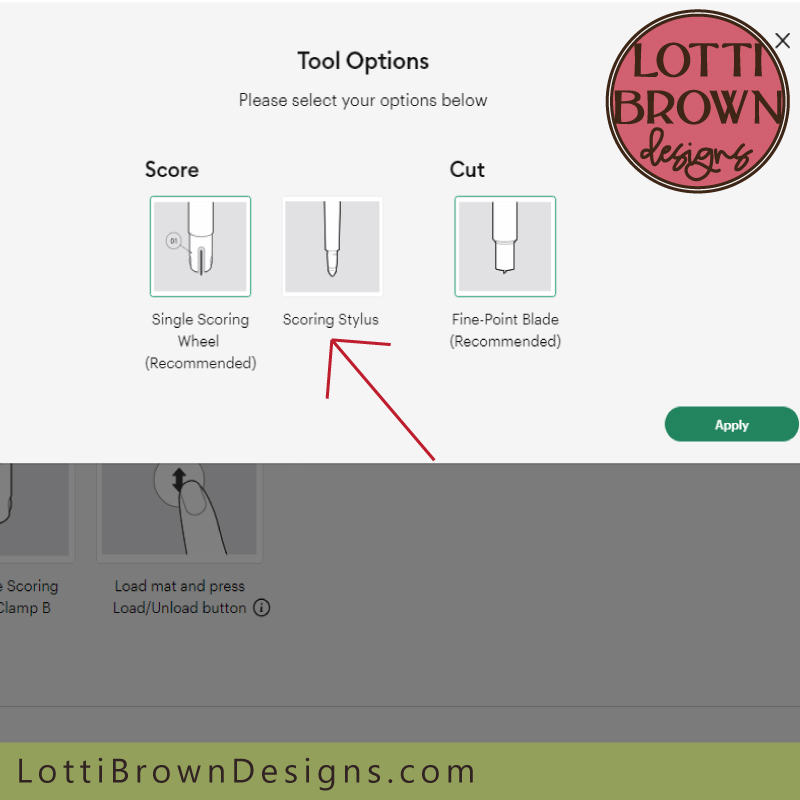 Select your scoring tool here - also put it in your machine!!
- Click 'Apply' when you're ready - see the image below...
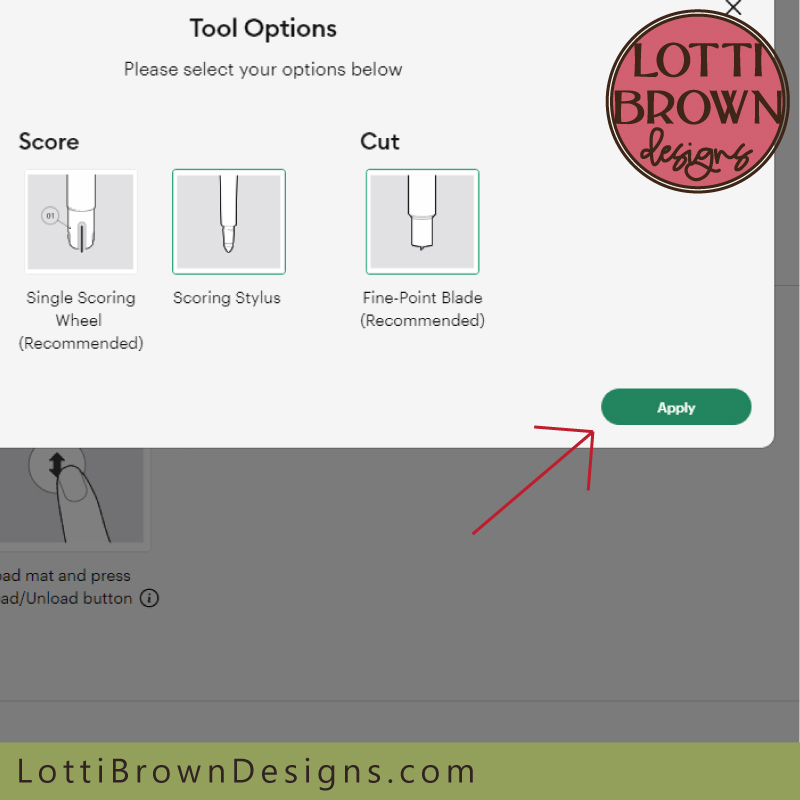 Click 'Apply'
And that's it - we're ready to load in the mats and set the machine off to cut, as usual - follow the directions on the screen as to which mat you're working on and when to load it in...
When everything has cut and scored, come back here and we can continue with the second part of the tutorial to actually fold and put together your paper gingerbread house template...
Putting Together your Paper Gingerbread House
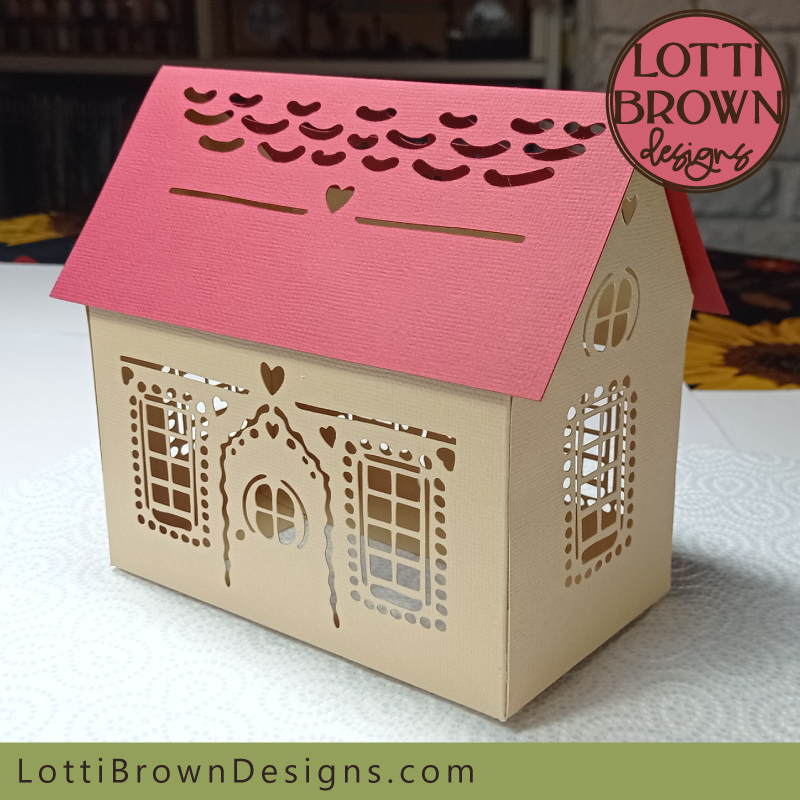 Papercraft gingerbread house made with Cricut
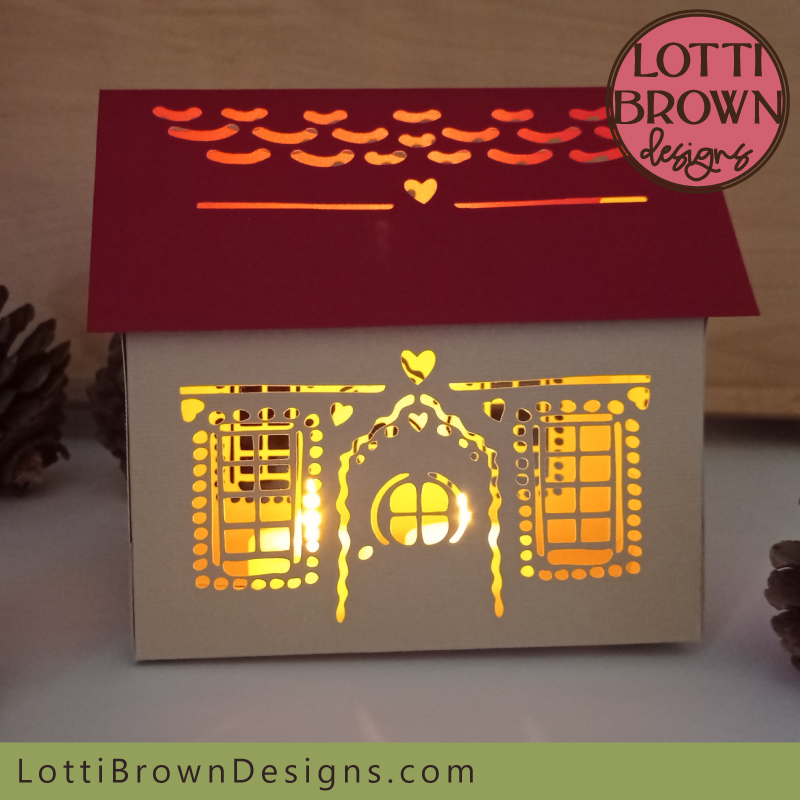 Light up your gingerbread house for a festive feel
I hope you enjoy the project - continue with it here....
You Might Also Like:
Lotti Brown's Designs & Templates
How-tos...
- How to use SVG cut files for Cricut (also other cut file formats & machines)
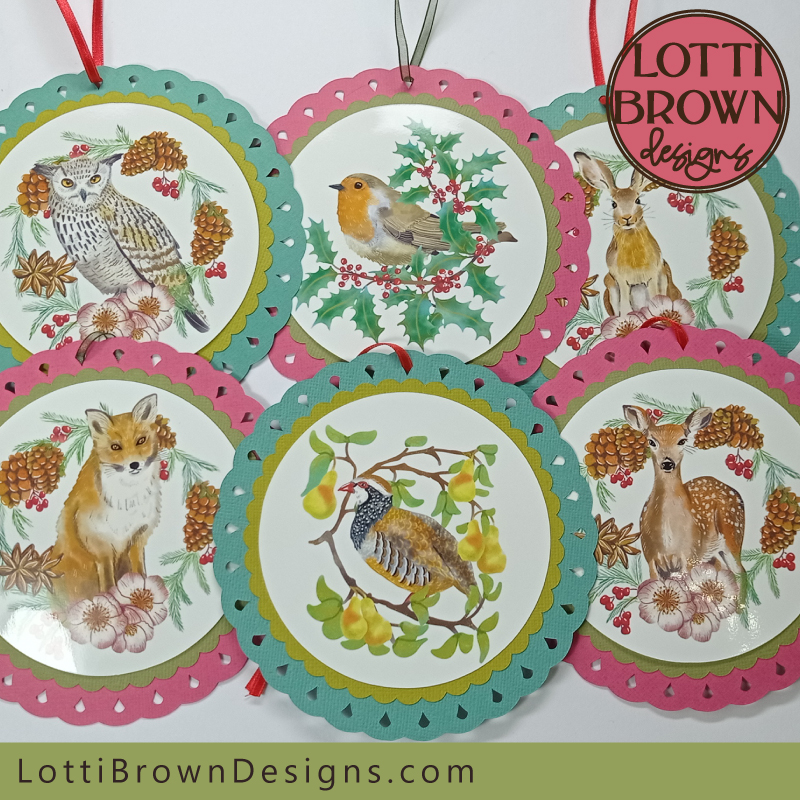 Papercraft Christmas ornaments project for Cricut
You might like this Christmas ornaments project for Cricut and other cutting machines
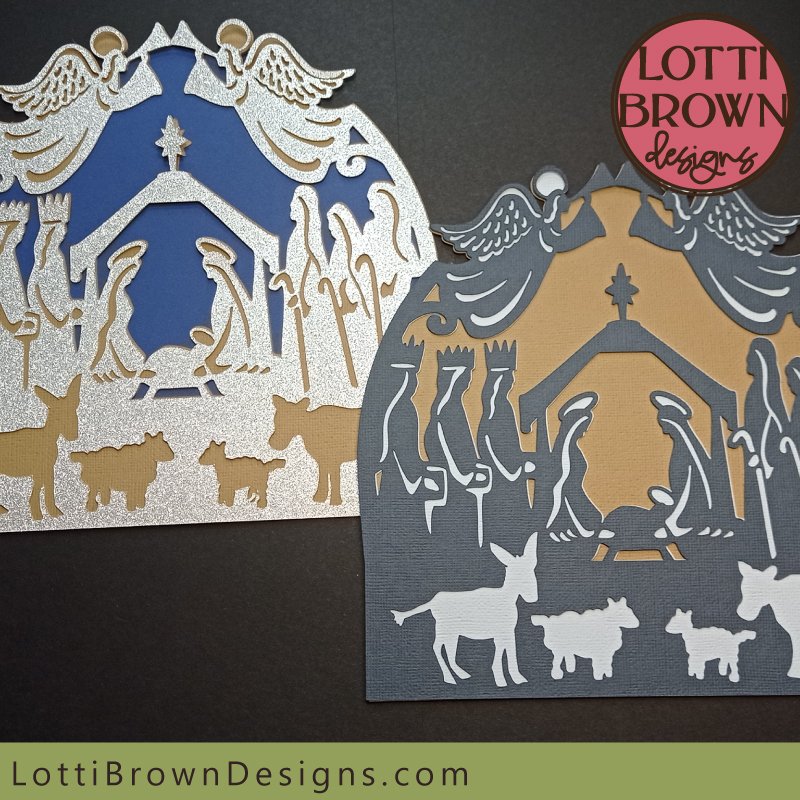 Nativity scene project
I also have lots of other Christmas designs and projects for you here...
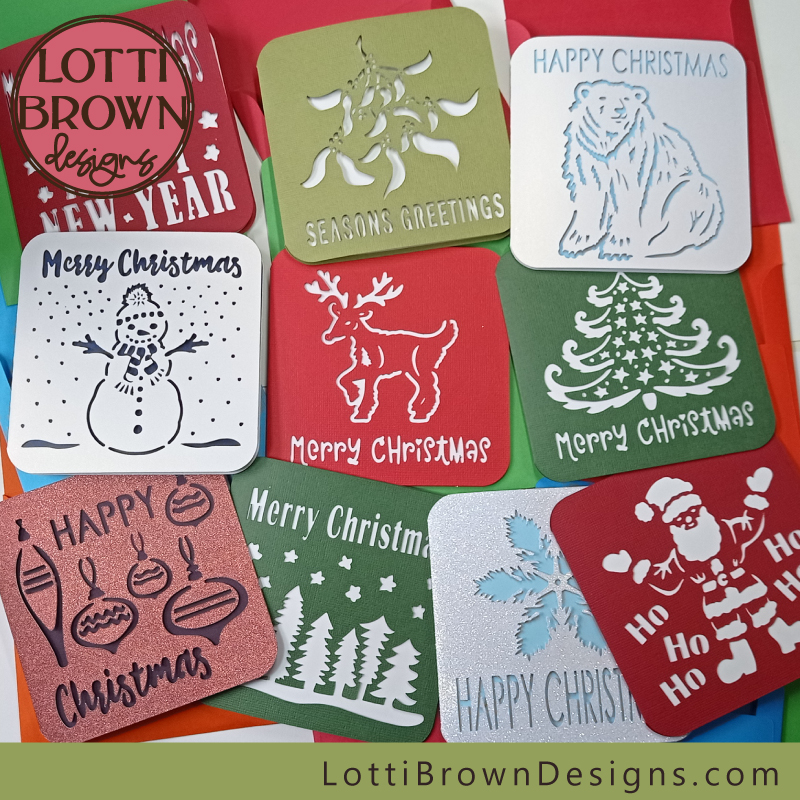 Christmas card templates
How about making Christmas cards with your Cricut? Find out about that here...
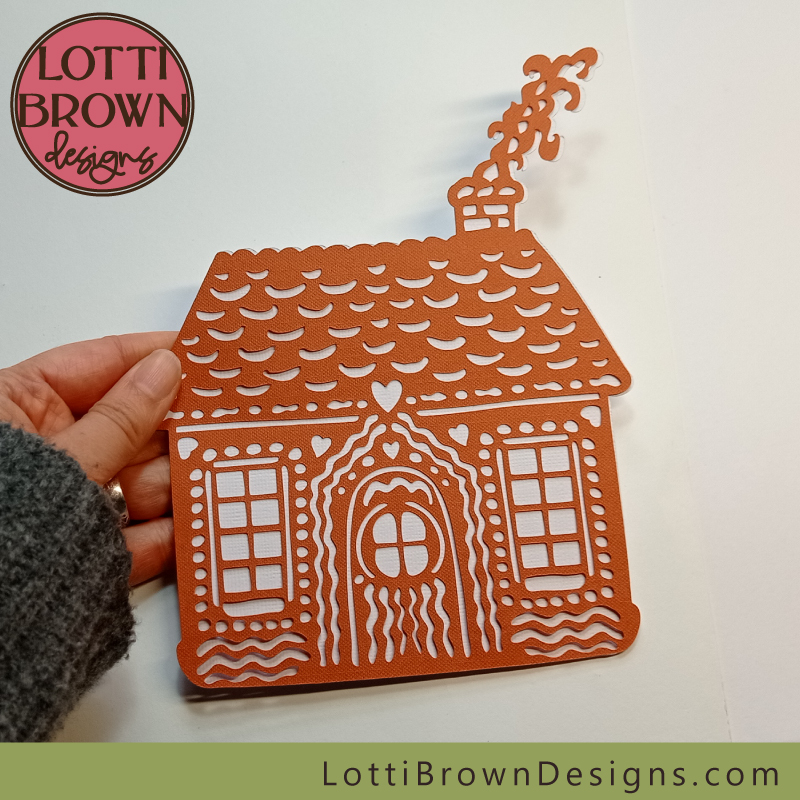 Gingerbread house SVG file
If you need a 2D gingerbread house SVG design, I have this one here...
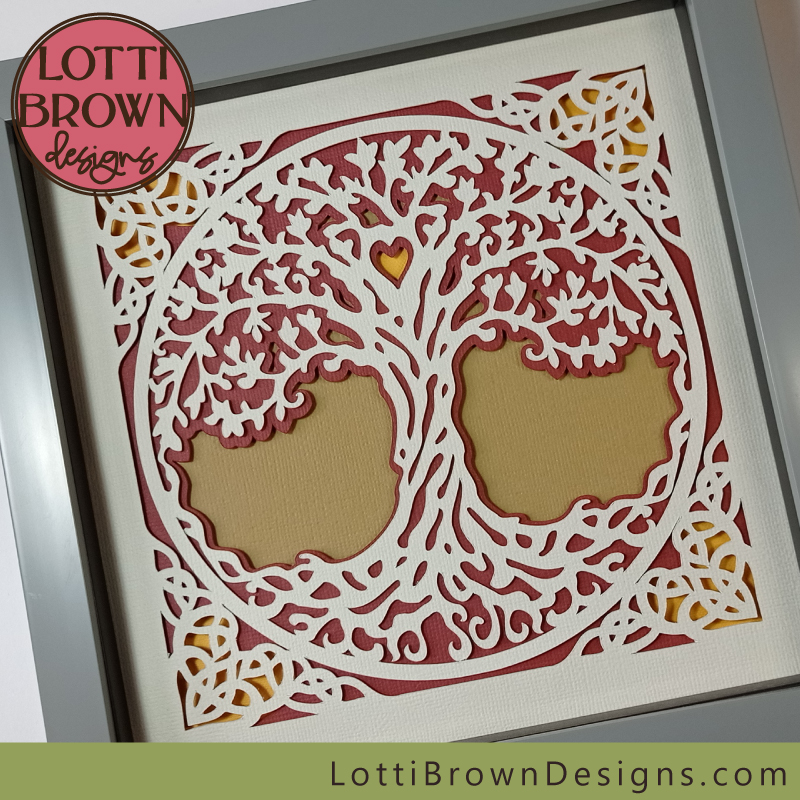 Tree of Life shadow box project
Get inspired for more Cricut craft projects (like this lovely Tree of Life shadow box) on this page here...
Shall we stay in touch..?
Each month, I share stories from my own nature journal, new art from my studio, and simple seasonal inspiration to help you feel more connected with the turning year...
Recent Articles
-
British Nature Folklore Library: Stories, Seasons & Celtic Tree Wisdom
Dec 01, 25 05:09 AM
Explore British nature folklore, Celtic tree meanings, and seasonal wildlife stories. A growing library of myth, meaning, and hand-drawn inspiration. -
Beautiful Art Inspired by Nature
Dec 01, 25 05:04 AM
Beautiful folksy art inspired by nature from the fields and hedgerows of Yorkshire - colourful birds and wildlife with a nostalgic floral touch... -
Birds and Folklore in Britain: A November Nature Journal
Nov 26, 25 04:32 AM
November birds and berries - fieldfares, redwings, lapwings and snow geese with folklore, meaning and nature journal inspiration.
Follow me:
Share this page:


