*** IMPORTANT - I'm retiring my digital files - SVG/PNG/DXF/EPS - and printables from 31st December 2025 ***
*** Please ensure that you have everything you need - files and/or instructions printed off from the website (find them currently in the ARCHIVES section) - by 31st December 2025 as they will not be available after this date ***

Pretty Paper Flower SVG for Cricut
- Home
- SVG files
- Floral SVGs
- Paper Flower SVG

Make a pretty paper flower - SVG for Cricut and other cutting machines, also possible to cut by hand using the PNG file included.
It's easy to make - and you can make the version you need, with or without a stem, depending on the project you're doing.
- SVG, DXF, EPS and PNG file formats
 Easy-to-make paper flower template for Cricut and other cutting machines (or cut by hand)
Get the paper flower template from my store here...
Digital download paper flower template for Cricut and other cutting machines or cutting by hand
SVG, DXF, EPS and PNG file formats
For personal craft use and small-business commercial use (up to 200 products)
For physical/craft products only - no digital products, use, or sharing
Easy Paper Flower SVG for Cricut
I designed this really pretty paper flower SVG for Cricut to be beautiful and easy to make!
- I wanted it to be suitable for beginners to paper flower making
- I wanted it to be able to be made with the cardstock you already have in your crafting stash - I used Sizzix Surfacez cardstock - it should work with any good quality cardstock or paper
- And I wanted it to be able to be easily used with or without a stem
- And I wanted it to be able to made without a hot glue gun - mainly because I don't have one, but also because I know not everyone enjoys having hot glue squirting around at their crafting table
So the flower isn't any particular type of species of flower, it's just a pretty flower that you can use at whatever size you like to brighten up your craft projects and your home.
You can use it without the stem - flat bottomed - to glue onto wall displays, in shadow box frames, onto your craft projects...
 Papercraft flower template - without the stem - leaves included (optional)
Or use it with the stem to display in vases around your home...
 Pretty paper flower template with stem and leaves
 Papercraft flower showing the stem and sepals at the back - these are optional
 Pretty paper flowers displayed in a vase
You can choose how you want to use the flowers - it's easy just to add on the stem at a later date, if you wish...
 Lovely lilac - made from Sizzix cardstock
What You'll Need for the Paper Flower Project
My paper flower tutorial is easy to make, but there are a few things you'll need to make the project successfully...
 Paper flower SVG, DXF, EPS, PNG
You will need:
- My paper flower template (SVG, DXF, EPS, PNG) - if you don't already have that, you can get it from my store right here...
- Paper or cardstock in four different colours - you will need 2 A4-sized sheets for the petals, plus one for all the leaves. You will then need small amounts of card in one or two different colours for the flower centres (I did two different colours but you can use the same colour for both parts if you like). I used Sizzix 'Surfacez' textured cardstock for the petals and flower centres, with Cricut cardstock for the green parts. You can experiment with other types of paper or card to make the flower, too.
- Paper glue (hot glue gun NOT required to make this) - I used a glue stick
- Florists wire to make the stems (optional) - I used two wires per flower, but you might want to use more to make the stems a little sturdier
- Floral wrap (florists tape) (optional) - a waxy tape that we use to wrap around the wires to make the stems
- Moulding ball tools and soft moulding mat (optional) - (also called moulding tool, moulding ball, fondant decorating tool) this is a tool with a round metal ball on the end and a soft mat which helps you to shape the petals for the flower. If you like making flowers, this is very good to have. You can also shape the petals with just your fingers if you don't have the tool.
- Sharp scissors (optional) - to cut the floral wrap
- A way of cutting the template - I used my Cricut Maker machine - you can use other kinds of cutting machines, or also use the PNG to cut by hand.
 Everything you'll need to make your paper flower cut out template
Are you ready? Shall we get started..?
Paper Flower Craft Tutorial
If you would like to print these paper flower SVG for Cricut instructions, please use the 'Print' buttons on the page (top right of the page and at the bottom of the content).
This will create a print-friendly version for you and you can also deselect any parts of the page that you don't need to print.
 Make these pretty paper flowers with me!
So let's get going with our paper flower SVG for Cricut and other cutting machines...
We'll be making a pink paper flower, as that's the colour I made the template in. You can make whichever colour of flower you like, of course, and you can see that they look really pretty in these pastel colours!
I've made four leaves in the template so that you can have different size options - I think you'll most likely use the larger leaves for the flat-bottomed flower and the smaller ones for the flower with the stem. I just used one small leaf per flower with the stem, so if you don't want to use all the leaves, you don't need to cut them all out. Or you can cut more out for more leaves, if you want. It's up to you!
We'll start from having the template already cut out. If you need any help with getting to that point, check out this page. I also have more help with using a Cricut here...
If you need the measurements for each element of the flower, you can find those here... (look under Easy Paper Flower Template)
 Everything is cut out and ready to go!
We're going to start with making the main flower - so you'll need:
- the 5 petals
- and the two flower centres
You can put everything else (so that's everything that's green, plus the pink circle) to one side for a moment while we concentrate on the main flower...
 Let's start making the main flower...
Shaping the Flower Petals
- Let's start with shaping the petals using the moulding ball tool. I start with the largest petal set and use one of the larger moulding tools.
 Use a large-size moulding tool to shape the larger petals moving to a smaller one as you reach the smaller petals
- What we're going to do is use a little pressure and at the same time bring the ball tool in towards the centre from the edges - this will create a concave shape - we also want to use circular motions at the wide end of the petal - this will round the petal out.
- And lastly, we'll use circular motions in the middle of the five petals to curl the whole shape up.
- I have a video just below to show you what I mean...
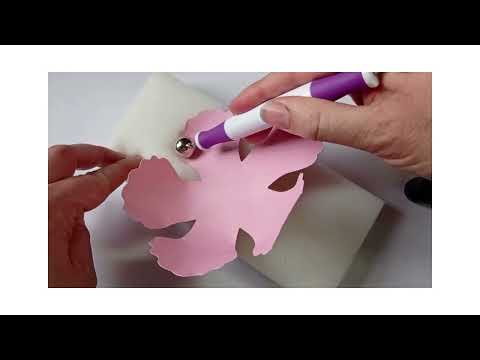
Remember, it's not an exact science - you don't need to replicate these movements precisely to be successful with your flower!
- Don't worry about making creases in the card - creases are what we want! It helps the flower to look more like a real flower that has a 3D shape and bends and creases all over the place!
- If you don't have a moulding tool, you can shape the card with just your fingers. The card is soft and when you bend it, it will take on that shape, so have a look at the shape that my petals have ended up in and just gently curve the cardstock with your fingers to encourage it to take on that curved shape. Again, any creases you might make just add to the effect. You can also use other rounded and hard implements to make the shape, like the back of a spoon, or a smooth knob or rounded handle. Try popping the petal shape into a cup or bowl to create the curved shape it will need. You will need to press the cardstock into shape with your fingers as you do it for the shape to stay with the flower.
 The cardstock has taken on the curved shape of a flower
 Creating the cup-like shape for the paper flower
- We just need to repeat this for each of the five sets of petals until they're all looking curved and flower-like (see the image below)...
- As you progress onto the smaller petals, you'll find it easier to use one of the smaller ball tools if you have them.
 Shape all five sets of the petals
Shaping the Flower Centres
- Now we'll do the two flower centres (see image below) - we'll use the moulding ball tool again for these...
 We'll shape the flower centres next...
- For these, pull your ball tool from the end of each stalk in towards the centre while applying a little pressure - the stalk will stick up as you pass over it. Do each in turn (see images below)...
 Press and move the ball tool from the end of each stalk in towards the centre
 The little stalks will start to stand upright
- Then put your moulding ball into the centre of the shape and make little circular movements (in the centre circle only) - this is the same movement as we did last, in the centre of the pink petals, just on a much smaller scale. This makes the whole shape curve up - see the images below...
 Use little circular motions in the centre of the shape...
 The stalks stand up more and the shape takes on a more cupped or curved appearance
- Repeat this for the second flower centre - see the image below...
 Both flower centres are shaped with the tool
Assembling the Flower Head
- We now have all the parts ready to make the main flower...
 The petals and flower centres are now shaped and ready to build into the main flower
- We'll start with the largest petal set - we'll work down through the sizes in order from largest to smallest, so it's a good idea to get them in order in whatever way you like. I stack them, as you can see in the image above, so that I can make sure I've got them all in the correct order, then turn the whole pile over and pick one from the back (now the top) - this will be the largest one...
- You just need to place this largest petal ready, like you can see in the image below...
 Start with the largest petal set - we'll then work down through the sizes. Just place it ready like this...
- Then, grab the next size down (so we're working on the second-largest set of petals, now), and add glue to the BACK of the petal shape, just in the centre - see the images below...
 Add glue to the back of the second-largest set of petals
 Only add glue to the central part, not down onto each petal
- Glue it down on the largest petal set - like you can see in the image below - take care to line up the petals so that the each petal of the smaller set is positioned between the petals of the larger set, so that you can't see the gaps between the petals...
- Also try and position it as centrally as you can - I'm not very good at this, but I still think my flowers look nice, and I think it does give a bit of variety to the flowers, so don't worry too much if you struggle too, but do give it a good go if you can!
- Push down in the centre to secure the glue.
 Position the petals carefully so that they aren't lined up the same as the petals beneath but instead are set in between the other petals, like this...
- Then, we just need to repeat the process for each petal set in turn, remembering to keep selecting the next size down each time until you reach the very smallest size:-
- Add glue to the back of the petal set
- Position it so the petals fall in-between the ones directly underneath and are fairly well in the centre of the flower
- Push down in the centre to secure the glue
- You should be able to build up your flower in this way so that it looks something like the image below...
 All of the petal sets have now been added and make up the papercraft flower
- Next, we need to add the flower centres, so just add some glue to the back of the largest flower centre (yellow) but just in the centre, not the stalks - see the image below...
 Add glue to the back of the largest flower centre - just in the centre
- Then glue it down trying to get it in the centre of the flower - you can see this in the image below (I could've done a better job of getting it in the centre!!)...
 Try to glue the centre as centrally as you can in your paper flower
- Repeat the process with the smaller flower centre (brown) - add glue to the back (see the image below)...
 Add glue to the back of the brown flower centre...
- Then glue this down in the centre of the larger flower centre - as well as getting it positioned centrally, try and get the little stalks so that they fall in-between the little stalks from the piece beneath - see the image below...
 Glue down with your little stalks falling in-between those from the larger piece, so that it looks like this
- And that's it! Your main flower is now complete. Hurrah!
 Well done, the main part of your paper flower is now complete
If you want just a flat backed flower, you don't need to do anything else with your flower - it's finished. There are different things you can do with your flower if you want, though...
If you want to add leaves to your paper flower, you can use the larger sized leaves from my template to position behind the flower like in the image below - you can glue them to the back of your flower, or to any backing that you might be using, depending on your project...
You can add leaves to the back of your paper flower if you want - three always works well - use the larger sized leaves from your templateYou can also add a stem (and leaves) to your paper flower if you like - see the image below - if you'd like to do that, the tutorial will continue on this page...
 Would you now like to add a stem (and optional leaves) to your paper flower?
If you'd like to add a stem to your paper flower, follow the rest of the instructions here...
If you're not bothered about adding a stem, just enjoy your paper flower now - and decide which colour flower you'd like to make next..?
 A gorgeous lemon-yellow paper flower
 Lovely lilac paper flower
Where to Get the Paper Flower Template
If you've enjoyed reading this paper flower tutorial and would like to make it for yourself, you can get the paper flower SVG for Cricut and other cutting machines from my store at the link right below (SVG, DXF, EPS and PNG file formats included)...
 Paper flower template for Cricut and other cutting machines - also possible to cut by hand
Get the paper flower template from my store here...
SVG, DXF, EPS and PNG file formats
For personal craft use and small-business commercial use (up to 200 products)
For physical/craft products only - no digital products, use, or sharing
The craft tutorial for adding the stem to your flower is here
You Might Also Like:
Lotti Brown's Designs & Templates
How-tos...
- How to use SVG cut files for Cricut (also other cut file formats & machines)
 You might also like these pretty paper daffodils to make!
If you like making flowers, you might also like to make these pretty papercraft daffodils...
I've got more floral-themed SVG files and templates on this page...

Shall we stay in touch..?
Each month, I share stories from my own nature journal, new art from my studio, and simple seasonal inspiration to help you feel more connected with the turning year...
Recent Articles
-
December Berries Folklore in Britain - Rosehips, Holly and Haws
Dec 24, 25 04:35 AM
 Explore December berries folklore in Britain - rosehips, haws, holly, ivy and sloes - with seasonal nature notes, birdlife, and quiet winter magic.
 -
Birch Tree Symbolism, Myth, and Folklore
Dec 23, 25 04:19 AM
 Explore birch tree symbolism, myth, meaning and folklore as part of my Celtic Tree Calendar art project...
 -
British Nature Folklore Library: Stories, Seasons & Celtic Tree Wisdom
Dec 01, 25 05:09 AM
 Explore British nature folklore, Celtic tree meanings, and seasonal wildlife stories. A growing library of myth, meaning, and hand-drawn inspiration.
Follow me:
Share this page: