*** IMPORTANT - I'm retiring my digital files - SVG/PNG/DXF/EPS - and printables from 31st December 2025 ***
*** Please ensure that you have everything you need - files and/or instructions printed off from the website (find them currently in the ARCHIVES section) - by 31st December 2025 as they will not be available after this date ***

Gift Box Template
Craft Tutorial
- Home
- SVG files
- Box Templates
- Gift Box Tutorial

Make it with your Cricut - my gift box template craft tutorial to make a beautiful and sturdy gift box...
 Cricut gift box template craft tutorial - make this pretty gift box
Make this pretty cardstock gift box with your Cricut or similar cutting machine
(can also cut by hand)
Digital download template (get it here) - SVG, DXF, EPS & PNG
For personal craft projects and small-business commercial use (up to 200 products)
For physical (craft) products only - no digital products, use, sharing etc
 Also includes the instructions for the patterned-lid box templates!
Cardstock Gift Box Template Tutorial
This is a beautiful gift box that's easy to make, looks really special, and is a good solid, sturdy construction - I love it and I love making these little gift boxes, it's actually really fun! If you want to find out more about my long history of making boxes in this way, take a look at this main card box making templates page here...
 Learn how to make these beautiful gift boxes
 Make it special with a pop of colour on the inside!
- These are the instructions for making my basic square gift box template PLUS any of the other box templates from my collection here - the basic process and method is the same for all the boxes so they all share these instructions - there is one extra step for the boxes with the patterned (cut-out) lids - so look out for the extra instructions at step 5 (BEFORE we start gluing) if this is you, otherwise everything is the same except one of your pieces has a design cut-out...
- The instructions are long - but I promise that they're not as difficult as they look - they're only long because I've shown you every little step and fold to show you exactly what I mean at each step, as I want you to be able to make it easily - and also have fun!
- These instructions are part 2 of the crafting tutorial showing you how to fold and assemble your gift box template - part 1 shares how to set up the template in Cricut Design Space (you may also find it helpful even if you're using another type of cutting machine) - if you haven't done that part yet, follow the part 1 instructions here, then come back to this page to continue with your project...
- This craft tutorial starts with the pieces from your gift box template all cut and scored, so please make sure you're ready to go and at this point - and if not please check out part 1 which I hope will help you with getting this part done.
- Need the template? Get it from my store here! (Other templates are all here)
 Pieces from your template are all cut and scored and ready to go!
So let's get started...
Gift Box Craft Tutorial
 Make this pretty gift box with your Cricut or similar cutting machine
If you would like to print these gift box template instructions, please use the 'Print' buttons on the page (top right of the page and at the bottom of the content).
This will create a print-friendly version for you and you can also deselect any parts of the page that you don't need to print.
1) Let's start with all your gift box template pieces cut and scored and laid out ready to go - if you haven't got this far yet, follow these instructions to help you...
You will also need:
- Metal rule - or another straight, hard edge to fold against
- Glue stick - or another glue that takes a few minutes to dry fully so that you have time to reposition and restick parts
- Magic tape (sometimes known as 'invisible tape' - or similar tape) - for the boxes with patterned (cut-out) lids only
- Florists ribbon - and sharp scissors to cut and curl the ribbon (optional - to make it look extra pretty)
2) We're going to start by folding along each of the score lines to help us make the gift box. I use a metal ruler to help me do this, so that the folds are sharp and accurate. I'll show you exactly how to do this...
Pick one of the larger pieces (green in this example) - it doesn't matter which piece you start with. Make sure that you've got the piece with the score lines showing upwards. We'll fold along each of the score lines in turn...
I like to start with one of the inner score lines - by that, I mean one of the lines that's around the inner square.
- Line up your metal rule so that the edge of the rule lines up just next to the score line - almost on it, but not quite, just so you can see it right next to the edge of the rule - make sure that the rule extends along both flap parts - see the image below...
 Line up your metal rule along the first score line
- Just fold both of the parts (flaps) upwards against the metal rule, whilst pressing down on the rule and holding it firmly in place with your other hand (see image below)...
- Run your fingers against the underneath of the fold (the underside of the cardstock) to push it against the metal rule to firm up the fold edge a little more.
 Fold the first flap against the metal rule
- That's the initial fold done - so let's move onto the next one...
- I like to move outwards towards the edge from this initial fold - you can see this in the image below - please note that whereas the first fold was for both the large and small flaps, this fold is only for the larger flap - there's no score line on the smaller flap here.
- Just fold it upwards in exactly the same way, holding the metal rule firmly in place, and then firming against the rule with your fingers from the underside of the cardstock.
 Making the second fold
- Brilliant - then we're going to move outwards one more time and make the same folding actions against the furthest edge flap (see image below)...
- Fold the edge upwards against the rule, then firm from underneath.
 Folding the small edge up
- That's one side done, so I'll leave you to continue this same process for the folds on each of the rest of the four sides (see image below which shows starting on the second side)...
 Starting the folds along the second side
- When you've made all your initial folds on your green square, your cardstock should look something like the image below.
 Folds all completed on the first green square
3) Now, we're going to go back and firm up each of those folds - this time without the metal rule.
- Let's start at one of the inner folds again, just like we did before (that's one of the folds that form the square shape in the centre of the cardstock).
- This time, fold your fold back on itself so that it looks like the image below - run your fingers along the fold, squeezing it to firm it up (if this seems difficult, you can fold it forwards first, just to firm up the fold a bit more before you start)...
- Again, remember this one is for both flaps!
 Fold your fold back on itself
- Then, fold it fowards again, again running your fingers along the fold and pressing/squeezing to firm up the edge - see the image below...
 Fold your fold forwards again and firm up with your fingers by running them along the edge of the fold
- So then, just move outwards to the next fold out - do the same with this fold (this is just the one flap, remember)!
- Fold back on itself, firming the edge with your fingers (see image below)...
 Fold along the second fold in the same way - backwards and then forwards, firming as you go
- Then fold forwards again, and firm the edge again (see image below)...
 Repeated folding makes the fold edges sharper and more flexible
- Then, we do the same with the third fold on this side - folding back on itself first and firming along the edge with your fingers (see image below)...
 Work on the third fold next
- Then, folding it forwards again, while firming along the edge with your fingers - see image below...
 Work that fold!
- Yep! You guessed correctly! Now continue with this folding around all the sides - don't worry, you get faster as you get used to the movements and you'll find you actually get round quite quickly...
- Fold backwards and firm the edge with your fingers...
- Then fold forwards again - and firm along the edge one more time
- When you're done with all this folding, the piece should look a lot like the image below...
 Your piece should look like this when all the folding is done
4) So that's one of the green squares ready! The other one's looking rather flat - so it needs some folds too...
 One done and one to fold
- Work around the folds of this next square in exactly the same way (steps 2 and 3 in the instructions above)...
- First, fold each fold up against the metal rule, firming from beneath as you go - do all the folds with the metal rule before moving onto the next step below...
- Then (without the metal rule) go through each of the folds again - fold back on itself and firm with the fingers - then fold forwards again and firm along the fold again...
- When you're done, you should have two squares with the folds all ready, like in the image below...
 Both pieces now have the folds all completed and ready for the next stage!
5) Now, it's onto the fun bit! We're going to start putting the gift box template together, so that it will end up looking like a little box and not a folded piece of cardstock!
Are you ready?
First, take a quick check of the box below as if you're making one the templates with a patterned cut-out lid, this is an extra step for you - everything else is exactly the same...
If not, jump straight on to the instructions beneath the green box.
Are you making a box with a cut-out patterned lid?
Are you making the daisy gift box? Then click here now for your instructions for how to get the daisy in the lid. I'll prompt you from that page to come back to the main instructions when you're ready.
If you're making one of the gift box templates with the cut-out patterned lid (find them here), this is a special part of the instructions, just for you...
This is how we get the coloured insert into the lid - we do this bit before we start any other gluing!
If it's your first time making the box, you might prefer to make the other part of the box first (the base) and them come back to the lid with the pattern, just to make it easier to follow the instructions the first time and have your piece looking exactly the same as my photos...
- You will have three smaller square inserts (instead of two) - take them now, and put them together to see that two are larger (for the lid) and one is smaller (see image below). We're going to use one of the larger ones now...
 Use one of the larger insert squares for this step
- Using magic tape (sometimes called 'invisible' tape) or similar, just tape the square of card to the BACK of the piece with the cut out pattern/design. Line it up nicely inside the central square, like in the image below.
- If the square of card has a nice side and a back side, it should have the nice side facing down at this point and the back side facing up.
- Use a small amount of tape to stick it in place on each side - note the amount of tape I've used on the sides in the photo below - no tape stretching the length of the sides, please, just a little bit will do...
 Use magic tape to tape the square to the back of the patterned lid so that it sits in the central square
- Turn it over to show the design - see the image below...
 With the backing piece now in place, we're ready to carry on following the main instructions...
- Now, just continue with the main instructions - you can just glue over the magic tape in the next step, below - it won't affect the results.
The instructions continue here...
- Use a glue stick or other glue that doesn't stick firm straight away and gives you a little bit of time to reposition the parts (this is important as we're going to unstick a bit as part of the making process).
- Spread glue around all the folded edges - that's everything except the square in the middle - we're working, now, on the BACK of the cardstock - so if you've got a nice side of the cardstock, it's NOT that side, it's the other side.
- No need to put glue on heavily or go right up to the edges!
 Glue around all the edges on the BACK of the square - everything except the central square
6) Now, onto the folding! Start with any side and:-
- Fold along the middle fold of the three folds, to create the side (wall) of the box - the two parts should stick together, so just run your fingers all along the length of the piece to make sure they stick - BUT...
- On this first piece only, leave the back end of the strip unstuck (so in the image below, that's the bit behind my thumb (on the left of the image as you look at it)...
- Also, don't stick down the little flap that will go onto the base of the box (that's the central square)
 Glueing and folding the first strip to make the side of the gift box
- Next, we need to make the fold at the corner joint (between my thumb and forefinger in the image below) - so just fold this little flap inwards - ultimately it's going to make a right angle corner, you'll see how we do that in the next step...
 Fold in the little flap to start making the first corner
- It's best to have the project flat on your work surface for this next bit...
- Lift the next side up vertically and then stick your little flap onto it like in the image below...
- Try and get everything at right angles if you can - the angle between the side and the base - and the corner angle (no need to be perfectly precise or measure anything!)
 Stick the first flap onto the next side at a right angle (while holding the side up vertically to get it in the correct position)
- Then, fold the upper part down over the bit you've just stuck down, pressing with your fingers along the whole length to stick along the whole of this side wall of the box (including the corner flap on the fight-hand side)...
- It should look something like the image below
- Don't stick the bottom flap down yet (on the base of the box)
 Folding to complete the second side of the box
- Repeat this to form the third side:-
- Bend the edge over to form a corner
- Raise the third side vertically - and stick the flap to it
- Fold over the upper part of the side to create the side wall - and press along the length to stick down
- Don't stick the flap to the base just yet!
- It should look something like the image below - starting to look like a proper little box now!
 Making the third side of the little box
- Repeat again to create side 4:-
- Bend the edge over to form a corner
- Lift up the fourth side vertically - and stick the flap to it
- Fold over the upper part of the side to create the side wall - and press along the length to stick down
- Don't stick the flap to the base just yet!
You'll notice the final flap is still sticking out - we'll deal with this next...
- Unpeel the edges of the first side (that you, hopefully, didn't quite stick down) to create a little space where we can tuck in the final flap (don't worry if it starts lifting other parts slightly - this is to be expected)
- It should now look something like the image below...
 Unpeel the edge of the first side to create a space to tuck in the final flap
- Then, you guessed it, just tuck in the flap so that it's nicely in between the two surfaces of your folded edge - so in the image below, I just need to push it in a little more - you'll feel when it slots into place...
 Tuck in the final flap - you'll feel when it slots into place
- Now, you can tidy up these final sides and press to stick the parts together so that they form a nice firm wall/side of your box - see image below...
- You can press down the base flaps too, now, so that they are stuck down too
 Stick down the final corner and sides
- One final job is to pinch each of the corners between your fingers to straighten up the corner - try to get it as close to a right angle as possible - see the image below...
") Pinch and form each of the corners to get them into a right angle (as close as possible)
Pinch and form each of the corners to get them into a right angle (as close as possible)- Then, run and press your fingers along each of the sides, too, to straighten each of those edges up, also - your box should end up looking something like the one in the two images below...
 The box is complete (well, this part, anyway!)
 Base or lid of the gift box
7) Guess what? You get to do it all over again for the other half of your gift box...
If you've got a patterned lid box and you chose to do the base part first, don't forget to go back to those specific instructions to create your lid!
- Add your glue to the outer edges of the gift box template, leaving the central square unglued - see the image below...
 Glueing the second half of the gift box
8) Now, repeat the steps in point 6 (above) for this half of your box:-
- Fold over one side
- Bend at the corner
- Lift the next side and stick the flap on to create the corner
- Fold the side over and stick down over the flap
- Bend the next corner - etc etc
- When you get to the final corner, lift the sticky a little from the first side, and tuck the flap under before sticking everything down
- Pinch and firm the corners and straighten the sides
Soon, you'll have both halves of your gift box completed - just like in the image below...
 Both halves of the gift box template are now completed - and ready for that final step!
9) There's just one final step to complete the gift box template - and that's to add the contrast-colour insert into each half - this hides the glued edges beneath and also gives a lovely pop of colour when you open the box (if you don't want this, you could easily do them the same colour as the box)...
- Take the two little squares (red in this example) and hold them together to see that one is slightly smaller than the other (see image below)
 Look at your two small squares to see that one is a little smaller than the other
- You'll notice that one of your box halves is also slightly smaller than the other
- The smaller one is the gift box base and the larger one is the gift box lid
- The smaller square (of course) goes with the small box half and the larger square goes with the larger box half - see the image below...
 Match up the squares and the halves of the boxes so that the smaller square is paired with the smaller half of the box (and vice versa)
- Now, just add glue to the back of each of the squares (see image below)...
 Add glue to the back of each of the squares
- And pop them into their corresponding half of the box, firming down to stick well - see the image below...
 Glueing in the box inserts
Your gift box template really is now complete! ...unless you're making the gift card box - if that's you, you can find the instructions to finish the box with the gift card insert here...
 Completed gift box - made with Cricut
 Underneath of the gift box
 DIY gift box made with my Cricut Maker
Are you making the gift-card box?
If you're making the gift-card box, please find the last little bit of your instructions here....
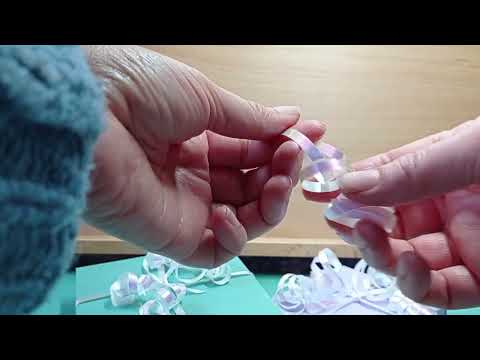
- 10) For the finishing touch, add some florists ribbon!
 Present your gift box with some beautifully curled florists ribbon
To curl your ribbon:-
- Cut a length of ribbon and hold one end in your left hand (or right hand if left handed) - have the shiny (nice) side facing up and the underside of the ribbon facing down
- Open a pair of sharp scissors fully and hold them open (with your other hand) with the inside of the lower blade against the underside of the ribbon
- Press the thumb of your right hand (or left hand if left handed) on the ribbon so that you can feel the scissor blade beneath (be careful!)
- You will need to press together your thumb and scissor blade (again - careful! - it may take practice to get the pressure right - increase pressure gradually to avoid accidents)
- Then, keeping the ribbon taut, pull your thumb/scissors fast along the whole length of the ribbon - it should curl up tightly
- Repeat if the results aren't quite curly enough
 Beautiful gift boxes made at home
I hope you love your new little gift box!
If you'd like to make this gift box, you can get the basic square gift box template from my store here (SVG, DXF, EPS, PNG)...
If you'd like to see more gift box templates, you can look on this page...
If you would like to print these gift box template instructions, please use the 'Print' buttons on the page (top right of the page and at the bottom of the content, just below).
This will create a print-friendly version for you and you can also deselect any parts of the page that you don't need to print.
You Might Also Like:
Lotti Brown's Designs & Templates
How-tos...
- How to use SVG cut files for Cricut (also other cut file formats & machines)
Need a card to go with your gift? I've got lots for all occasions here...


Shall we stay in touch..?
Each month, I share stories from my own nature journal, new art from my studio, and simple seasonal inspiration to help you feel more connected with the turning year...
Recent Articles
-
Birch Tree Symbolism, Myth, and Folklore
Dec 23, 25 04:19 AM
 Explore birch tree symbolism, myth, meaning and folklore as part of my Celtic Tree Calendar art project...
 -
British Nature Folklore Library: Stories, Seasons & Celtic Tree Wisdom
Dec 01, 25 05:09 AM
 Explore British nature folklore, Celtic tree meanings, and seasonal wildlife stories. A growing library of myth, meaning, and hand-drawn inspiration.
 -
Beautiful Art Inspired by Nature
Dec 01, 25 05:04 AM
 Beautiful folksy art inspired by nature from the fields and hedgerows of Yorkshire - colourful birds and wildlife with a nostalgic floral touch...
Follow me:
Share this page: