*** IMPORTANT - I'm retiring my digital files - SVG/PNG/DXF/EPS - and printables from 31st December 2025 ***
*** Please ensure that you have everything you need - files and/or instructions printed off from the website (find them currently in the ARCHIVES section) - by 31st December 2025 as they will not be available after this date ***

Gift Card Box SVG Template
- Home
- SVG files
- Box Templates
- Gift Card Box SVG

Gift card box SVG template to make with your Cricut or similar cutting machine - present your gift-card gift in style in a smart box that makes it feel like a really special present!
- Get the crafting instructions on this page!
 Make this smart gift card box so you can present your gift card like a beautiful gift!
Get your gift card box template from my store here
Digital download for a DIY gift card box to make with your Cricut or similar cutting machine
SVG, DXF, EPS, and PNG file formats
For personal craft use and small-business commercial use (up to 200 products)
For physical/craft products only - no digital products, use, or sharing
Gift card not included
Gift Card Box SVG Template
 Gift card box template
I created my gift card box SVG template to be a really lovely way of handing over your gift-card gift, so that your loved one has something to unwrap on their special day - and the gift feels really special, too!
The template is based on my basic gift box template (that you can see here, with lots of different designs and patterns here) - the template is designed to be of strong construction so that it can stand up to the rigours of gifting - but it's still nice and easy to make!
This one, though, is sized especially for a standard-sized gift card, and has a special insert inside for the gift card to slot inside - see the image below...
You can also slide in receipts or a note under the gift card, in this special insert, if you want to include these discreetly in your gift.
 Gift card box with special insert for the gift card to slot inside - gift card not included
As you can see, it also has a contrast-colour insert inside the lid, that makes the box feel that little bit extra special. I actually include the insert inside the base, too, so that if you decide you don't want to use the gift card insert, or your recipient takes the insert out, your gift box will still look attractive.
Your gift card box SVG template used as-is in Cricut Design Space will make a box that's around 12.5 x 8 x 2 cm in size (that's approximately 4.92 x 3.15 x 0.79 inches). This is the size that fits a standard-sized gift card (credit card size) that's around 8.5 x 5.4 cm (3.34 x 2.13 inches).
Made at this size, your template should cut onto three A4-sized cardstock sheets - two of one colour (lid and base) and one of another colour (inserts).
 Easy box for gift card
 Showing the underside of the box
 DIY gift card box with gift card insert (gift card not included)
- The gift boxes I made, that you can see on this page, are all made from Sizzix 'Surfacez' textured cardstock (mainly from the 'muted colours' pack).
- I cut the gift card box SVG template with my Cricut Maker using the Medium Cardstock setting
 Present your gift card box tied up with a curled florists ribbon to make it look extra special
DIY Gift Card Box Instructions
The gift card box template uses the same basic process as all my gift boxes on this page - so all of the gift boxes do share the same basic instructions. There are some slight differences - for example, this one has the gift card insert that the square boxes don't - so I'll draw your attention to these differences when you need to know and if necessary direct you to the extra instructions that are just for this part - and then direct you back again, of course - I won't leave you stranded!
The main thing that you need to know about this template is that it's a 'cut and score' project - this means that as well as cutting out the shape, we will get the cutting machine to add in the score lines as well, to help us fold in the right places.
Most cutting machines have a scoring tool or scoring function that you can use to make the score lines. If not, or if you prefer not to use it, you will just need to delete the score lines in your cutting machine program and score by hand using a blunt point such as a knitting needle and metal rule (you might prefer to draw the lines in lightly with a light pencil to guide you).
The lines that need to be scored are coloured red in the image below - you will need to set them to 'score' in your cutting machine program - and then make sure they're 'attached' or associated with the relevant shape.
If you're a Cricut user, I have the instructions you need to do this on this page - even if you're not using a Cricut, I think you might find it useful to guide you through your own program and understand what needs to be done...
BUT WAIT! I have all the instructions you need below, so take a read through them first, and I'll guide you through each step to help you make up your gift card box!
 Cut file template for the gift card box - SVG, DXF, EPS, PNG
Instructions for Your Gift Card Box Template
First read through everything in this box, then start working through the points - look out for the prompts in the instructions that will guide you through to the next part!
If you need the measurements for each element, they're in this section. Make sure you're looking at 'gift card boxes' and not just 'gift boxes'.
1) Set up the cut file in your design programme:
- 'Ungroup' the elements so that you can work with them separately.
- Select the red lines that you can see in the image above and set them all to score - do NOT set the short blue lines on the pink gift-card insert to score, these need to cut, so just leave them alone in this step and they'll cut okay.
- 'Attach' all the loose lines to their associated shapes - the red score lines and the blue cut lines.
- If you're a Cricut user, the full instructions for this are on this page - you will have an extra pink shape and some extra score lines at the top of the layer list - you can see these in the image below. If you initially just scroll down and ignore these, you can continue with the main instructions and I'll share with you the specific instructions for these parts later on, on that page - just look out for the pale green box with the extra instructions in. (Even if you're not a Cricut user, you will likely find these instructions helpful for your own machine program.) Follow the instructions for setting up the file here!
 These top elements are the extras for the gift card box template
2) Folding and assembling your gift card box SVG template:
- Your gift card box uses the main instructions for folding and assembling the main part of the box - the box, lid, plus the base insert and lid insert - your parts are rectangular rather than square, but the assembly process is just the same, so go ahead and follow the instructions on that page...
- You do have an extra part of the instructions which will help you to fold and assemble the gift card insert, which is the part you'll insert the gift card into - this step is right at the end of the process, so just when you think you've finished, I'll direct you across here to follow the extra instructions which are just below...
Instructions for Making the Gift Card Insert
These are your instructions for the extra gift card insert for the gift card box SVG template - you should already have assembled your gift card box, complete with the coloured inserts in the base and lid, so your starting point should look something like the image below...
If not, please return to the main instructions to finish, and look out for your prompt to come back here at the end for this final special step...
 If your gift card box looks something like this, you're ready for the final step
- You should have one final piece of cardstock to create with now - a rectangle with a slit in one end and a tab on the other. This will make the gift card insert for your box.
- Use your metal rule to fold up the cardstock along each of the four score lines, just like in the image below - lift the card up and just run your fingers on the underside of the fold to firm it against the straight edge.
 Use your metal rule to fold the cardstock up, along each of the four score lines
- Then fold along each of the folds, backwards and then forwards again to create the crease nicely in the cardstock, firming and squeezing with your fingers as you go each time, to firm up the fold and the edge.
- We'll fold it over so that the nice side of the card is on the outside - and the tab meets up with the slit, as you can see in the image below...
 Fold your insert so that the nice side of the cardstock is showing on the outside, and the tab meets the slit, like this.
- Then all we need to do is to slide the tab inside the slit, so it looks like the image below - there's no need to glue it, although you could put a dab of glue or magic tape on the inside if you wanted.
 Fit the tab into the slit, like this - no need to glue!
- Now, just pop the insert into the base of the box, like this - see the image below. The base of the box is the slightly smaller of the two, so pick that one.
- It might be a little bit springy when you first put it in, so just take a couple of minutes to just gently settle it in place, making sure each of the corners are pushed down - and then push the centre edges down gently so that it stays in where it should and doesn't spring out again. I found that once I'd got it settled in, it didn't keep popping back up again.
 Pop the insert in the gift card box and gently push it down to settle it in place
- And finally, slot your gift card into the slots like in the image below. If you've got receipts or you want to pop in a little note, you can slide this into the space underneath the gift card.
 Pop your gift card into your completed presentation box
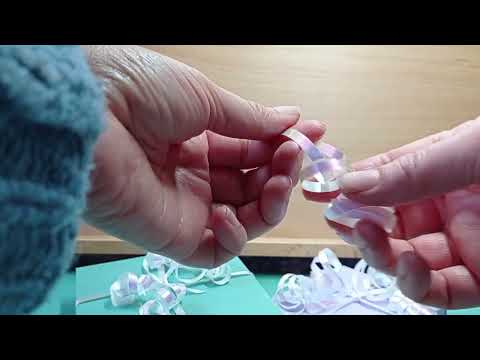
 With a flourish of florists ribbon, your DIY gift card box is ready to gift!
When you've added the lid and a final flourish of curled florists ribbon, your DIY gift card box is ready for you to gift!
 Gorgeous DIY gift card boxes - made with Cricut
If you need some help with curling the ribbon, take a look at the video below where I show you how to hold the florists ribbon against an opened pair of sharp scissors and your finger and pull to create the curl - this only works with florists ribbon - and if your ribbon has a shiny side and a flat side, make sure you hold the scissors against the flat side.
 Beautiful boxes make gorgeous gifts!
How to Get Your Gift Card Box SVG Template
If you liked reading about this DIY gift card box project, you can get the cut file template to make the box with your own cutting machine - SVG, DXF, EPS, PNG - just check out the link right below...
 Gift card box template
Get your gift card box template from my store here
SVG, DXF, EPS, PNG file formats included
Ideal for Cricut & similar cutting machines - also possible to cut by hand
For personal craft projects and small-business commercial use (up to 200 products)
For physical (craft) products only - no digital products, use, or sharing
Gift card not included
You Might Also Like:
Lotti Brown's Designs & Templates
How-tos...
- How to use SVG cut files for Cricut (also other cut file formats & machines)
 Greeting card templates
You might also like my collection of card templates - loads of occasions catered for and I'm adding more all the time...
And my growing library of different gift box templates - here!

Shall we stay in touch..?
Each month, I share stories from my own nature journal, new art from my studio, and simple seasonal inspiration to help you feel more connected with the turning year...
Recent Articles
-
December Berries Folklore in Britain - Rosehips, Holly and Haws
Dec 24, 25 04:35 AM
 Explore December berries folklore in Britain - rosehips, haws, holly, ivy and sloes - with seasonal nature notes, birdlife, and quiet winter magic.
 -
Birch Tree Symbolism, Myth, and Folklore
Dec 23, 25 04:19 AM
 Explore birch tree symbolism, myth, meaning and folklore as part of my Celtic Tree Calendar art project...
 -
British Nature Folklore Library: Stories, Seasons & Celtic Tree Wisdom
Dec 01, 25 05:09 AM
 Explore British nature folklore, Celtic tree meanings, and seasonal wildlife stories. A growing library of myth, meaning, and hand-drawn inspiration.
Follow me:
Share this page: