*** IMPORTANT - I'm retiring my digital files - SVG/PNG/DXF/EPS - and printables from 31st December 2025 ***
*** Please ensure that you have everything you need - files and/or instructions printed off from the website (find them currently in the ARCHIVES section) - by 31st December 2025 as they will not be available after this date ***

Never Ending Card Cricut Instructions 1
- Home
- SVG files
- SVG Card Templates
- Never Ending Card Cricut Instructions
Never ending card Cricut instructions - this tutorial is to help you use your never ending card template in Cricut Design Space, setting it up correctly to cut and score...
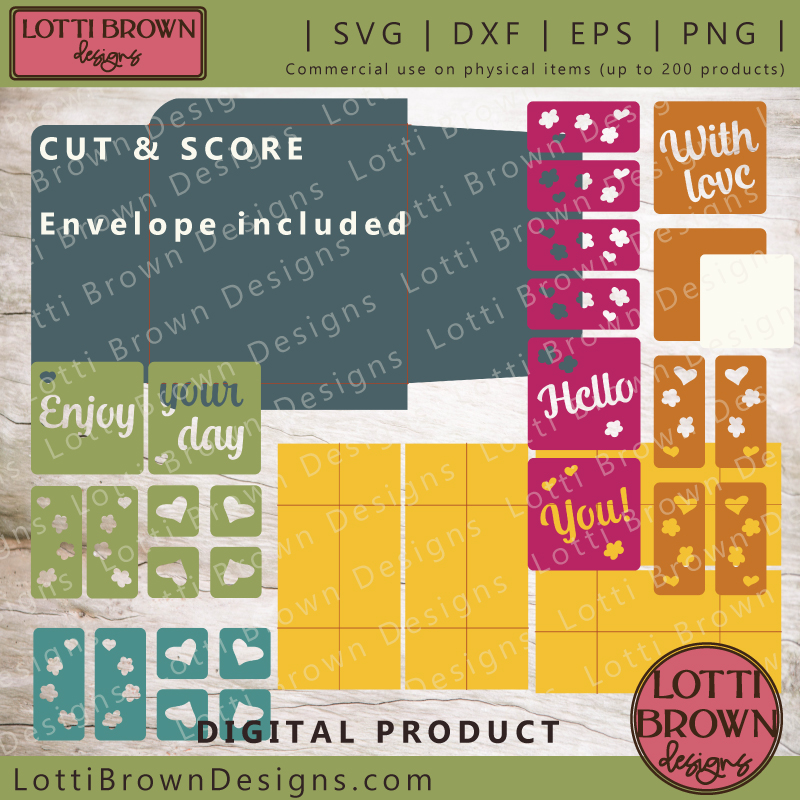 Cut file digital template for never ending card
This page is part 1 of the full instructions for making this never ending card with a cutting machine, such as Cricut. This part of the instructions is specific to Cricut Design Space, but if you're making the card with another cutting machine, the instructions may help you understand how to set up the files in your own cutting machine programme.
The other two parts of the full instructions are to do with making the basic card (pt 2) and then decorating the card (pt 3), so they can be used by any cutting machine user, or even if you decide to cut the template by hand.
You will need this template to use these instructions - it's available to download from my store here...
If you'd like to find out more about the never ending card and a little bit about how it works before you start, as well as think about the materials you might like to use, take a look at the page here, and then come back to this page to continue with the tutorial...
If You're Not Using Cricut Design Space
If you're not using Cricut Design Space to make your never ending card, you will need to know that some of the lines in the cut file need to be scored...
These are the thin red lines on the envelope and on the yellow rectangles, shown below...
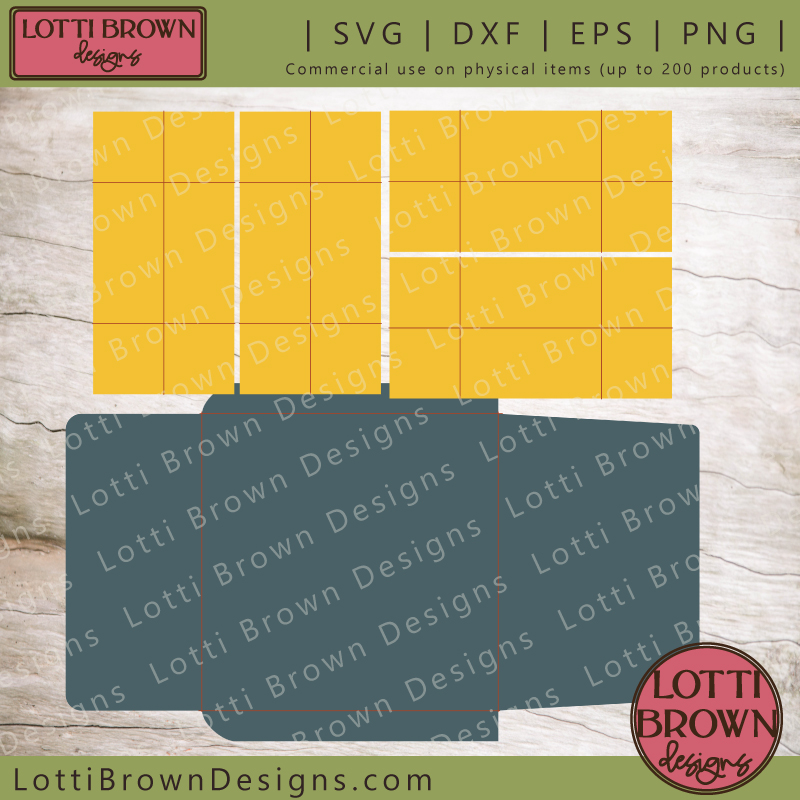 The red lines show the score lines for the project
You will need to set up your files in your cutting machine so that these lines score and don't cut (they will default to cut if you don't change anything). Please refer to your cutting machine's help pages if you need help with this.
If you're a Cricut user, this page will give you a step-by-step instruction showing exactly how to set everything up, so keep reading...
If you want to score your lines manually, please delete these lines using your cutting machine's program. You can score the lines manually with a knitting needle (or similar) and a metal ruler.
- The score lines for the envelope go from corner to corner around the central square of the envelope.
- The score lines on the yellow rectangles are in the centre of the rectangle lengthwise, and the same distance from either edge. In my template, that's 3cm (1.9 inches).
If you need them, you can get all the measurements for the template on my page with help for using the files (look in the section about using the card templates).
N.B. The PNG will print with the score lines included.
Never Ending Card Instructions for Cricut Design Space
The thin red lines (on the envelope and on the four yellow rectangles) are score lines - these need to be set to score in Cricut Design Space, or they default to cut and will likely ruin your project.
If you're confident you know how to do this, please go ahead, set them to score, attach them to their relevant element, and send your project to cut and then proceed to the next part of the tutorial, assembling the card - if you're at all unsure, please go through the instructions with me, step by step, here - and I'll show you every step you need to get it right...
Please don't be put off that the instructions are very long - that's just because I've photographed every tiny step so that you don't get stuck - there's nothing very complex to do, as long as you just follow the steps as I've set them out.
The page also has a print function that you might find useful to help you follow the steps.
Getting started
- Open up Cricut Design Space and upload the never ending card template in the usual way - if you need help with that, look here... (opens in a new window)
- When the file is open in the program, and you can see it in the design area, you're ready to start following the instructions, below...
- The first thing we need to do is to 'Ungroup' all the elements of the file (see the image, below...)
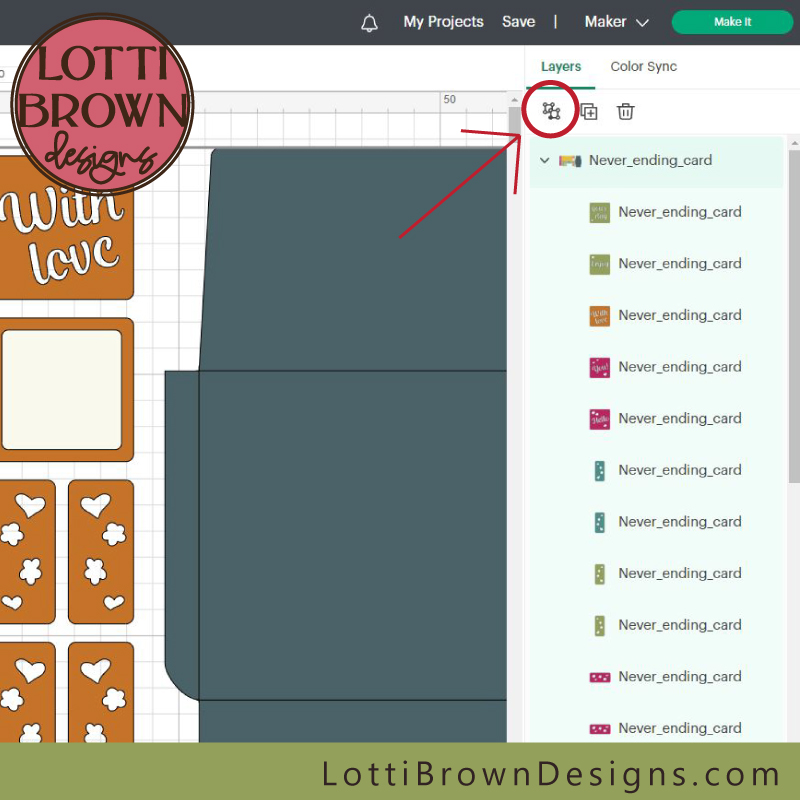 First, 'Ungroup' all the elements of the file
The envelope
- Then, we need to scroll right down to the bottom of the layers panel on the right, so that we can concentrate on the envelope element and its accompanying score lines (see the image below...)
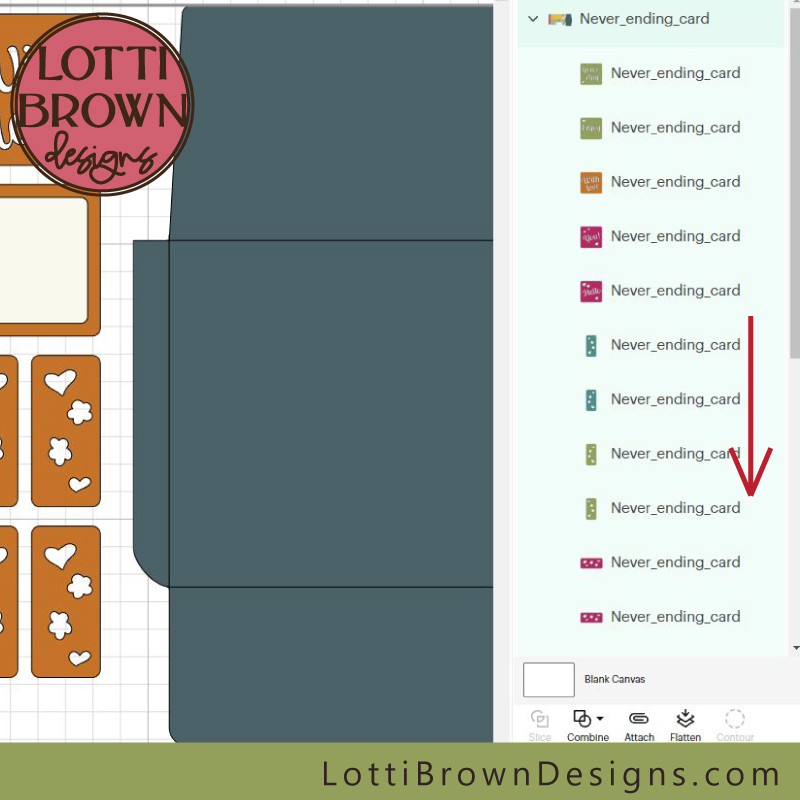 Scroll right down to the bottom of the layers panel
- What we need to do is select each of the lines that need to be score lines - there's four on the envelope shape (plus 3 each on each of the yellow rectangles) - so let's start with the score lines for the envelope.
- The lines you want are the four lines above the envelope shape in the layers panel (I always position my score lines above the shape they go with) - see them pointed out in the image below. You can select each score line individually if you want, but it's easier to select a few at a time - you can do this by selecting the first one, then holding down your Shift key while you select the others.
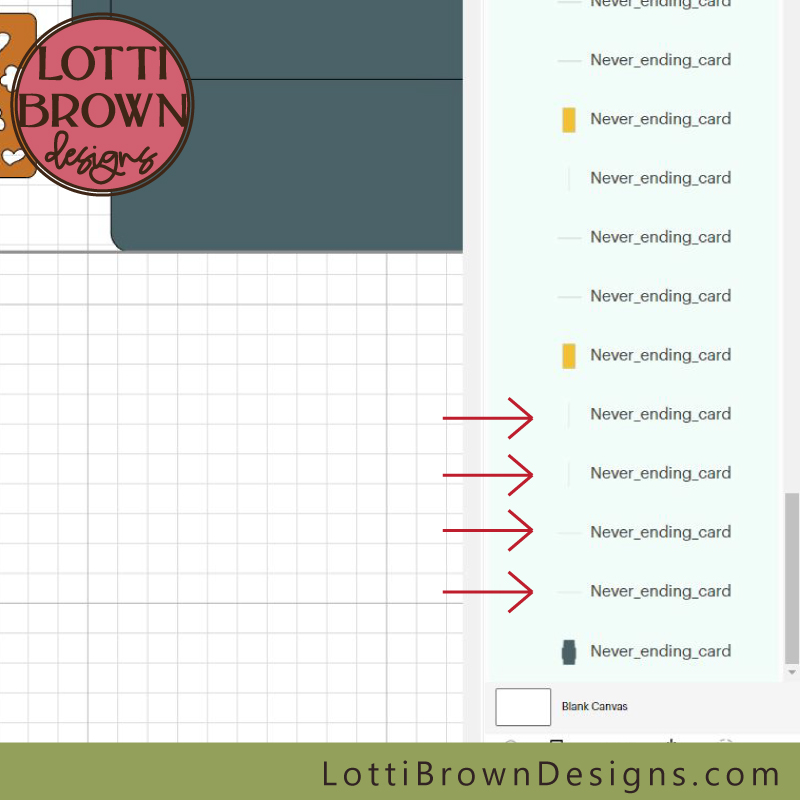 Select the four score lines that go with the envelope
- Now, we set them to 'Score' - do this by using the drop-down menu under 'Operation' (top left) and selecting 'Score' (see the image below...)
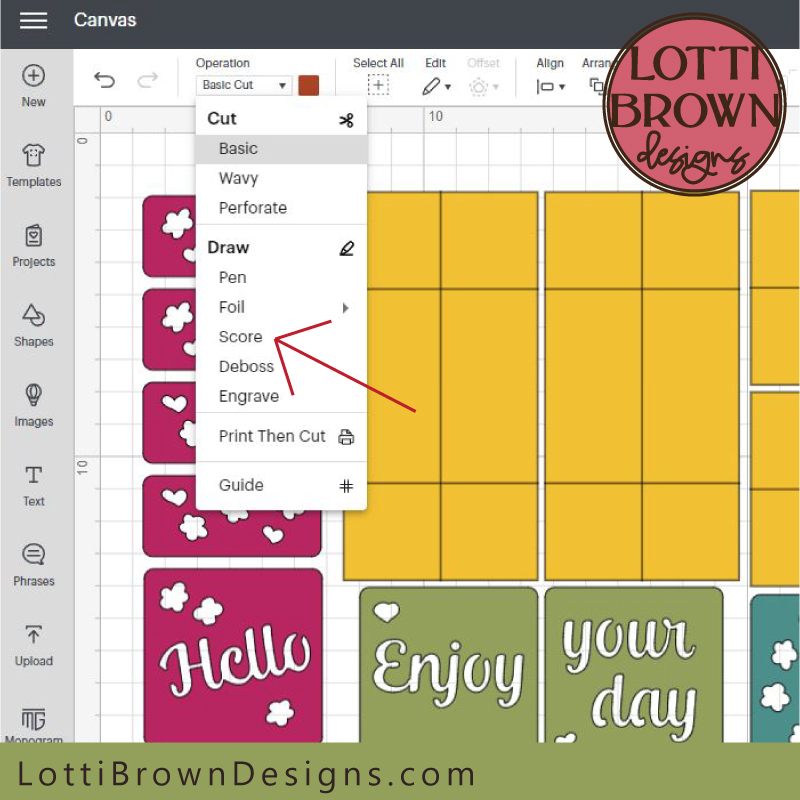 Set the lines to score
- Now, we need to tell the Cricut what we'd like to score the lines onto - it's the envelope shape, of course. We do this by attaching the score lines onto the envelope shape.
- To do this, select each of the four score lines PLUS the envelope shape - and then, press the 'Attach' icon (at the bottom) (see the image below...)
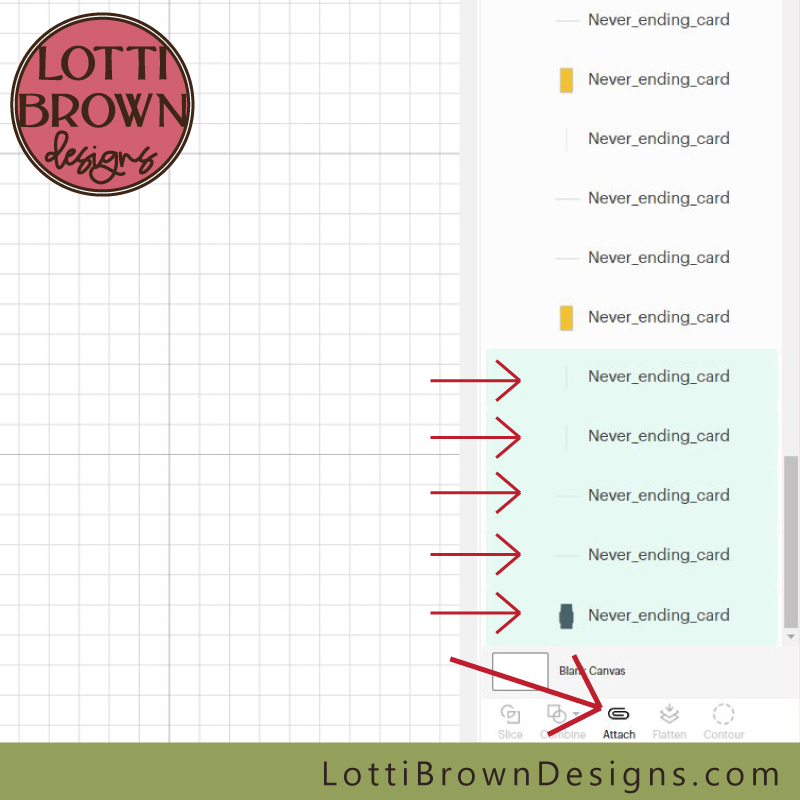 Select all four score lines plus the envelope and 'attach'
- Once 'attached', the whole envelope grouping will shoot to the top of the layers panel. We can check it out, it should say 'Attach' with the score lines and the envelope below, all inset into one group (see the image below...)
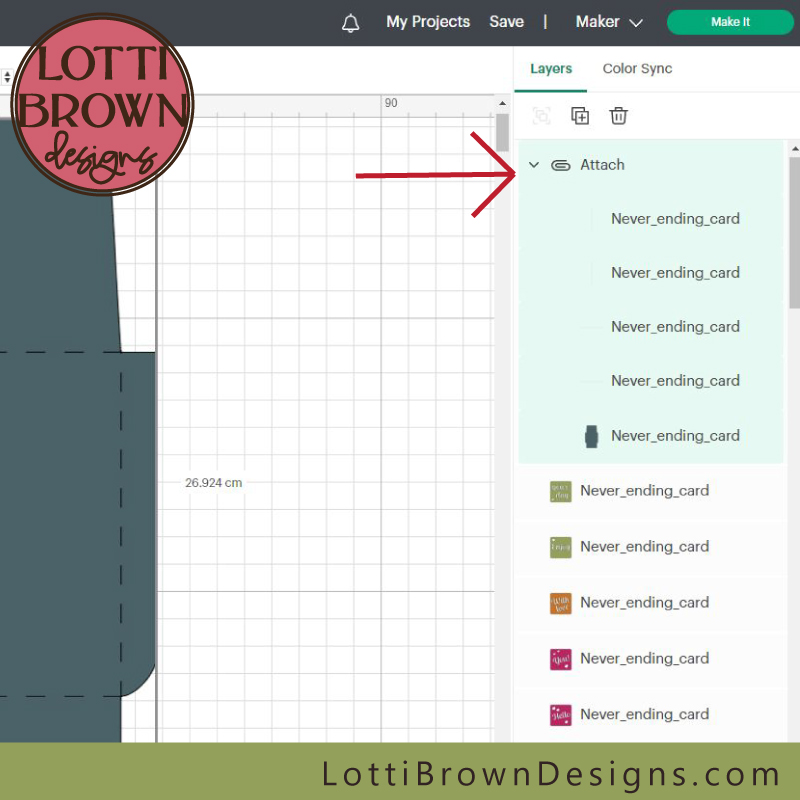 The group is now 'attached' and puts itself at the top of the layers panel
Yellow rectangle 1
- Next, we need to scroll right back down to the bottom again, as we're going to set the lines to score and attach them for each of the four yellow rectangles. I work from the bottom rectangle each time.
- So now, let's select the THREE lines that go with the bottom yellow rectangle (see the image below...)
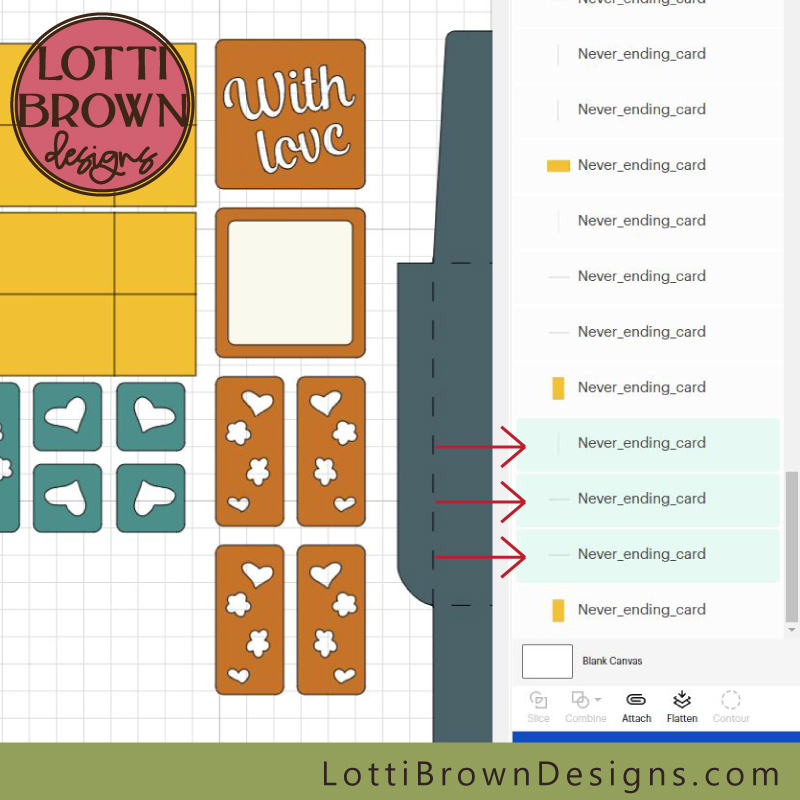 Select the three lines that go with the bottom yellow rectangle
- And then set them to score, just like before (see the image below...)
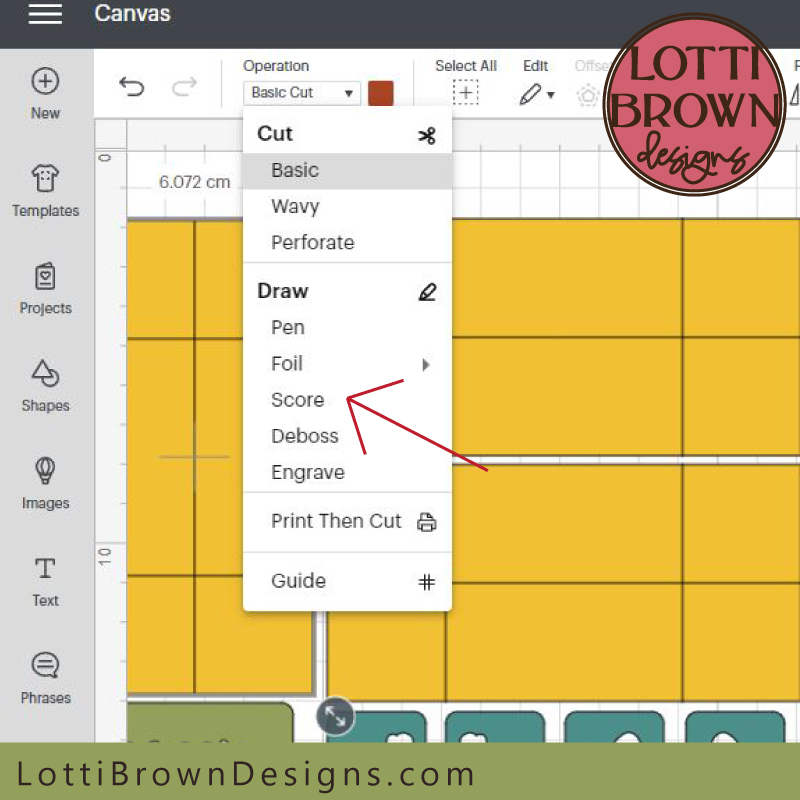 Set the lines to score
- Then select all three lines PLUS the yellow rectangle right at the bottom (remember that I put the score lines on top of the shape they go with in the layers panel)...
- When they're all selected - 'Attach' (see the image below...)
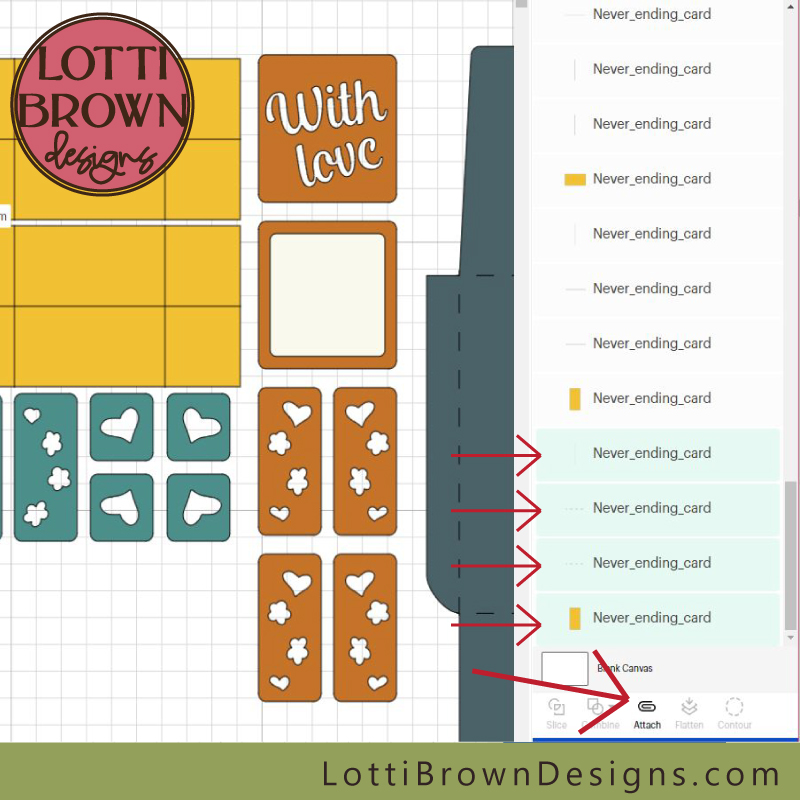 Select the three score lines and attach them to the bottom yellow rectangle
- Once again, this grouping will shoot to the top of the layers panel - we can check it there, to make sure everything looks good - three score lines attached to one yellow rectangle cut.
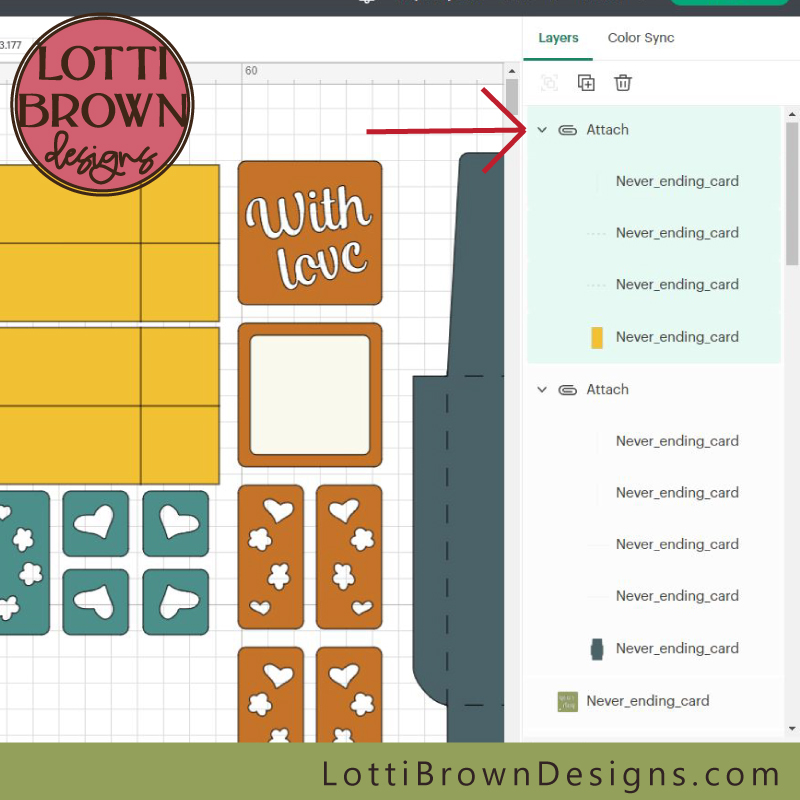 Check the attached grouping
Yellow rectangle 2
- There are four yellow rectangles in total, so we've got three more to do. Let's scroll back down to the bottom of the layers panel and get started on the next one, right at the bottom...
- Select those three lines above the bottom rectangle that are going to be score lines (see the image below...)
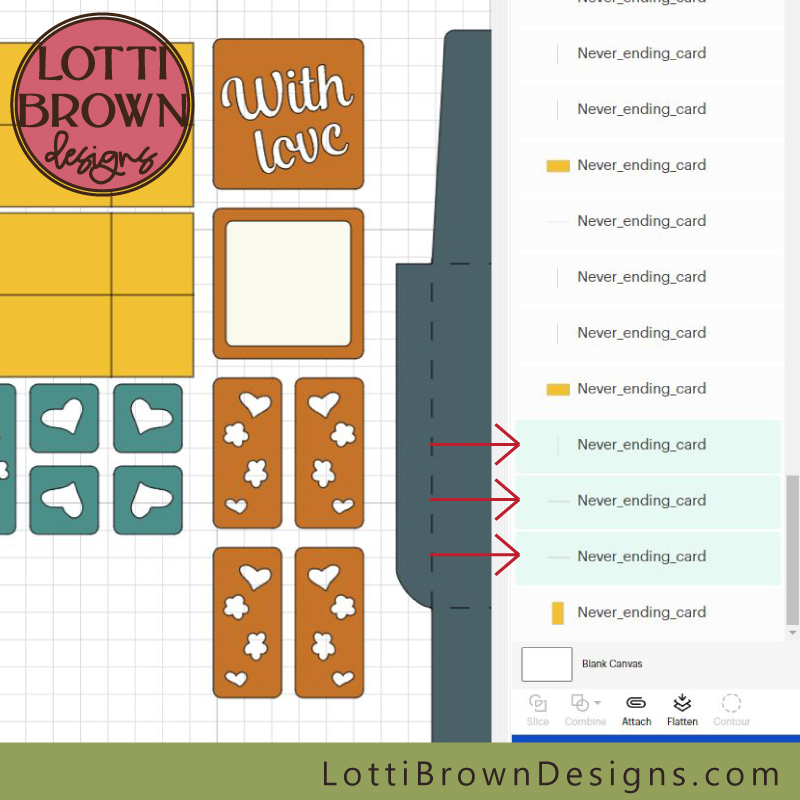 Select the three lines to make into score lines
- With the lines selected, click on 'Score' (see the image below...)
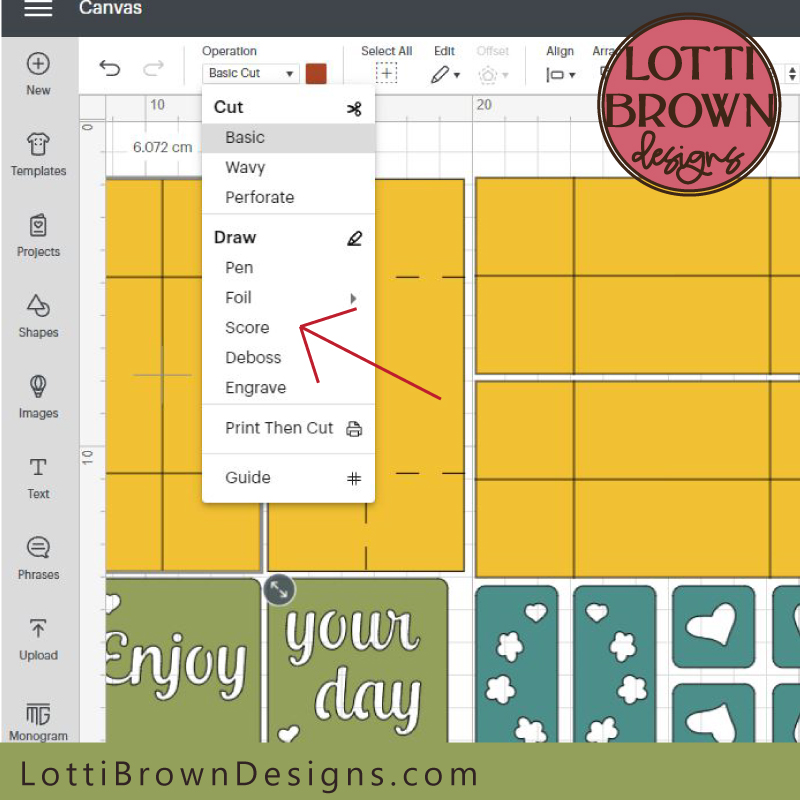 Click on 'Score'
- Then, go back across to the layers panel and select the three lines PLUS the bottom yellow rectangle - and press 'Attach' to group them all together (see the image below...)
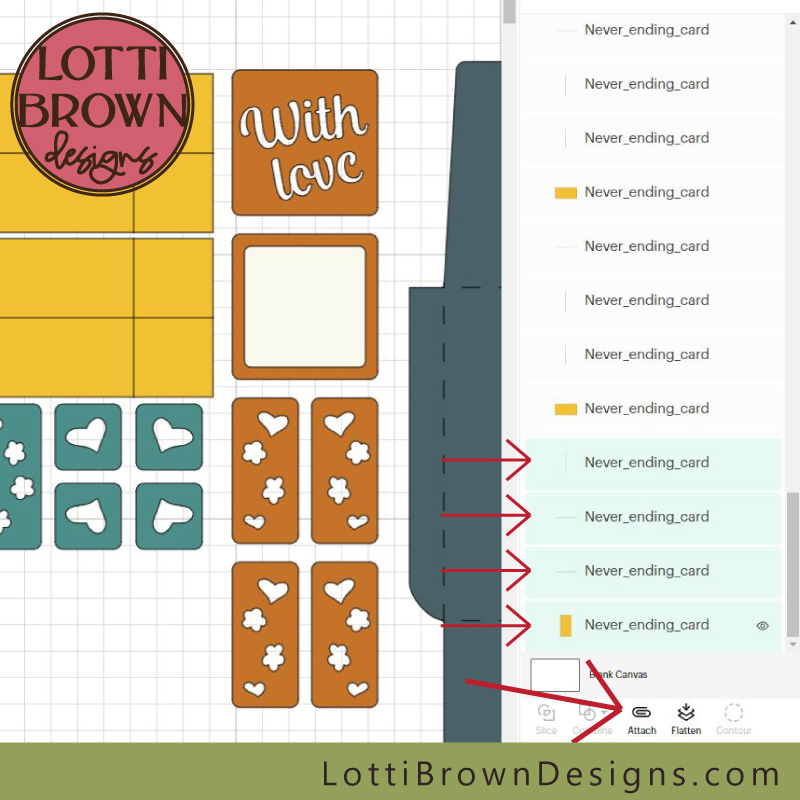 Select the lines and rectangle and 'attach' them together
- The grouping we've just made now shoots to the top of the layer panel - so we may as well check it there (see the image below...)
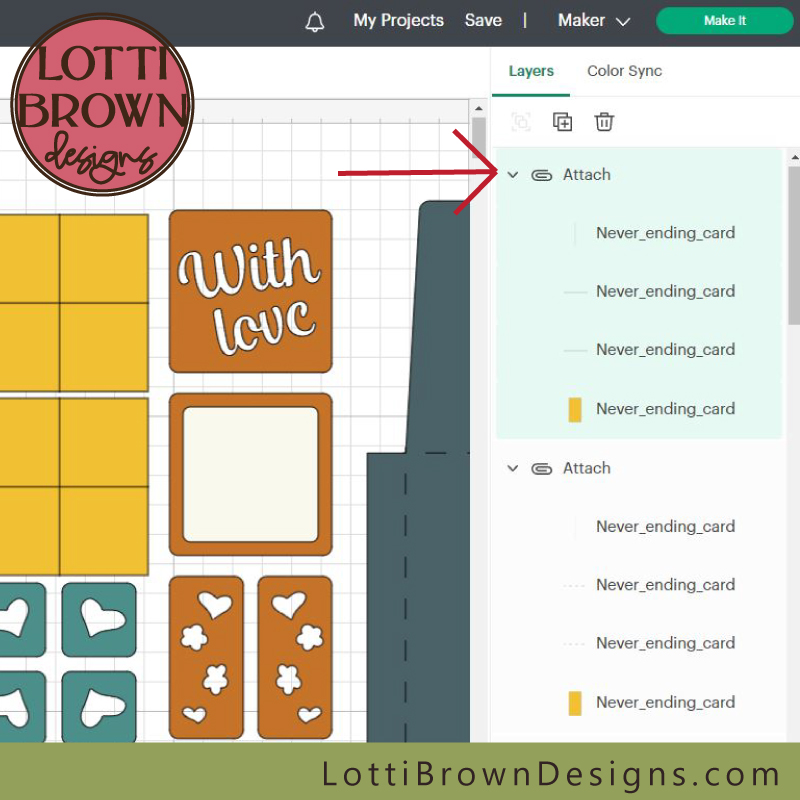 Take the opportunity to just check the attachment grouping for this second yellow rectangle
- If you look across at the yellow rectangles in your design area, you will be able to see that the two tall rectangles have dashed lines showing they're set to 'score'. The two wide rectangles still have solid lines (still set to cut) so we'll deal with those next...
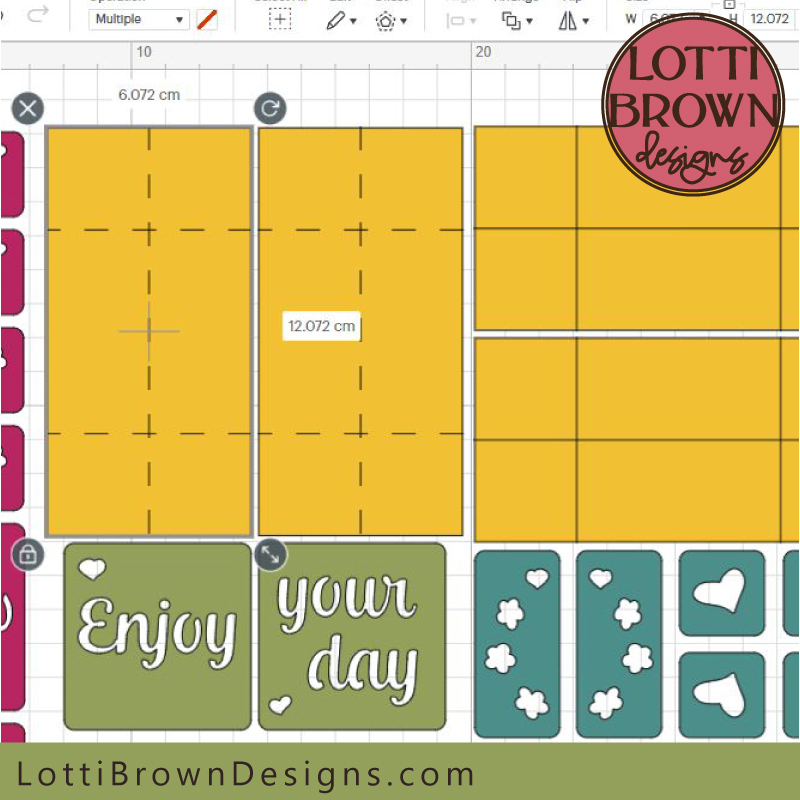 Yellow rectangles showing score lines
Yellow rectangle 3
- We do, of course, need to scroll right back down to the bottom again - and we need to select the three lines that are to go with the bottom yellow rectangle - those are the three right above it (see the image below...)
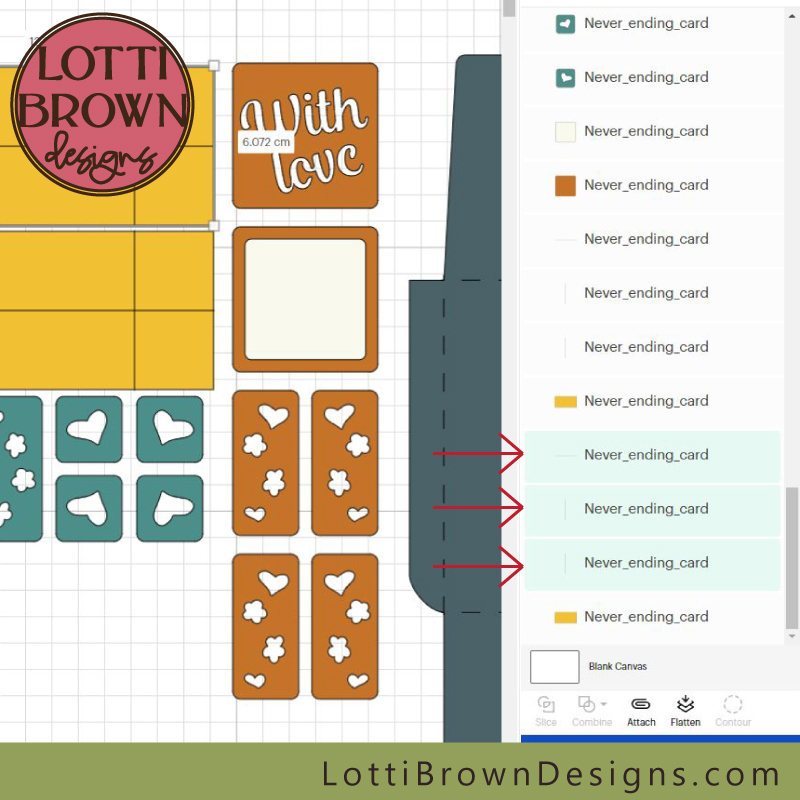 Select the three lines that go with the next rectangle
- And set them to 'Score' (see the image below...)
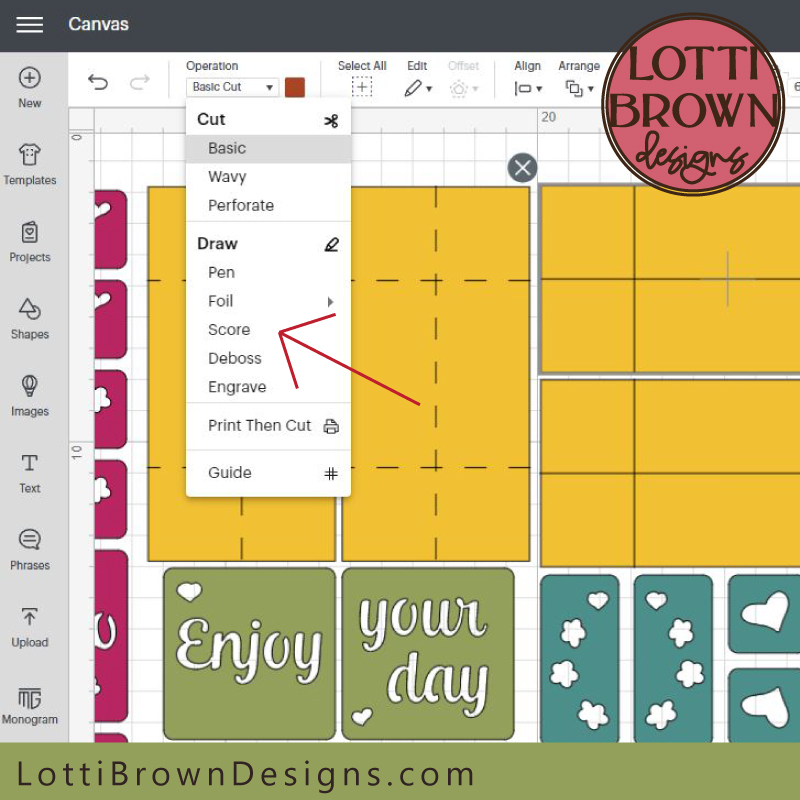 Set to 'score'
- Now select all three lines together with the bottom yellow rectangle - then click on 'Attach' to attach them all together in one grouping (see the image below...)
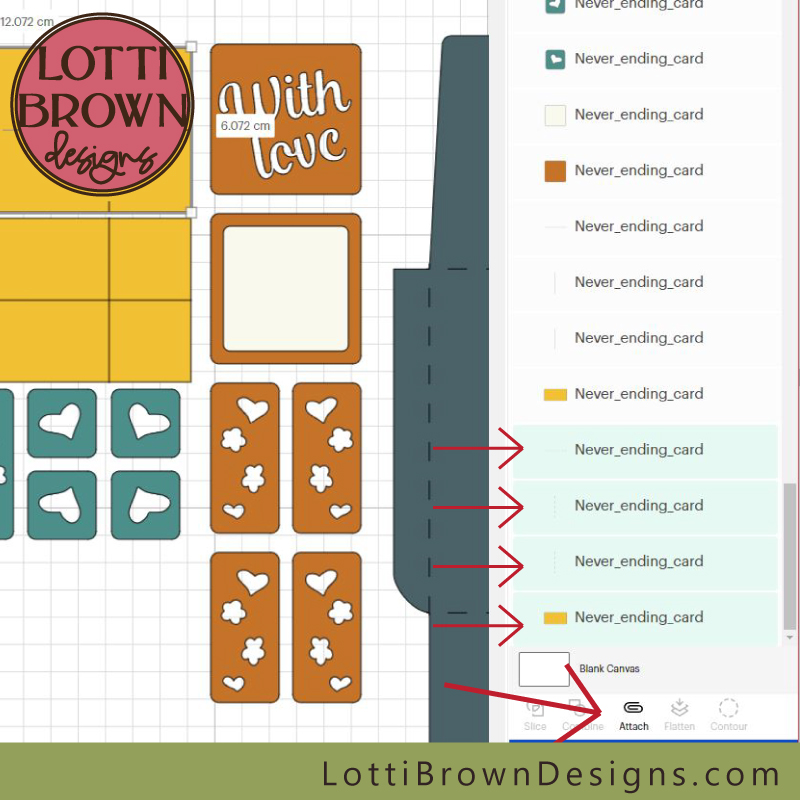 Select and attach the score lines for the third rectangle
- And of course, the grouping now takes itself right to the top - so we can check it there (see the image below...)
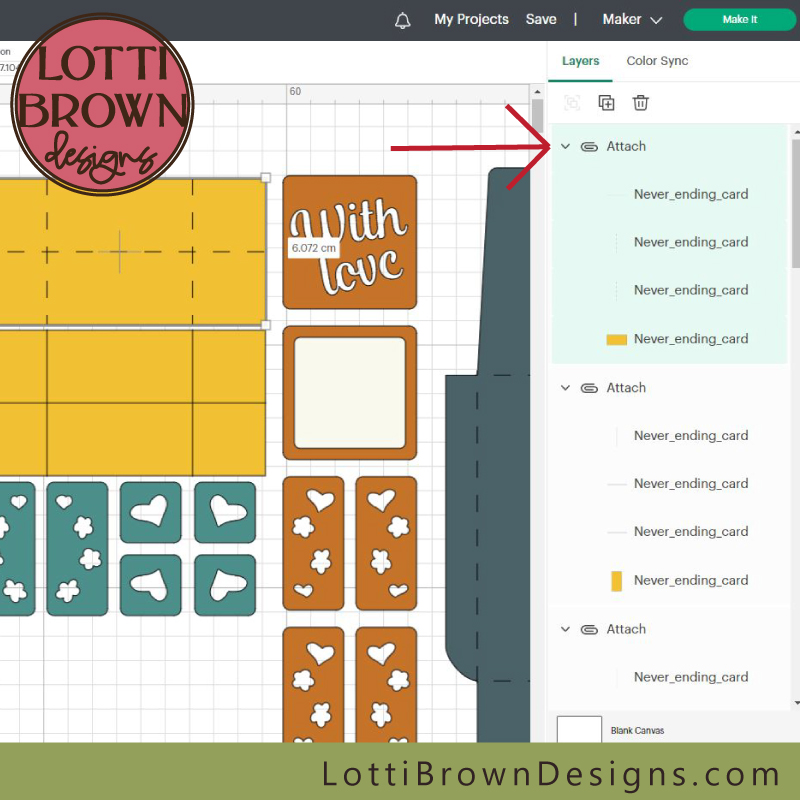 Check the attachment group
Yellow rectangle 4 (last one)
- So now, it's right back down to the bottom again to deal with the fourth (and last) yellow rectangle. Select the three lines just above the bottom rectangle (see the image below...)
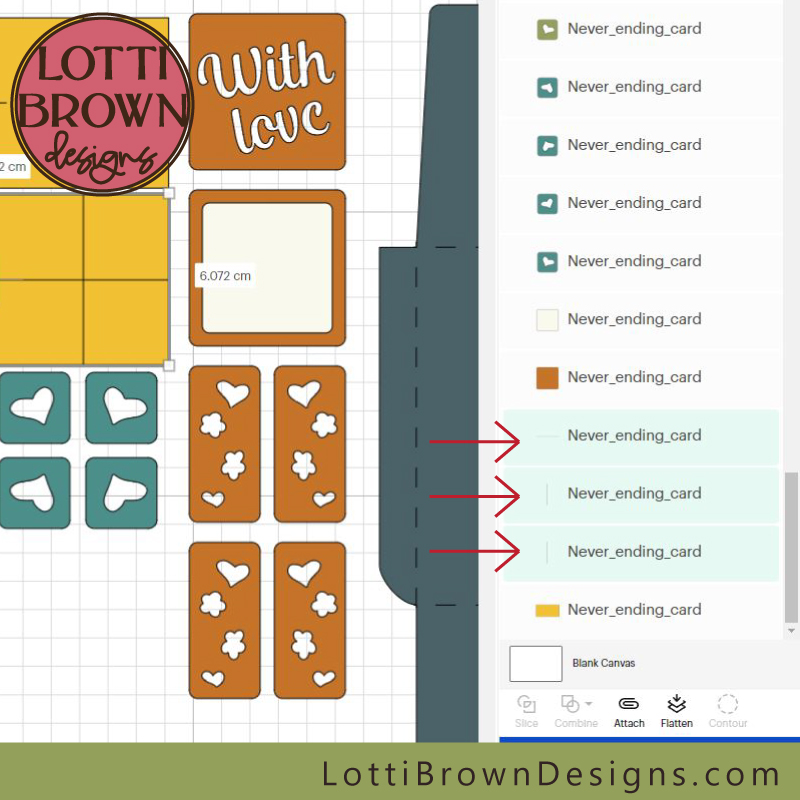 Select the final three lines to score
- Click 'Score' (see the image below...)
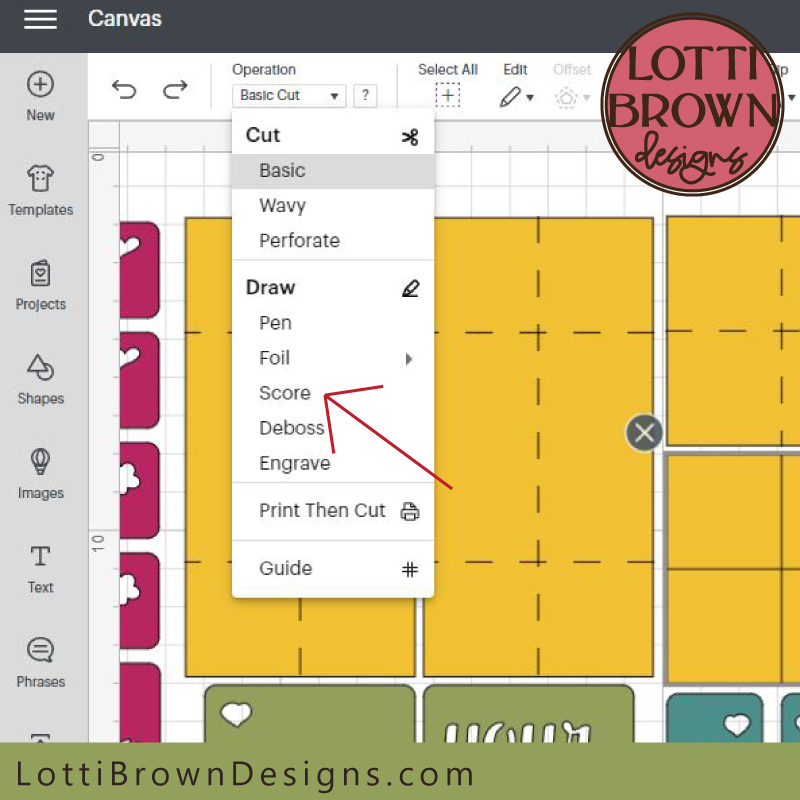 Click on score for the final time
- Then click to select your three score lines, PLUS the bottom yellow rectangle - and click on 'Attach' to make them into a grouping (see the image below...)
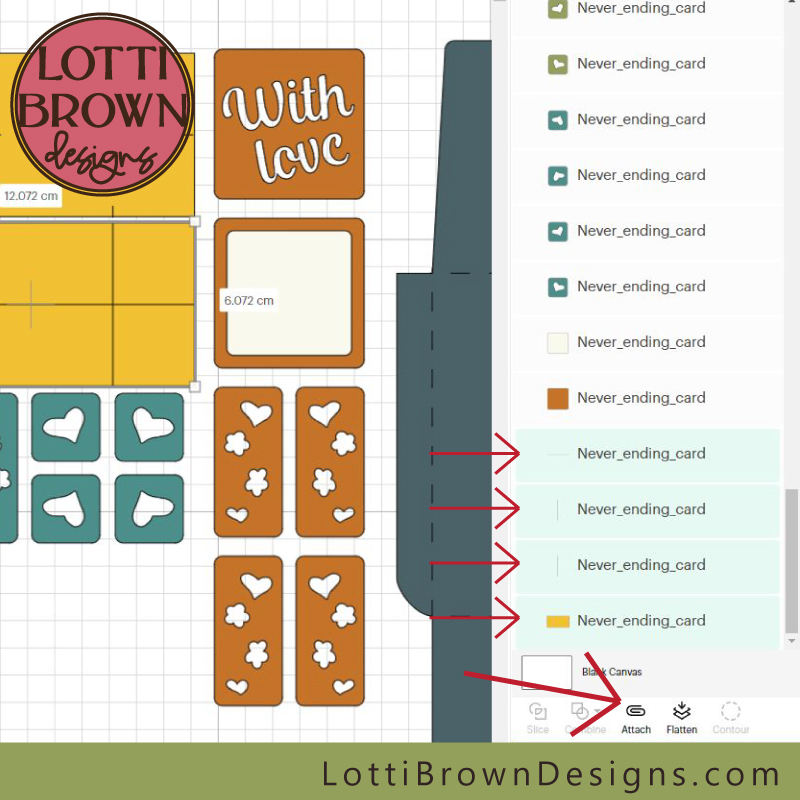 Select and attach to make a grouping for the final yellow rectangle
- The last grouping has found itself at the top of the layers - so just take a second to check everything looks right there (see the image below...)
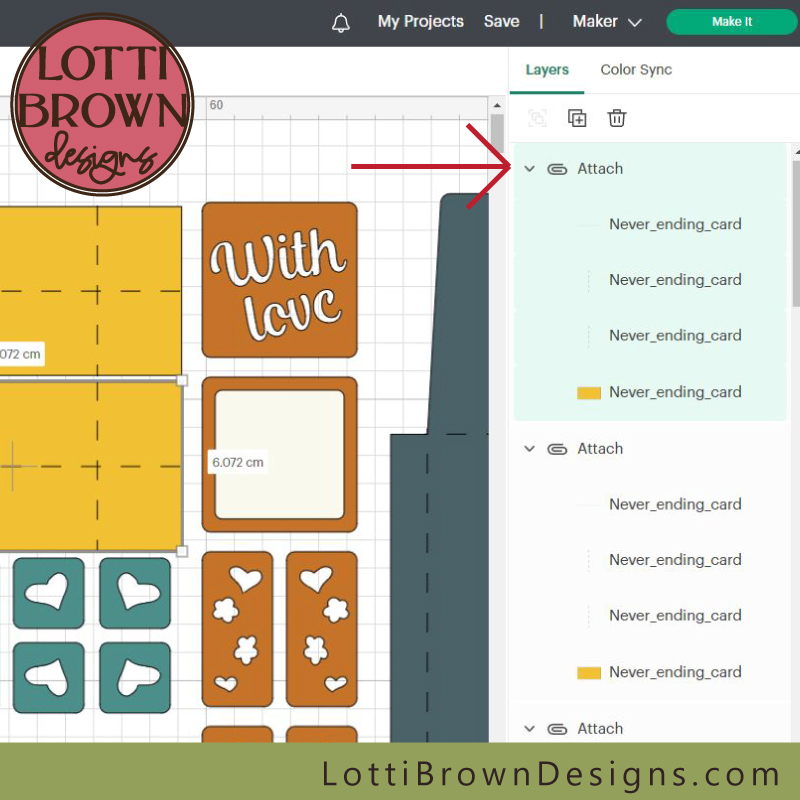 Check the final grouping looks correct
Visual Check
- You've done several checks as we've worked through the instructions (with a couple more to come still) - but here's another one for you. I just see it as another chance to make sure nothing's gone awry or been missed before we move onto the next part...
- We're just checking that all the lines on each of the yellow rectangles are set to score - this is shown by the dashed line (rather than a solid line) (see the image below...)
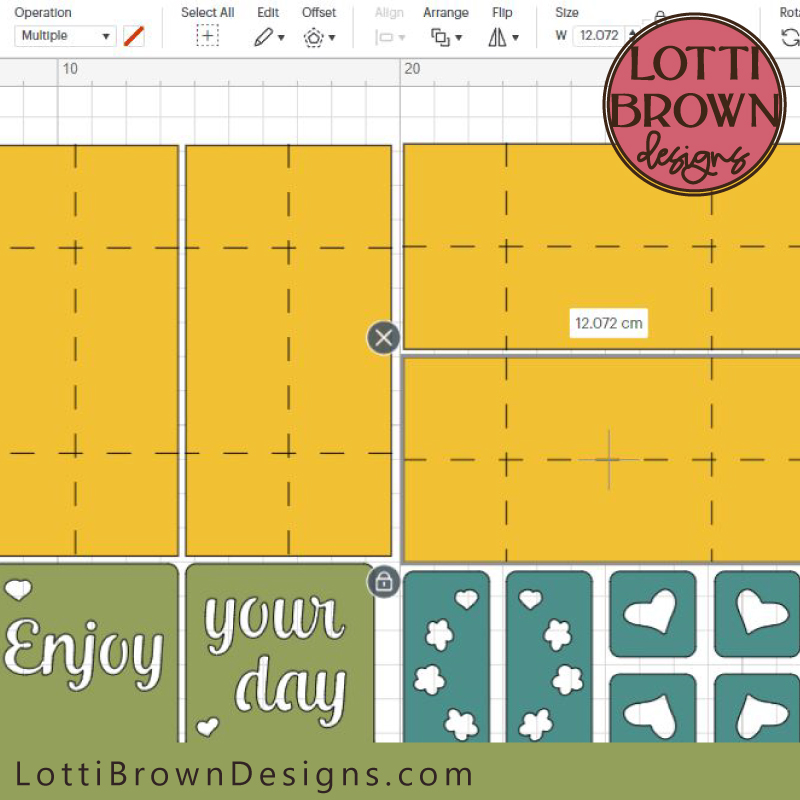 Check that all the lines on the yellow rectangles are set to score (dashed)
- We can also check the same for the score lines on the envelope (see the image below...)
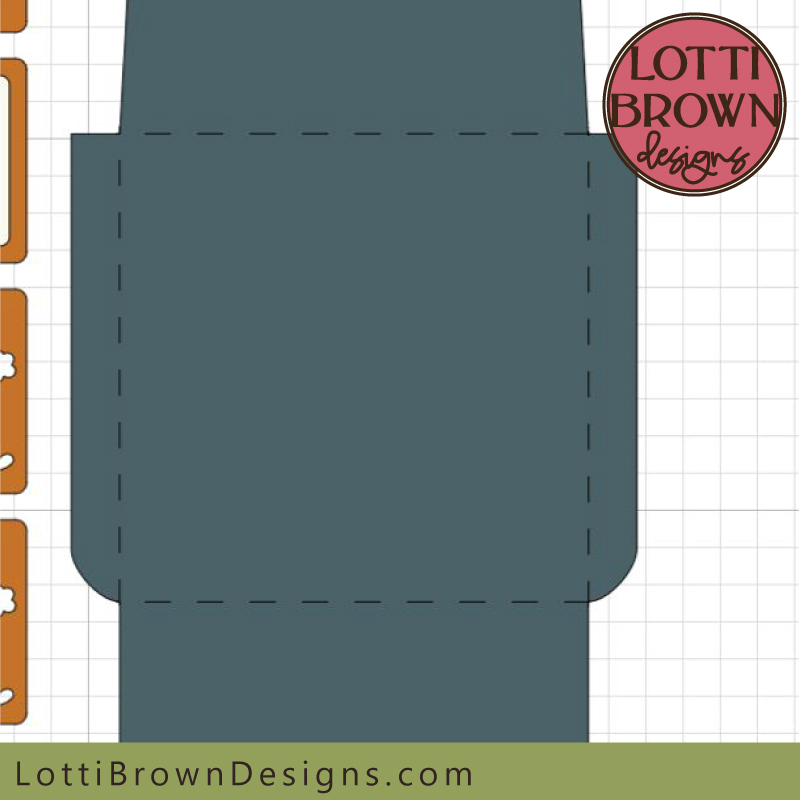 Checking the score lines on the envelope
Send to 'Make It'
- Everything looks good - so let's send the project to make - press 'Make It' (top right) (see the image below...)
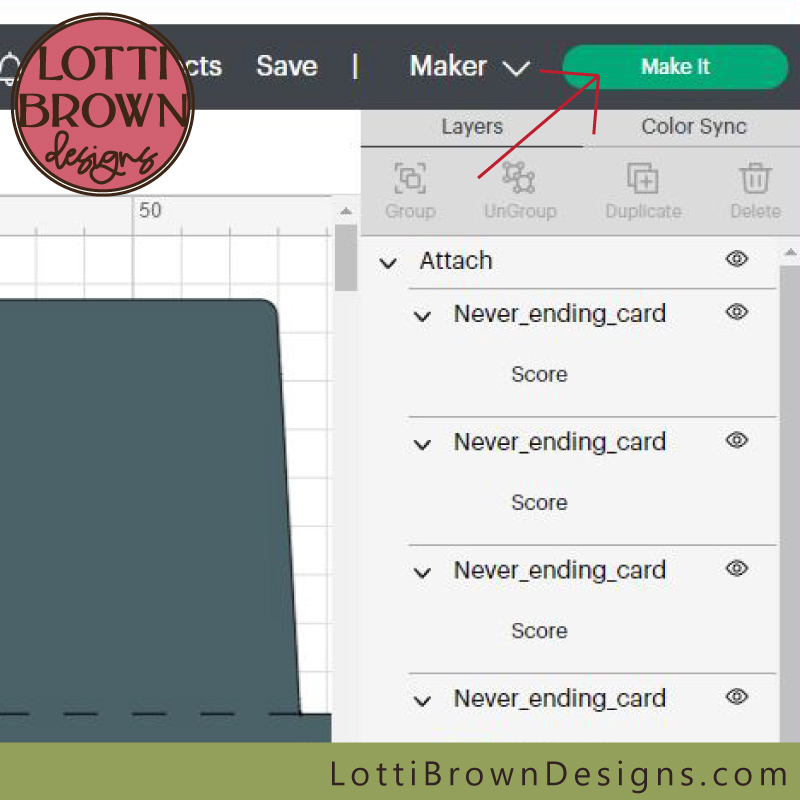 Send your project to 'Make It'
- You can check that the two colours with score lines are correct, by checking the mats down the left-hand side of the screen. Where all the other mats say 'Basic Cut' alongside, the mat with the yellow rectangles, and the mat with the envelope should both say 'Score' and 'Basic Cut' (see the 2 images below...)
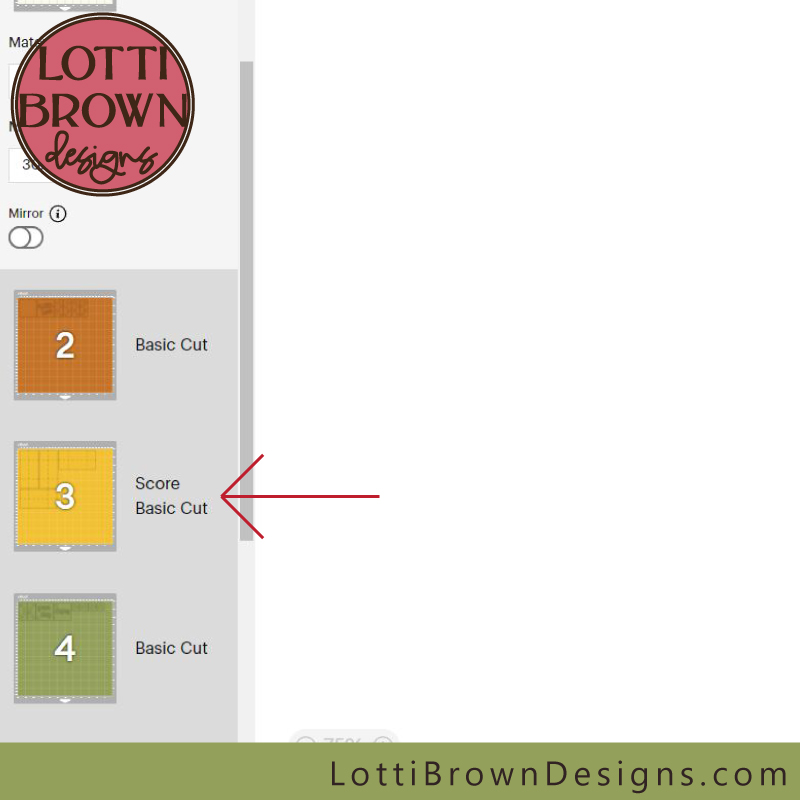 Your yellow mat should say Score and Basic Cut
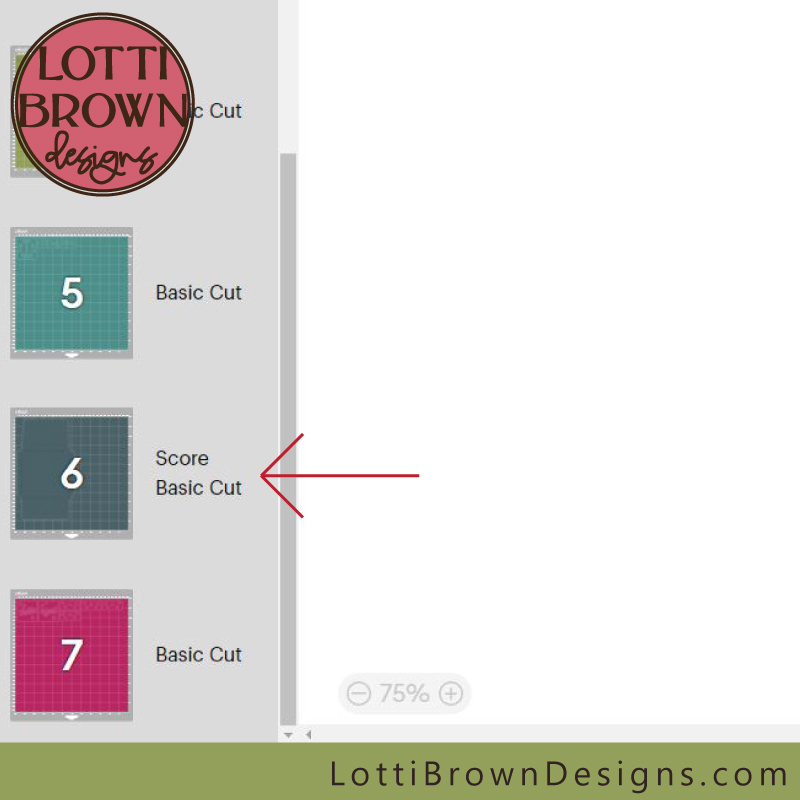 Your envelope mat should say Score and Basic Cut
- Proceed with your cuts as usual, setting your correct base material each time according to the material you've decided to use...
- When you get to one of the mats that have the score lines, please insert your scoring tool into the machine as instructed (see this page for a discussion on scoring tools) - you may need to 'Edit Tools' depending on which scoring tool you have for your Cricut and which Cricut machine you use (see the images below...)
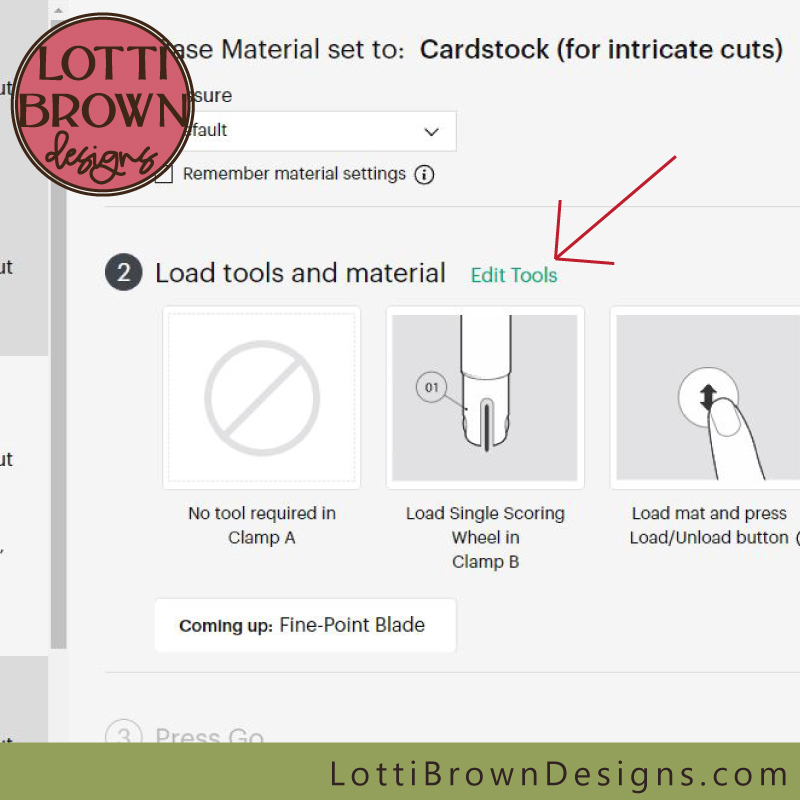 How to edit the scoring tool if necessary
- If you need to edit your scoring tool, just click on which one you have for your machine, and then press 'Apply' (see the image below - I have a scoring stylus...) Please don't forget to actually put the tool in the machine, too!
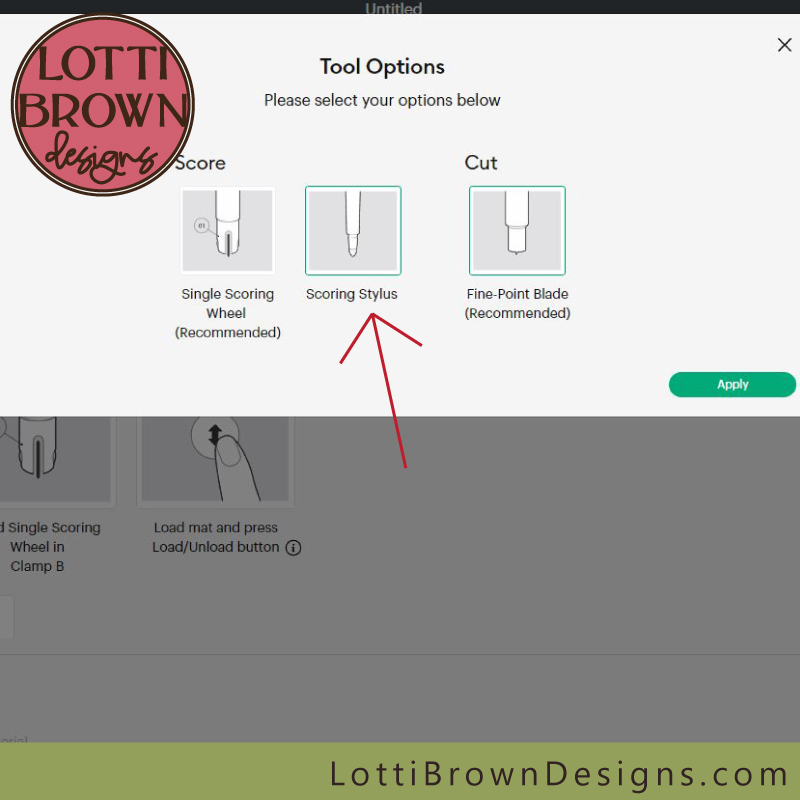 Click to select the type of scoring tool you have for your machine
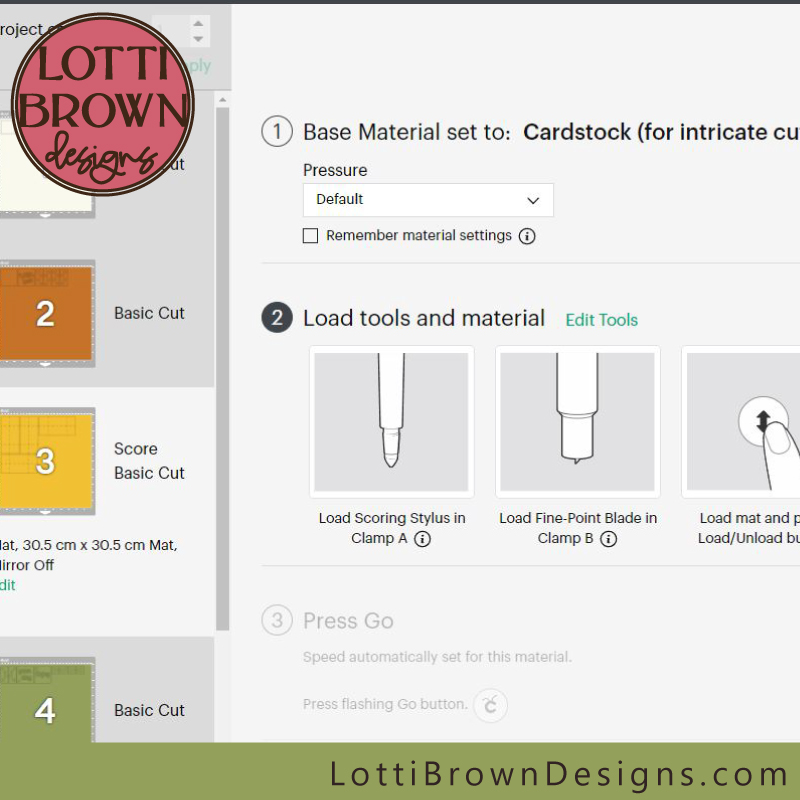 Scoring tools set up and ready for the yellow mat
- You may need to edit the tools again when you come to the second mat with score lines (the envelope) (see the image below...)
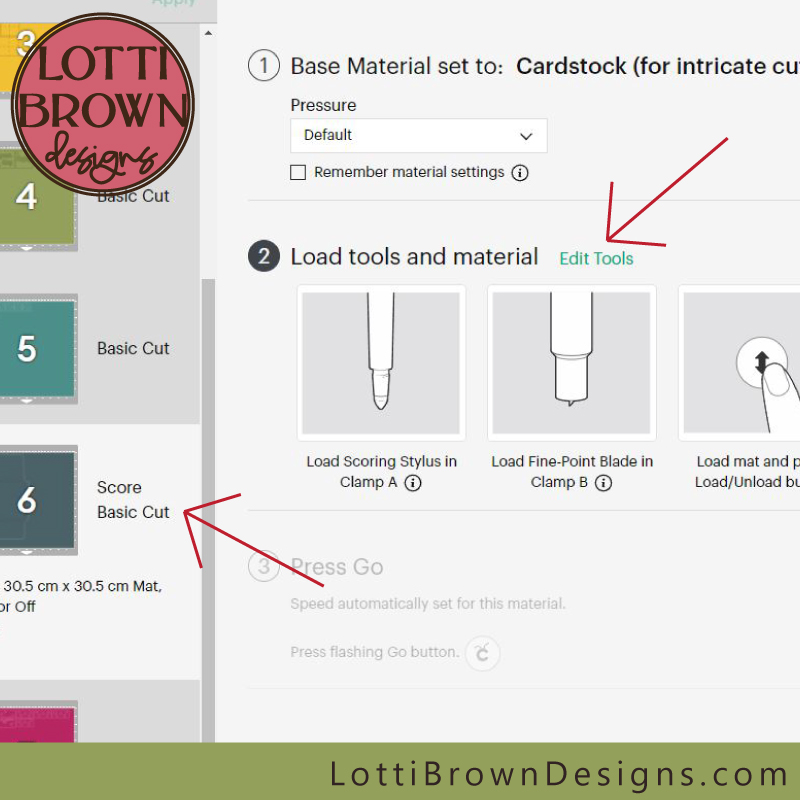 The envelope mat also requires scoring
- When all your mats have finished cutting and you've removed the cardstock from the sticky mats, you're ready to start making your never ending card...
Where to go next...
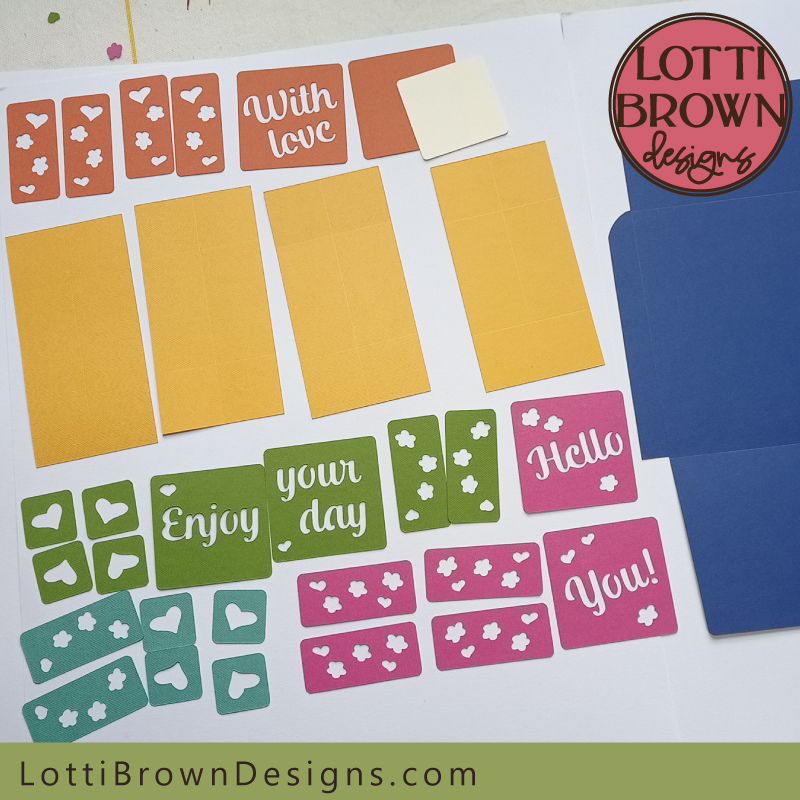 All the cut outs are ready to make the never ending card
When all your cut-outs are ready like this, you can go onto the first of two tutorials to help you assemble and decorate the card (and make the envelope)...
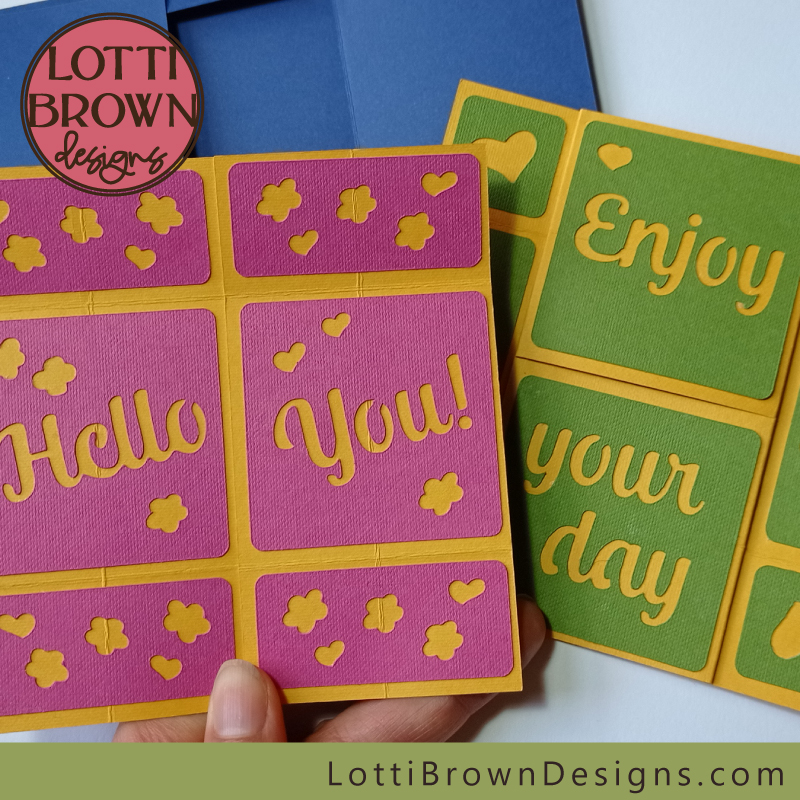 Never ending card project
The main page for the never ending card project is here - check it out to see photos of the card, check out how the card works, and think about materials to use for the card, as well as see all the instructions for the card - click here...
You Might Also Like:
Lotti Brown's Designs & Templates
How-tos...
- How to use SVG cut files for Cricut (also other cut file formats & machines)
Shall we stay in touch..?
Each month, I share stories from my own nature journal, new art from my studio, and simple seasonal inspiration to help you feel more connected with the turning year...
Recent Articles
-
British Nature Folklore Library: Stories, Seasons & Celtic Tree Wisdom
Dec 01, 25 05:09 AM
Explore British nature folklore, Celtic tree meanings, and seasonal wildlife stories. A growing library of myth, meaning, and hand-drawn inspiration. -
Beautiful Art Inspired by Nature
Dec 01, 25 05:04 AM
Beautiful folksy art inspired by nature from the fields and hedgerows of Yorkshire - colourful birds and wildlife with a nostalgic floral touch... -
Birds and Folklore in Britain: A November Nature Journal
Nov 26, 25 04:32 AM
November birds and berries - fieldfares, redwings, lapwings and snow geese with folklore, meaning and nature journal inspiration.
Follow me:
Share this page:

