*** IMPORTANT - I'm retiring my digital files - SVG/PNG/DXF/EPS - and printables from 31st December 2025 ***
*** Please ensure that you have everything you need - files and/or instructions printed off from the website (find them currently in the ARCHIVES section) - by 31st December 2025 as they will not be available after this date ***

Cricut Felt Cutting Project for Beginners
- Home
- SVG files
- Project Ideas
- Blue Tits Felt Art Project

Fun Cricut felt cutting project for beginners - make a pretty blue tits and flowers 3D felt wall art perfect for a shadow box...
 Blue Tits & Blossom felt wall art craft project for Cricut
Get the template for the project from my store here....
Digital download template for Cricut and similar cutting machines
SVG, EPS, PDF file formats
For personal use and small-business commercial use (up to 200 products)
For physical (craft) products only - no digital products, sharing, etc.
Please read the full T&Cs here...
Please note that this file is available in different file formats to most of my other files - this design is available in SVG, EPS and PDF file formats only
Cricut Felt Cutting Wall Art Project
 Cricut felt project for beginners - no sew!
This is a lovely project if you're just getting started with Cricut felt cutting - it looks pretty and it's fun to make.
It's not too difficult to make at all, but it is a step-up from my paper and cardstock shadow boxes - you will need to position all the elements yourself to make your scene, and make the flowers 3D. This makes it a bit more complex, but it also makes it more challenging, which can be great fun, and you do get more of a sense of achievement when you're done...
You could also change the scene around a bit, too, if you wanted to put things in different places, to really make the project your own!
I'll share full step-by-step instructions with you to help you along - along with a list of everything you'll need to make the project.
If you want to print out the instructions, you can use the button below - you can choose which parts of the page you need to print. There is also a print button on the top right of the page and towards the bottom of the page, at the end of the content.
What you'll need:
- Felt in 9 different colours including black, white/cream, 2 shades of blue, yellow, green/grey, plus brown/branch colour and gold/sky/background colour - you will also need a pink felt for the flowers - IMPORTANT: this must be a wool blend felt if you want to be able to shape the flowers to be 3D as I show you. If you don't have a wool blend felt, or if you don't have the shaping tools (see later in the list) you can make the flowers smaller and leave them flat.
- Cardstock - thick so it's sturdy. I used 300 gsm cardstock. This is for the background square.
- Felt glue (or other suitable adhesive)
- Moulding ball tool (for shaping paper flowers or cake decorating) plus soft mat to use it with
- Small pot of water - for shaping the flowers
- A way to cut the felt - I'm using my Cricut Maker with the rotary tool, fabric sticky mat, and a brayer to stick the felt down well - you could use a sharp craft knife, if you prefer to cut by hand - more to help you get started cutting felt with the Cricut here...
- The template for the blue tits and flowers wall art design - available from my store here...
- It's also handy to have a printer so that you can print the PNG file as a visual guide to help you position the elements
- A shadow box frame if you want to frame up your project when it's finished - I used one that's 8 x 8 inches - if you have a frame in mind, please measure it before you start and resize your project in Cricut Design Space to fit your own frame.
- You will also need TIME - the glue needs several hours to dry fully - and if you're making the 3D flowers like me, they'll need to dry for several hours, likely overnight, so please allow yourself enough time to complete the project.
Making the Blue Tits and Flowers Wall Art
Let's get started with this fun Cricut felt cutting project...
- Load up the SVG into Cricut Design Space and send the project to 'Make' to start cutting. If you need any help with how to cut felt successfully with your Cricut, click here...
- Remember to change to thick cardstock for the pale grey square - this is the background to the whole piece and you need it to keep your artwork sturdy. This is the first mat to cut in Cricut Design Space if you don't amend any of the colours in my design.
- There's a lot of tiny pieces with this project, so it's a good idea to take care when unloading the felt from your machine - putting the pieces aside as they come out, so that you can keep them the right way round, can also help make sure you know where all the bits and pieces are intended to go - see the image below...
 Gather all the pieces together and try to keep the pieces the right way up to help you know where all the parts go
- We'll start from the back of the design and work to the front, so we'll start with the two plain squares - the cardstock one and the felt one - see the image below...
 We'll start with the two background squares...
- Add glue to the reverse of the felt square. You don't need to soak it but do put plenty on. This felt glue is slow-drying, which means you get plenty of time to reposition slightly. The glue gradually soaks into the felt and bonds over the course of an hour to be touch dry. Avoid handling for up to 4 hours. See the image below...
 Add felt glue to the reverse of the felt square
- Now, glue the felt square carefully down onto the cardstock square, trying to get the edges aligned. Press it down, but not too hard, you just need to make sure the pieces are not slipping about - pressing too hard might damage the fibres of the felt - see the image below...
 Glue down the felt square onto the cardstock square
- Next up is the white circle - add glue to the back of it like in my photo below...
 Add glue to the white circle
- Then glue it down onto the square - you want it a little higher than the centre, but do try and get it positioned centrally between the left and right sides, as much as you can - see my photo below...
 Glue the circle down, roughly in this position
- Now, we'll move onto the branch - add glue to the BACK of the branch felt - see the image below...
 Add glue to the back of the branch felt piece
- Then turn it over and position the branch like in the photo below - it helps to start at the left hand side, lining up the corner on the branch with the corner of the square. Then line up the bottom pieces with the bottom of the square, and let the right-hand ends find their place along the right-hand edge.
 Glue down the branch, aligning the corners and edges to help you position it
- Now, we need to start to position the little birds - this is perhaps the most difficult bit, as if you get too far wrong, the tails won't fit, so try to be careful and use the print-out (if you printed it) to help you. You can also use my photo below to help you - at first, just position the two yellow bodies, and the little legs - don't stick anything down yet!
 Position the bodies and legs - don't glue anything yet!
- We want the legs to go under the bodies, so we need to glue the legs first - add glue to the back of each little leg - see my photos below...
 Add glue to the back of the legs
 Add glue to the back of the legs of the second bird too
- Then glue the legs in place under each of the (unglued) yellow bodies - see the image below...
 Glue the legs in place
- Now, we need to glue down the bodies, so add glue to the back of both bodies - see my image below...
 Add felt glue to the back of the birds' yellow bodies
- Then, just glue the bodies down in place - see my photo below...
 Glue the bird bodies in place
- Next, get the tails, and just start positioning them to see where they need to go (don't glue yet) - see the photo below...
 Start positioning the blue tits' tails (no glue yet)
- Then add glue to the BACK of the tails - see my photo below...
 Add glue to the back of the tails
- And just glue the tails in place, like in my image below...
 Glue the tails in place
- In the next bit, there's a few elements that we need to get in place - so there's three blue wings, and two green back pieces. They should position something like this, that you can see in my photo below - you can also use the printout to help you. The wings of the left-hand bird should overlap each other - it doesn't really matter which is on top and which below...
- I did design it as I've shown it below, but I think it would also be okay to glue the wings over the top of the back piece for the left-hand bird too, and it might look nice, if you wanted to do that instead!
 Work out how you're going to position the wings and back pieces
- I found it easier to work one bird at a time for the gluing - I'm starting in the photo below with the left-hand bird and gluing the back of the pieces...
 Work one bird at a time - add glue to the BACK of the wings and back piece belonging to the left-hand blue tit
- Then glue the pieces in place - it should look something like mine, in the photo below (you might have chosen to have the wings on top instead)...
 Glue the pieces in place
- Then repeat this for the other side, and glue the wing and back piece onto the second bird (right-hand side). I seem to have forgotten to photograph adding the glue to the wing and back piece for the second bird, but you can see the photo below where all the pieces are glued in place...
 Blue tit wings and back pieces glued in place - yours might have the wings differently!
- Next, it's positioning these little white collar pieces - it might take a minute or two to get them the right way round, and they are rather fiddly - but see if you can get them positioned something like this in the photo below...
 Try to position the little white collar pieces
- Then, very carefully, add glue to the BACK of the small white pieces - see my photo below...
 Add glue to the small white pieces
- And glue them in place - see mine in the photo below...
 Glue the pieces in place
- Now, it's time for the birds' heads - pop them onto the bodies (without glue) just to see how they fit - see my photo below...
 Next, we'll add the heads to the blue tits' bodies
- Add glue to the back of the heads - see photo below...
 Add glue to the BACK of each head
- Then glue them on - like in my photo below...
 Glue on the heads
- Next, try the white face pieces in place (without glue for now) - it can be tricky to get these the right way round. It should look something like mine in the photo below...
 Offer up the white face pieces so you know where to put them
- Add glue to the REVERSE side of each white piece - like mine in the photo below...
 Add glue to the back of each piece
- Then glue the face pieces in place so that the blue tits look like they've got nice eyes and faces - see my photo below...
 Glue the face pieces in place making sure the blue tits look like they have proper eyes and nice faces
- Then, we're going to put their little blue caps on, right on the tops of their heads - try it out first without glue, so that you can work out where they go - see the image below...
 Try out how you're going to position their little blue caps...
- Then, add glue to the reverse of each piece - see my photo just below...
 Add glue to the back of each little blue cap
- Then pop them on their heads and press gently to glue in place - see mine in the photo just below...
 The little blue tits are now complete with their caps
- Next, we'll move onto the flowers - we're going to use a little water and the moulding ball tool to give the flowers some shape and make them curl up to look more 3D. You can see one I already curled on the foam mat on the left in my photos below - while all the other flowers are flat and waiting to be curled on the right - I'll show you how in the next few steps...
- Please remember that you need a wool-blend felt to shape the flowers like this. If you don't have a wool-blend felt, please just cut the flowers a little smaller to use flat.
 Next, we're going to make our flat flowers look more 3D, like mine I already shaped, on the left, above
 How we're aiming for the flower to look at the end of the process
- You'll need your moulding ball tool, a soft mat (or folded-up towel would do), and some water. I'll explain the steps with photos, below, and then I'll add a video to show you the whole process in action, so please read these few steps together, before you put it into action for your own flower...
- Start by just wetting your fingers and dabbing it onto the flower. It wants to be wet, but it doesn't want to be soaked - so no dunking it in the water. Just the surface needs to be wet.
- Wet both sides of the flower - see my photo below...
 Gently wet both sides of the flower with your finger
- Then, take the smaller end of the moulding ball tool, and pressing down with the flower on your foam mat, make tiny circles on each petal to curl each petal - see my 2 photos below...
 Start shaping the petals by making tiny circles with the small end of the moulding ball tool
- Circle on each petal in turn until they curl and shape - like mine in the photo below...
 Work on each petal in turn
- Next, take the larger ball end of the tool, and make circular motions in the centre of the flower to curl all the petals up - see my photo and video below...
 Use the large ball end of the tool to make circles in the centre of the flower to curl all the petals up
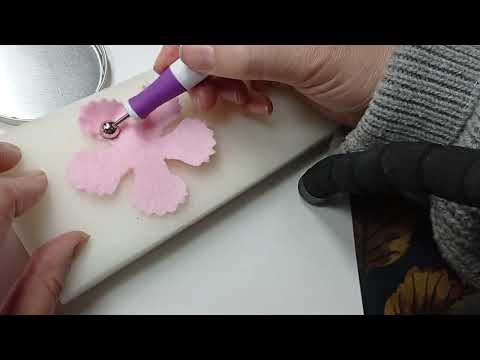
- You should be left with little cups like this in the photo below - you can use your hands to cup and shape your flower up like this. Curling in as much as possible is what we want - the petals will droop quite a lot as the flower dries, so don't worry that your flower will be too curly or cupped.
 Your shaped flowers should form little cups like this
- Repeat the process for all five flowers until you have them all cupped like in my photo below...
 Repeat for all five flowers - then we must leave them until they're completely dry
- Then, leave the flowers until they're completely dry - this may take several hours - for me, it was overnight.
- When they're dry, they'll have uncurled and drooped a little. If yours have drooped too much and you need to recurl them, do this now and again wait for them to dry completely before going onto the final steps.
- You can see how mine look now they're fully dry in the photo below...
 Felt flowers - now fully dry and ready to work with
- You get to position the flowers where you think they'll work best. You can follow the print-out image, or my photo below, for where I think they go best. Try to avoid the edges, where the petals might not fit well.
- Put them in place without gluing them for now...
 Try out positions for the flowers where you think they'll work best
- When you're happy with the positions, add some glue - this is better added to the flat picture, rather than squashing your flower trying to get it onto the back. So just add a dab of glue where you want your flower to go - see my photo below...
 Add a dab of glue where you want the flower to go
- Glue your flower in place and repeat for each of the flowers - see mine in my photo below...
 Glue each flower in place
- Finally, add glue to each of the little black circles - see image below...
 Add glue to the small black circles which will make the flower centres
- And then glue them in place in the centre of each flower - your Cricut felt cutting project is complete! See how mine turned out in my photo below...
 Now the flower centres are glued in position, the blue tits felt artwork is complete
Blue Tits and Blossom Cricut Felt Cutting Wall Art Project
You can now frame your Blue Tits and Blossom felt wall art in a shadow box frame to display or gift...
 Blue Tits and Blossom felt wall art
 Blue Tits felt project for Cricut
 Pretty blue tits and flowers 3D felt cutting project
If you like my Blue Tits and Blossom wall art Cricut felt cutting project, and want to make the felt artwork yourself, you can get the template from my store at the link just below with instant download worldwide...
Get the Blue Tits & Blossom felt wall art template files at my store here...
SVG, EPS and PDF file formats
For personal use and small-business commercial use only
For physical (craft) projects only - no digital products, use, or sharing
Please note that this file is available in different file formats to most of my other files - this design is available in SVG, EPS and PDF file formats only
For Cricut felt cutting hints and tips, check out this page to help...
You Might Also Like:
Lotti Brown's Designs & Templates
How-tos...
- How to use SVG cut files for Cricut (also other cut file formats & machines)

Shall we stay in touch..?
Each month, I share stories from my own nature journal, new art from my studio, and simple seasonal inspiration to help you feel more connected with the turning year...
Recent Articles
-
Birds and Folklore in Britain: A November Nature Journal
Nov 26, 25 04:32 AM
 November birds and berries - fieldfares, redwings, lapwings and snow geese with folklore, meaning and nature journal inspiration.
 -
Elder Tree Meaning and Myths
Nov 24, 25 06:06 AM
 Explore the elder tree meaning, symbolism and myths with me as part of the Celtic Tree Calendar...
 -
Nature Journaling Autumn Fungi & Folklore
Oct 28, 25 05:58 AM
 Nature journaling autumn fungi - discover how nature journaling helps you slow down, notice more, and reconnect with the season...
Follow me:
Share this page: