*** IMPORTANT - I'm retiring my digital files - SVG/PNG/DXF/EPS - and printables from 31st December 2025 ***
*** Please ensure that you have everything you need - files and/or instructions printed off from the website (find them currently in the ARCHIVES section) - by 31st December 2025 as they will not be available after this date ***

Mother's Day Shadow Box Ideas for Cricut
- Home
- SVG files
- Shadow Box SVGs
- Mother's Day Shadow Box Template

Creative Mother's Day shadow box ideas for Cricut and other cutting machines...
Pretty, floral design Mother shadow box SVG - ideal for Mother's Day, birthdays, new mothers etc. Make it on your Cricut, Silhouette or other cutting machine. Choose from Mother, Mom, Mum, or Mama wording...
 Mother shadow box SVG template for Cricut etc
This idea for a Mother's Day shadow box project is a layered cardstock shadow box SVG suitable to make with a Cricut, Silhouette or similar cutting machine. You will be able to cut by hand if you prefer.
- Files come in SVG, DXF, PNG & EPS formats (available from my store - links right below, plus at the end of the post)
- Suitable for both personal craft use and small-craft businesses selling physical products (no digital sharing or products for either personal or commercial use)
- Four different options for Mother wording - 'Mother', 'Mom', 'Mum' or 'Mama' (each comes in a separate file not as options in the same file - so please be careful to buy the one you need)
In this post, I'll show you how to make the Mother shadow box, and I'll also give you some colour inspiration for some ideas I tried out that I hope might inspire you to create your own colour combinations for your shadow box!
Please note that these colours below are alternative colours and are just for additional inspiration - all the files are coloured in the same neutral tones as the main project on this page.
 'Mother' shadow box template
Find the 'Mother' shadow box SVG in my store here
 'Mom' shadow box template
 'Mama' shadow box template
Find the 'Mama' shadow box SVG in my store here
 'Mum' shadow box template
How to make it - Mother's Day shadow box idea
The Mother (Mum/Mom/Mama) shadow box has just four layers, so it's super-easy to make and assemble...
 Layered Mother shadow box template - four layers
 Mother's Day shadow box idea for Mum
What you'll need for the make:
- Card stock - here, I've used 'Sizzix' textured solid core cardstock (80lb/216gsm) - neutral colours - I've also done an alternative for each of the options (Mom/Mum/Mama/Mother) in different colors, to try out some ideas and hopefully give you some inspiration, too - there are four layers, so four different coloured cardstock is recommended - I'll give you some color choosing tips later!
- Double-sided sticky pads - to stick the card layers together - these allow a little space between the layers to create the attractive 'shadow' effect
- Frame - I've used a shadow box frame here which allows a little more space for the 3D design and a lovely effect - this is a 8 x 8 inch frame
- A method of cutting - I used my Cricut Maker cutting machine to make this - you can also use other cutting machines, such as Silhouette, ScanNCut etc, or you can use the PNG files to cut by hand with a craft knife if you prefer
- The 'Mother' shadow box template (or one of the other options) which you can download from my store here - plus a computer/tablet/phone to access it - the files come in SVG, DXF, PNG and EPS formats. Please select the correct Mum/Mom/Mama/Mother option for you - they come as separate files, so please make sure you've selected the correct one - see below...
 Mother shadow box template - shown close up, pink and blue alternative colour choice
How to Make your Mother Shadow Box
Resize the design to fit your chosen frame - use your selected software to resize the design to your chosen size or print out the PNG files to the size you wish.
The file is sized to fit a 8 x 8 inch (20 x 20cm) frame, which is the one you can see in the photos on this page. I did not need to resize the file in Cricut Design Space before using it, but I needed to move it slightly to the left in Design Space to fit on the A4 sized card I was using. Make sure you measure your own frame space before you start to get your resizing accurate.
Choose your colours for your cardstock - you will need four colours - one for each different layer. I used colours from the Sizzix 'neutrals' cardstock pack (textured, solid core card) which I think gives a soft, elegant look which I believe would appeal to most people. This is the colour that's shown in each digital file.
You can also see some of my colourful inspirations on this page, too - when you're choosing your colours, think about contrast, especially between the 'Mother' (or Mom/Mum/Mama) and the surrounding colour - I found that a contrast between light and dark works well here.
For the top two floral design layers, I also found that I preferred the darker or stronger colour as the top layer, and a paler or softer colour beneath - but you might prefer the opposite, so if you do, go with that.
 Colourful inspiration for your Mother's Day shadow box ideas
You will need to cut out your layers from the digital files using your chosen method of cutting, whether cutting machine or by hand. If you need any help with how to use your cut files, you can find that here...
I also have some help for Cricut users here...
Assembling your project
When you've cut all four layers using your chosen method, let's gather them all together with some sticky pads, and put it all together...
 Cut layers for the Mother shadow box, ready to assemble
We're going to work from the back, towards the front - and we're going to put the double sided sticky tabs on the reverse of each layer - just follow along with me, as I assemble my Mother shadow box project here...
First, turn over the layer with the Mother text (or Mum/Mom/Mama) - this is the dark grey layer in my project. Stick double-sided sticky tabs around the edge as below...
 Add double-sided sticky tabs to the REVERSE of the layer
I've used three per side here, which I think is the optimum amount, and best positioning - but I've also tried it out with two per side and even one per side (as I was running out of sticky tabs). If you're just using one per side (that's four in total) I suggest one on each corner.
I've just used one layer of sticky tabs here, but if you want your layers to be further apart (bigger space in between) you can double-up with the sticky tabs.
Once you've stuck on the sticky-tabs and removed the protective cover off each tab, just carefully line up the top edges of the base layer (in this project, the white one) and this layer (dark grey), and lower this layer onto the one beneath so it looks like this (below) - when it's nicely aligned, you can press the sticky down...
 First layer in place
Next, we do exactly the same for the next layer (in this project, it's the soft cream layer - see below) - remember to stick the sticky tabs on the reverse of the layer - and it's best to try and line up the sticky tabs with the positions you had on the last layer, if you can (no need to be precise)...
 Adding sticky tabs to the next layer (stick them on the back!)
When you're ready, line up the top edges, and press this layer down onto the ones you just did (see below)...
 The next layer is in place - just one more layer to go!
Now, there's just the final (top) layer to go - simply repeat the process, adding sticky tabs to the reverse of the layer around the edges...
 Add more sticky tabs to the back of this final layer
And then line up the top edges, and stick them together (see below)...
 Your Mother's Day shadow box craft project is now complete
And that's it - your Mother's Day shadow box project is now finished - you just need to pop it into your frame and it's ready to gift!
Just pop your Mother's Day shadow box craft project into a box frame and it's ready to gift. Look at all that beautifully intricate detail!
Get some Mother's Day shadow box ideas for alternative colours
Here's some more inspiration, too, if you need any colour ideas for your Mother's Day shadow box...
 Mama shadow box idea in green and hot pink
 Mum shadow box idea in teal and soft greenMother shadow box idea in pink and blue
 Mom shadow box idea in red, yellow, & brown
I hope this inspired you to make your own Mother, Mom, Mum, or Mama shadow box project for Mother's Day, or your mum's birthday or other special day!
If you'd like to get started, you can download the files you need from my store (remember to select the correct wording) via the links below...


The files come in SVG, DXF, EPS & PNG formats and can be used for personal craft projects or commercial use (limitations apply).
If you're making a gift for your mum, you might also like to send a card - here are a few you might like to make:


You Might Also Like:
Lotti Brown's Designs & Templates
How-tos...
- How to use SVG cut files for Cricut (also other cut file formats & machines)

Shall we stay in touch..?
Each month, I share stories from my own nature journal, new art from my studio, and simple seasonal inspiration to help you feel more connected with the turning year...
Recent Articles
-
Birch Tree Symbolism, Myth, and Folklore
Dec 23, 25 04:19 AM
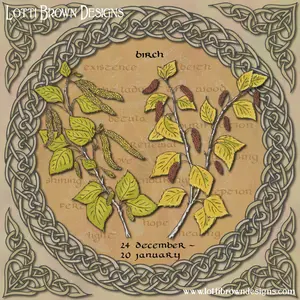 Explore birch tree symbolism, myth, meaning and folklore as part of my Celtic Tree Calendar art project...
 -
British Nature Folklore Library: Stories, Seasons & Celtic Tree Wisdom
Dec 01, 25 05:09 AM
 Explore British nature folklore, Celtic tree meanings, and seasonal wildlife stories. A growing library of myth, meaning, and hand-drawn inspiration.
 -
Beautiful Art Inspired by Nature
Dec 01, 25 05:04 AM
 Beautiful folksy art inspired by nature from the fields and hedgerows of Yorkshire - colourful birds and wildlife with a nostalgic floral touch...
Follow me:
Share this page: