*** IMPORTANT - I'm retiring my digital files - SVG/PNG/DXF/EPS - and printables from 31st December 2025 ***
*** Please ensure that you have everything you need - files and/or instructions printed off from the website (find them currently in the ARCHIVES section) - by 31st December 2025 as they will not be available after this date ***

Best Vinyl for Cricut Projects
- Home
- SVG files
- How to Use a Cricut
- Best Vinyl for Cricut Projects

Explore the best vinyl for your Cricut projects or other cutting and crafting ideas.
We’ll break it down into the basics for understanding which vinyl to use for each crafting situation.
And we’ll learn vinyl crafting terms and techniques to get your project off to the best start…
We’ll cover:
We'll look at vinyl quality, compatibility, and vinyl crafting tips - permanent and removable vinyl, printable vinyl, iron-on vinyl, removing vinyl, layering, weeding, slicing, and vinyl that just won't stick!
All this will help you to choose the best vinyl for your own Cricut craft project...
Because I know that when you’re just starting out with vinyl, the options are overwhelming and the terminology can be incredibly confusing.
It’s so easy to make the wrong decision – but if you do, don’t worry, just save it in your stash for a future project!
 Learn about the best vinyls for all your Cricut projects
If you want to see my instructions for a simple vinyl project, click here...
In the meantime, let’s start understanding all about how to use vinyl with your Cricut machine…
Best Vinyl for your Cricut
We’ll look first at these 4 basic vinyl types, as this is the most important decision you need to make for choosing your vinyl.
Once you know which of these 4 options you need, the basics are sorted and the rest is just down to your personal preference.
- Permanent
- Removable
- HTV/Iron-on
- Printable
Permanent vinyl
Permanent vinyl is great for:
Like it says, this vinyl is for projects where you want the vinyl to stay on – to be permanent. It’s also the best choice for projects that will be exposed to water in some way, whether that’s outdoors or in a bathroom, or in the washing-up bowl.
- Permanent vinyl is sometimes also called ‘outdoor’ vinyl' – and people also call it ‘651’ vinyl after the popular brand of vinyl ‘Oracal’ – their permanent premium vinyl is called ‘Oracal 651’.
- Oracal also do a permanent economy vinyl ‘641’ – both the 651 and 641 come in both matt and gloss finishes. The premium range offers superior adhesive to the economy vinyl – a stronger stickiness!
- Cricut also offer permanent vinyl. You can also check your local hobby or craft store.
- Permanent vinyls come in different effects and finishes including special effects such as glitter.
- Use permanent vinyl with transfer tape (more about this later).
- Permanent vinyl can be removed from many non-porous surfaces, should you need to, with a bit of soapy water and scrubbing. An adhesive removal product may also be helpful, as may heating any remaining residue.
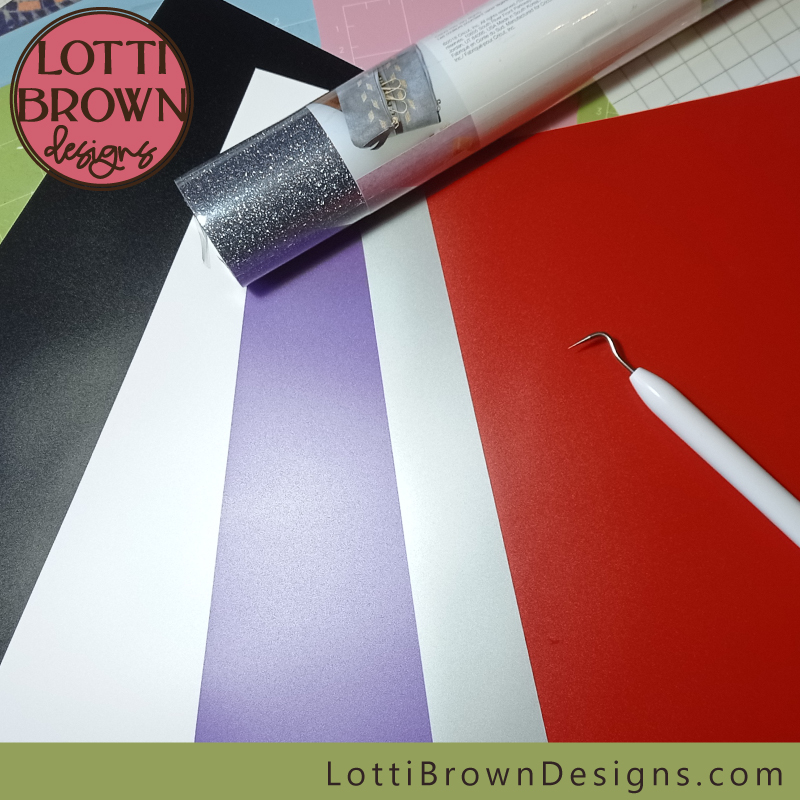
 Vinyls with transfer tape, including a silver vinyl
Removable vinyl
This is non-permanent or removable vinyl - sometimes known as ‘indoor’ vinyl and usually has a matt finish.
This is a great basic vinyl for most Cricut vinyl projects including decals, making signs, decorating boxes or homewares. You can use it on most surfaces including glass and smooth or painted/varnished wood.
The removable vinyl will peel off quite well within about 2 years of applying it – and it’s a distinct advantage to be able to easily reposition the vinyl when applying it, to get it in just the right place.
- Oracal 631 is a popular removable vinyl and Cricut also make their own, as do many hobby and craft brands.
- Removable vinyls also come in different finishes such as glitter or foil, and with printed patterns.
- Use with transfer tape (more about this later).
Use removable vinyl for:
- Indoor projects
- Homewares
- Wood signs
- Window displays (you can also get specialist ‘window cling’ vinyl for projects like this)
- Temporary decorations that you might want to peel off
When using on a more porous surface like wood, the best idea is usually to sand the surface so it’s smooth, or use varnish or paint before applying your vinyl. You can also use the popular crafting material ‘Mod Podge’ to paint on before and also after, to seal the vinyl in place.
I've actually used Cricut removable vinyl ('premium') outside and so far (after a few months) it's standing up to rain, snow, and ice!
 Cricut premium removable vinyl - actually used outside and holding up well!
 Range of removable vinyls from Cricut - you can see the surface has a slightly 'matt' or non-glossy, texture
HTV or 'Iron-on' vinyl
This is ‘heat transfer vinyl’ aka ‘iron-on’ vinyl. It’s the vinyl to use for craft projects on softer or more porous surfaces such as fabric, card, paper, wood, or leather.
It comes in regular finishes, but also lots of fun finishes such as glitter, foil, holographic, flock, and glow-in-the-dark.
This vinyl is applied with heat, which helps it to stick to your surface. You can use the Cricut Easy Press or heat press – but you can also use a household iron.
 HTV or iron-on vinyl in glitter effect - the shininess you can see is actually the backing sheet or liner - this side will stick on the mat for cutting and will be face up when applying heat (beneath a protective sheet)
How to use iron-on vinyl (HTV)
Take your time when crafting with HTV as it’s easy to make mistakes.
You need to:
- Pre-wash any fabric, without using fabric softener. This serves two purposes, to pre-shrink the fabric so that it doesn't shrink the first time you wash it (fabric often does), leaving the vinyl wrinkly. And also to remove any chemical residue that may be left from its manufacture, which could affect how well the vinyl adheres.
- ‘Mirror’ or ‘flip’ the design so it’s in reverse or ‘mirror image’. Do this when you’re in Design Space. This is especially important for text.
- Cut with the backing/liner sheet side down on the mat – the machine should just cut the vinyl and not the backing sheet.
- Use a protective mat under your project to protect your surface. Cricut do the Easy Press mat, you could just use a towel.
- Apply heat to your material (such as fabric) before you apply the vinyl.
- Apply your vinyl so that it looks the right way around on your item, with the vinyl touching your fabric and the shiny liner side facing up. Pop the protective sheeting that comes with your vinyl over the top of everything, or use a tea-towel or similar.
- Check the instructions that came with your chosen vinyl for if you need low, medium or high heat, and how long to apply heat for – don’t just wing it! You can always apply a bit more heat, but once you’ve overdone it, you can’t take it away!
- Apply heat to the protective sheet with an iron or heat press – this protective sheet protects your vinyl from too much heat and also allows the heat to distribute more evenly over your vinyl so that it sticks evenly.
- Press hard!
- Remove the protective sheet and check your vinyl. Again, read the instructions for your specific vinyl type, as sometimes you should remove the protective sheet straight away, and sometimes you should allow it to cool a little first (especially for effects like foil or holographic vinyl).
- The HTV should have bonded with the fabric - and with a regular HTV, you should be able to just see the texture of the fabric beneath (not so much for heavier HTVs like flock and other effects).
- You can always pop the protective sheet back over and apply a little more heat if you consider it not quite ‘done’.
HTV is great for:
- T-shirts and sweatshirts
- Bags, cushions and other fabrics
- Paper, card, wood and other porous surfaces
Cricut has some useful instructions here - make sure you check down the list for more specialist vinyl types, if applicable to your project.
You can also watch the video below which guides you through all the steps for making an iron-on project.
Removing HTV vinyl
Try heating the reverse of the fabric where the HTV vinyl you want to remove is – then start carefully peeling and picking at it with tweezers or a craft knife to remove it.
You may need to use an adhesive removal product to get the final bits off – check it’s compatible with your fabric type first, and wash your item before trying again with more vinyl.
Printable vinyl
This is a vinyl that you can print your design onto. It comes in regular or HTV/iron-on vinyl.
With Cricut, they have a removable, printable matt vinyl, ideal for making your own decals. You will need to use an inkjet printer and the ‘print-and-cut’ feature on Explore and Maker machines.
Printable vinyl is great for projects where you want to print your own design onto vinyl.
Cricut's instructions for using printable vinyl with your cutting machine are here...
Best Vinyl Finishes for Cricut
Once you know if you want printable, HTV, Permanent, or Removable vinyl, next you just need to decide on your finish. Browse through either the Cricut vinyls section or the Vinyls section of a crafting store to get some idea of the finishes you can use:
- Many different colours
- Metallic
- Glitter
- Foil
- Flock
- Holographic
- ‘Fairy dust’
- Reflective
- Pearl effect
- Many different patterns
Make sure you check the instructions that come with your vinyl, or if you're buying Cricut's own vinyl, check their vinyl advice section to make sure you're taking any specialist finishes into account. They also have a separate 'iron-on' info section.
More specialist vinyls
More specialist vinyl types to improve your crafting:
- Writable vinyl – write on with a Cricut Joy machine or by hand (using the Cricut Joy pens and markers) - instructions from Cricut are here
- Stencil vinyl – with extra adhesive to help prevent bleed around the edges of the stencil – it’s also removable/repositionable – works for wood, canvas, plastic, paper and many other surfaces - Cricut instructions here
- Window Cling vinyl – for window displays – easy to apply and remove – ‘clings’ rather than sticks – no need for transfer tape, just leave it on it’s backing then apply and peel the backing off
Not sure what type of vinyl you've got?
Here's how to tell...
Machine compatability
Next, consider your machine – all the Cricut machines can cut vinyl but some Cricut vinyl types are really designed only for certain machines…
Smart vinyls
- These are for the newer machines – Joy, Explore 3 and Maker 3 cutting machines that can cut without a mat.
- The vinyl comes in a roll and can autoload to cut longer lengths.
- They’re not really designed for a standard Maker or Explore machine. If you’ve already bought the vinyl, you can stick the vinyl to your mat as usual – beware, though, as the smart vinyls are thicker than the standard vinyls and may cut differently in your machine or cause jams and cutting problems!
More about smart vinyls from Cricut here.
Cricut Joy
This is a smaller machine, so look out for the smaller-sized vinyl rolls that Cricut make especially for the smaller cutting size – perfectly proportioned for your machine!
Premium, standard & economy vinyls
- Economy vinyls are excellent budget-conscious choices - perfect for building your skills.
- Oracal, Cricut, and others also offer a ‘premium’ vinyl that offers a higher quality that you might prefer for special projects…
- Oracal premium vinyl says they offer better adhesion with stronger stickiness so that the vinyl sticks well to your project.
- Cricut premium vinyl comes in permanent or removable and cuts and sticks well as it lies completely flat. It’s also easy to weed and apply.
- Cricut’s permanent premium vinyl is dishwasher safe when applied to a clean, dry, dishwasher-safe surface with no bubbles or folds. Leave for 24-48 hours and use on the top rack of the dishwasher only, avoiding extra dishwasher cycles.
Useful terms, tips and techniques for using vinyl
‘Kiss-cut’
- This is when the machine cuts just the vinyl and leaves the backing paper intact, making it easier to work with. This is what you want for all your vinyl projects.
- In most cases, if you set your Cricut machine to the correct material type (know what you bought and read through the whole list before you select, as there are lots of options), it will cut correctly like this for you without you having to worry how to set it up correctly. If you have an older machine and need to set your machine dial correctly, see Cricut's recommended settings here.
‘Weeding’
- This is when you peel away the bits of vinyl you don’t want from your backing sheet, leaving just your design. Use a Cricut weeding tool for this.
 Using the weeding tool to weed vinyl
Reverse Weeding
- Use this for very delicate weeding jobs. This is when you do your weeding AFTER you’ve applied your vinyl to your project – once it’s applied with the transfer tape (see next), whip the transfer tape off (carefully) and carefully weed your design.
Transfer Tape
- This is a clear, sticky sheet that you use to transfer your vinyl FROM your backing paper TO your project surface. I show you how to do this here...
- Vinyl packs will often come with transfer tape. You can use ‘strong-grip’ transfer tape for heavier vinyls like glitter vinyl. Masking tape can sometimes be used instead of transfer tape.
 Using transfer tape with vinyl
Wet method
This is a really useful method of applying vinyl - it's especially useful for intricate or complex designs, applying over vinyl, or if you feel like the vinyl sticks too quickly or in the wrong place...
It's essentially using water to allow you a little bit of time to position your vinyl in the right place - the water allows the vinyl to slip around a bit on the surface so that you can get it in just the right position.
- It's only for smooth, non-porous surfaces, so surfaces like ceramic, plastic, glass.
- Use soapy water (dish soap/washing-up liquid).
- Use a spray bottle (or a wet lint-free cloth or sponge, if you don't have a spray bottle).
- Spray the surface lightly, ensuring there's a light covering of the soapy water all over (but not too wet).
- Still on the transfer tape, position your cut and weeded vinyl design in position on the wet surface - you will be able to slide it around a bit to get it in the right spot.
- Use your scraper, as normal, to 'fix' your vinyl on the surface and also to remove the water...
- Then remove the transfer tape and carefully dry your design
Cricut Bright Pad
- Use this ‘lightbox’ if you find it difficult to see your lines to weed your design. It illuminates your vinyl and the lines show up well. You could also find an artist ‘lightbox’ in an art or craft store.
Layering & Slicing
Layering
- Layering or layering-up is a method of applying different layers of vinyl, usually different colours to create a multi-coloured design. You can layer regular vinyl and HTV vinyl too (not together).
- Layering can be an intermediate to advanced vinyl craft, as you have to line the layers up to get the design nicely aligned and looking good.
- Some designs are easier to layer up than others – for example, a letter or shape on top of a much-larger circle is quite forgiving. Some are much more fiddly or difficult and require you to be quite exact.
- Layering can sometimes be problematic with vinyl, as the layers can get bulky and the underneath layers can also show through, meaning that your design may look lumpy and bumpy. This is particularly so where there are several or many layers of vinyl needed. In this case, ‘slicing’ could be a better option (see next).
- When applying HTV in layers, protect the lower layers when applying heat so they don’t get damaged.
- Some vinyl types layer up better than others – special finishes can be problematic (such as flock or glitter) so it can be better to keep these just as a top layer.
- My cut file designs use layers, and are designed with papercraft layers primarily in mind. You may get better results by slicing the designs, especially for the multi-layered, multi-coloured designs. You could also simplify the design to use less layers and colours. I usually like to design with one layer that can work as a stand-alone layer to get the effect without too much hassle or tricky techniques.
- Layering can take practice so start with something easy, experiment, and don’t forget to have fun!
Slicing
- This is an alternative to layering where you assemble the vinyl pieces together like a jigsaw puzzle. Although this does away with the problem of awkward bulky layers and lumps and bumps, it can be very awkward to position everything precisely, especially for small areas and intricate cuts.
Here’s how to slice on Cricut Design Space:
- Work on two layers at a time, no more. Hide or ungroup other layers that you’re not yet ready to slice.
- Select both layers by holding down shift and clicking on each layer.
- Click on ‘slice’ (bottom right of screen)
- The layer is duplicated and the sections where the two layers overlapped are all ‘sliced’ into separate ‘jigsaw pieces’ – delete the ones you don’t need.
- Select the next two layers and repeat your slicing.
- This can take a little working out of which bits you want to keep or delete, and which layer you should slice out of where. Work methodically and carefully and think about what you’re trying to get the design to look like.
See Cricut's instructions for slicing here... Or watch a short example on the video below!
Can't stick, won't stick?
If your regular (non-HTV) vinyl is struggling to stick, especially onto a smooth surface such as ceramic or glass OR a matt surface such as a matt ceramic:
- Try cleaning the surface with alcohol (you can use a hand-sanitiser containing alcohol) and allowing it to dry before trying again.
- Heat the vinyl a little bit with a hair-dryer to help it stick.
Getting started with your first vinyl project
I have a simple vinyl project here to show you use to use a regular vinyl (this works for regular removable or permanent vinyl, not HTV or iron-on). I’ll share the entire process with you, including cutting, weeding, and how to use the transfer tape to get your vinyl onto your project surface...
More help with how to use a Cricut is here
Cricut's vinyl help centre is here
And the iron-on help centre is here
You Might Also Like:
Lotti Brown's Designs & Templates
How-tos...
- How to use SVG cut files for Cricut (also other cut file formats & machines)

Shall we stay in touch..?
Each month, I share stories from my own nature journal, new art from my studio, and simple seasonal inspiration to help you feel more connected with the turning year...
Recent Articles
-
December Berries Folklore in Britain - Rosehips, Holly and Haws
Dec 24, 25 04:35 AM
 Explore December berries folklore in Britain - rosehips, haws, holly, ivy and sloes - with seasonal nature notes, birdlife, and quiet winter magic.
 -
Birch Tree Symbolism, Myth, and Folklore
Dec 23, 25 04:19 AM
 Explore birch tree symbolism, myth, meaning and folklore as part of my Celtic Tree Calendar art project...
 -
British Nature Folklore Library: Stories, Seasons & Celtic Tree Wisdom
Dec 01, 25 05:09 AM
 Explore British nature folklore, Celtic tree meanings, and seasonal wildlife stories. A growing library of myth, meaning, and hand-drawn inspiration.
Follow me:
Share this page: